I’m one of those people where the texture of food is very important. Just like having a combination of savory to sweet and acid to fat, the texture of a dish adds to its interest. I find this to be particularly true when it comes to salads. For me, every salad has to have an element of crunch! Salads do not have to be constructed with the honeymoon approach (lettuce alone). I want a salad that is seasonal, colorful, crunchy and delicious.
Recently, I was totally gobsmacked when I realized I have never used Napa or Chinese cabbage at home. How can this be? I love cabbage! So when a recipe for an Asian salad popped up on my internet feed, I took a look. Because I’m slightly anal about this, I changed some things, and made a completely different dressing than the one suggested. The Miso-Sesame Vinaigrette worked beautifully. This salad is now my new obsession! It’s also perfect for those of us that eat a fair amount of chicken. I roast a whole chicken about every other week, so the leftovers are perfect for this salad. No leftovers? Grab a store-bought rotisserie chicken and you’re have way done! I even ordered three Napa seed varieties for our farm. I know I will be experimenting with this delicious, crunchy ingredient in the next few months.
ASIAN SHREDDED CHICKEN SALAD
INGREDIENTS:
FOR THE SALAD:
2 heaping cups of cooked and shredded leftover, or store-bought rotisserie chicken
4 heaping cups thinly sliced napa cabbage
4 scallion, thinly sliced
1 cup shredded carrots
1 cup English or Persian cucumber, diced
1 red bell pepper, seeded and chopped
1/2 cup fresh mint, roughly chopped
1/2 cup fresh cilantro, roughly chopped
1/2 cup toasted almonds
FOR THE MISO-SESAME VINAIGRETTE:
2 medium garlic cloves, smashed
1 small shallot, roughly chopped
2 tablespoons tamari or Braggs liquid aminos
2 tablespoons balsamic vinegar (white or reg)
2 tablespoons red or white wine vinegar
1 tablespoon miso paste of your choice (white or red)
1 tablespoon dark brown sugar
1/2 cup sunflower, avocado or vegetable oil
2 tablespoons toasted sesame oil
2 tablespoons black sesame seeds
INSTRUCTIONS:
In a large bowl, combine all the salad ingredients except for the nuts. In a small food processor or quart jar, using a stick blender, combine all the ingredients for the dressing, except the oil and sesame seeds. Blend dressing ingredients until smooth. Slowly add the oil, blending until emulsified. Stir in sesame seeds.
Right before serving, toss the salad with the 1/4-1/2 cup of the dressing. Garnish with nuts and more sliced green onions. Serve cold.
“Pray for miracles, but plant cabbages.” ― Ken Follett
During these cooler autumn days, we often lean into our personal versions of comfort food. For many it’s soups, stews or casseroles. I enjoy casseroles and they can be delicious; but they often look like a blob of melted cheese. I’m someone who requires food to be good tasting, and visually appealing. As the saying goes, “you eat with your eyes.”
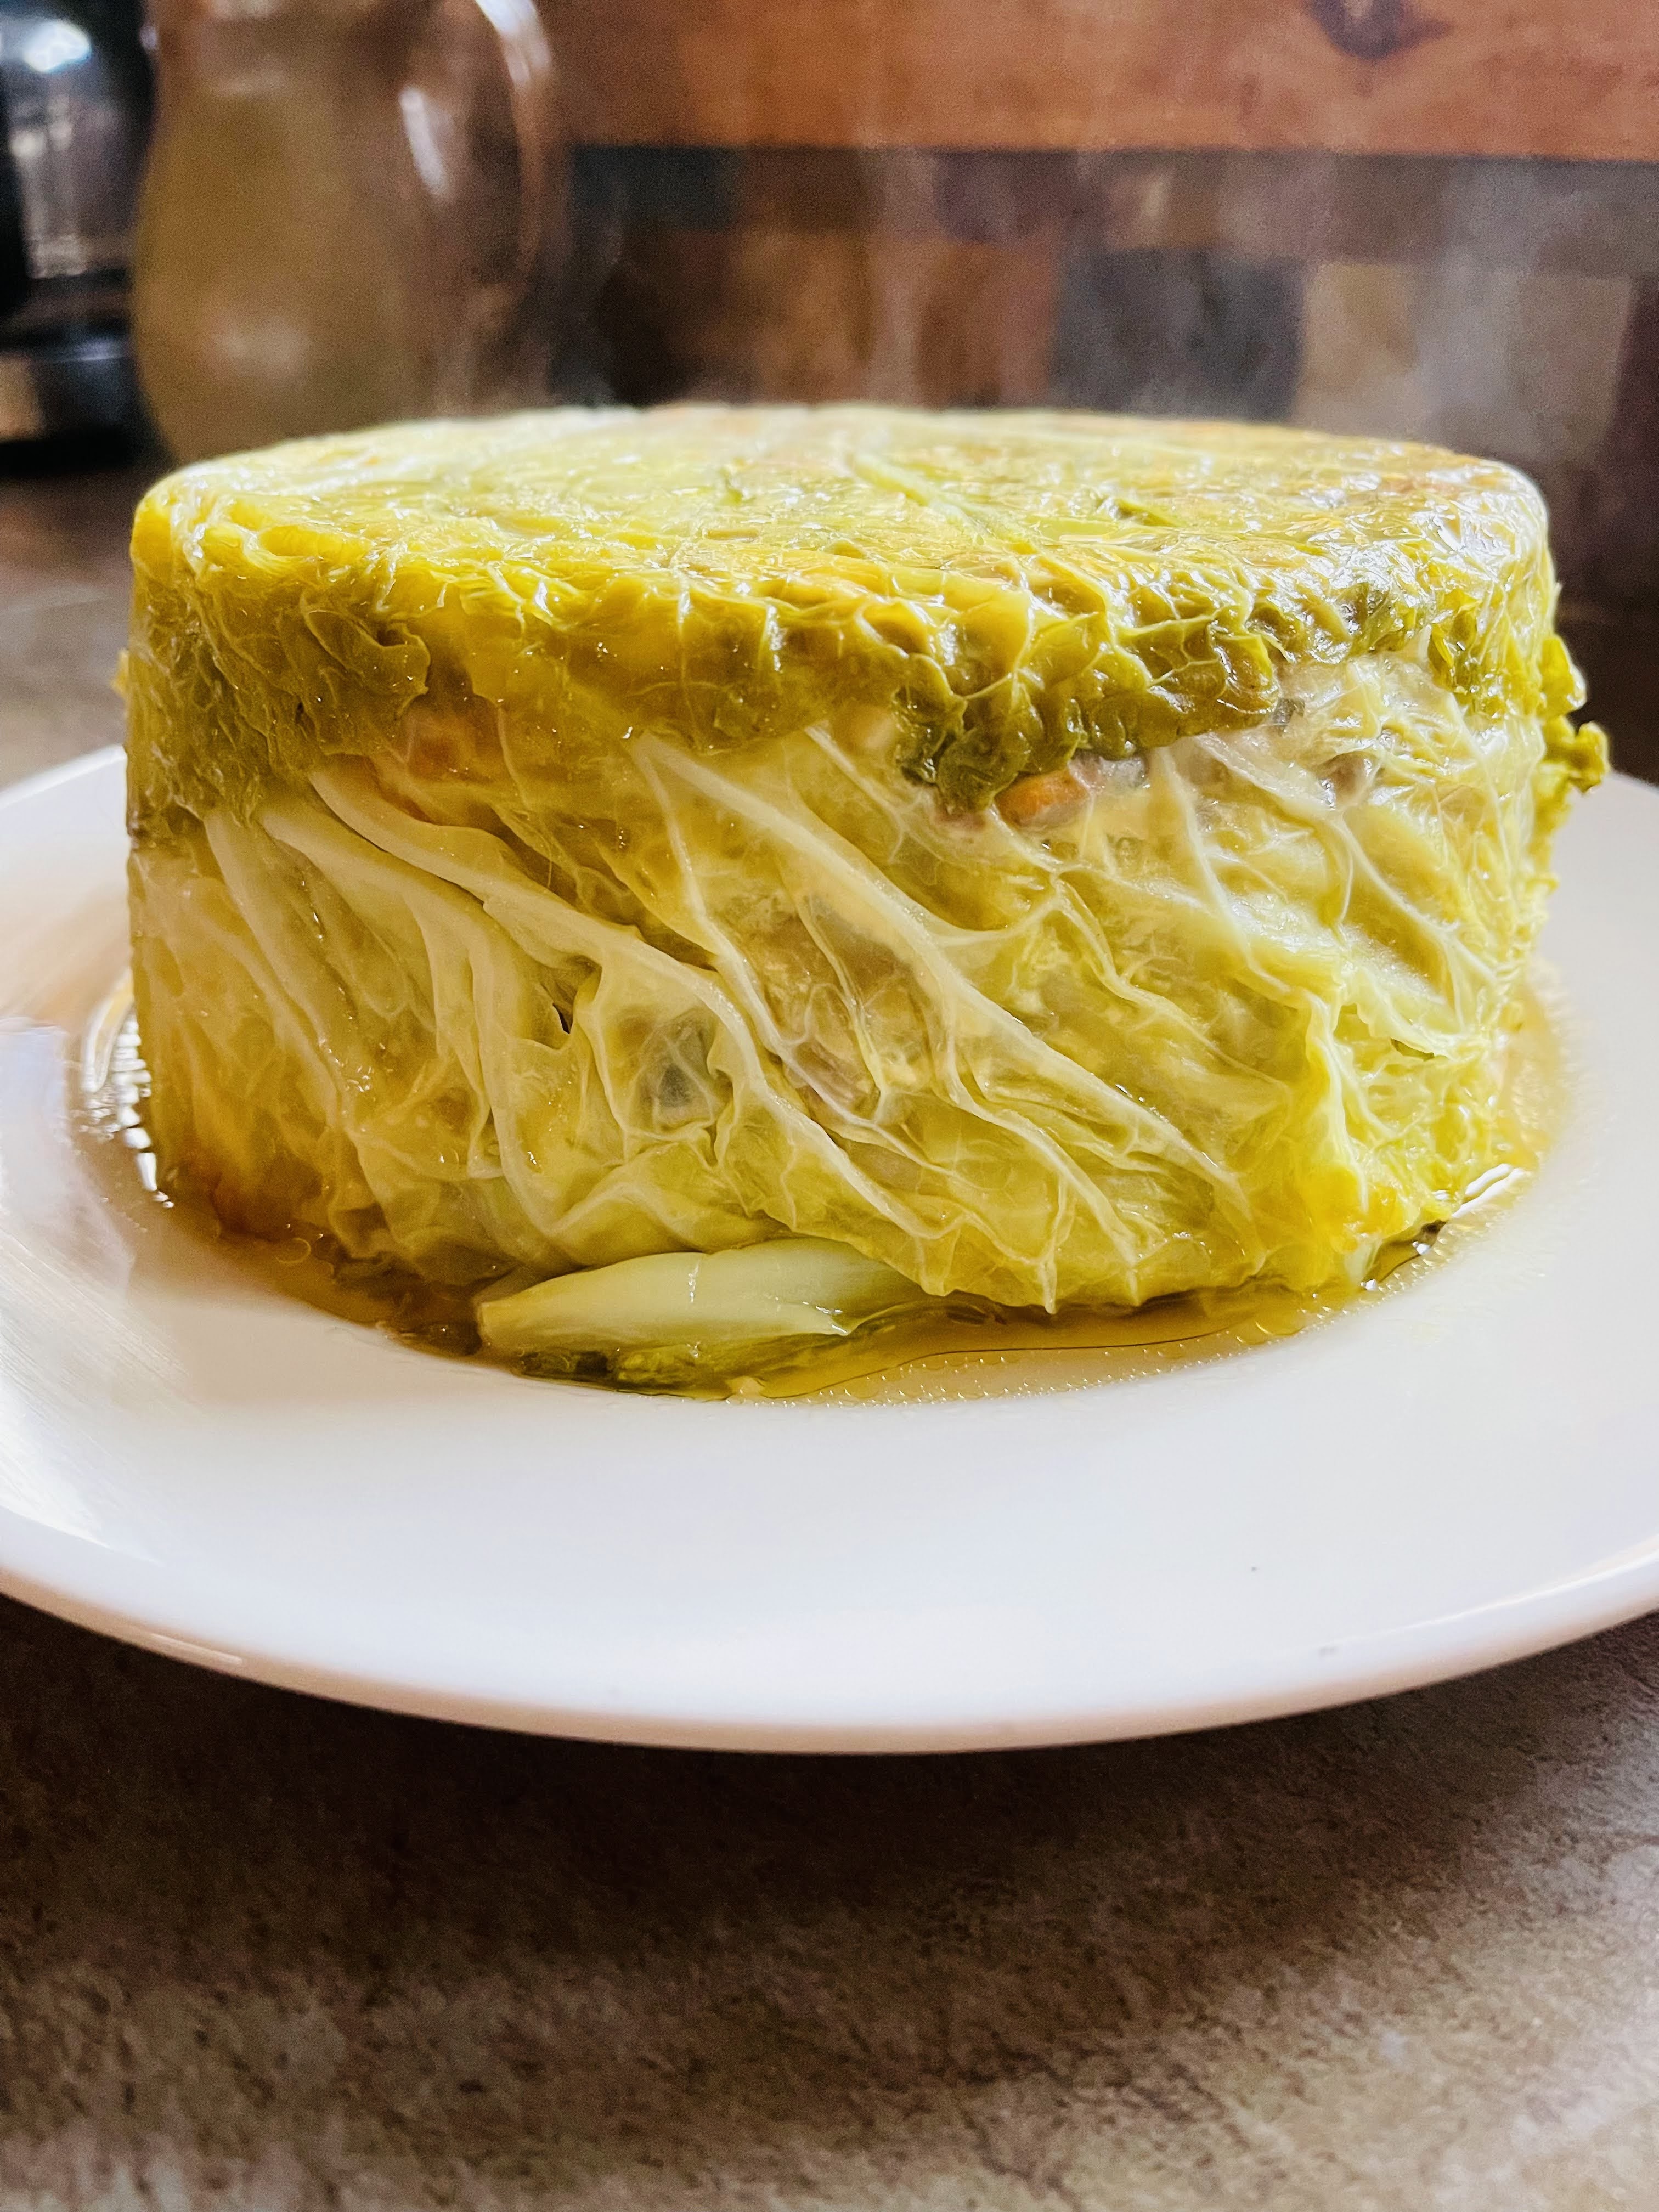
I’m a huge fan of Yotam Ottolenghi’s cauliflower cake and have made it several times. What a great way to present and eat vegetables. It covers all the bases. It’s creative, delicious and showy. So the other day when I picked up a beautiful head of savoy cabbage from the farmers market, I wanted to create something that showed off the deep veins in the leaves. Then it occured to me why not riff from the idea of cake, and make a cabbage roll on steroids? Well, it not only worked but will be on a regular rotation as the temperatures drop. Try it and see if you don’t agree!
STUFFED CABBAGE CAKE
INGREDIENTS:
1 large head of savoy cabbage
2 lbs of grass-fed ground lamb
1 medium yellow onion, diced
2 carrots, peeled and diced
1 cup red bell pepper, seeded and diced
4 large cloves of garlic, minced
1 cup pecorino cheese, grated
1 cup marinara sauce, or pasada
1 cup cooked jasmine rice
1 large egg
Olive oil
1/2 cup fresh flat-leaf parsley, chopped
Kosher salt and freshly ground black pepper to taste
INSTRUCTIONS:
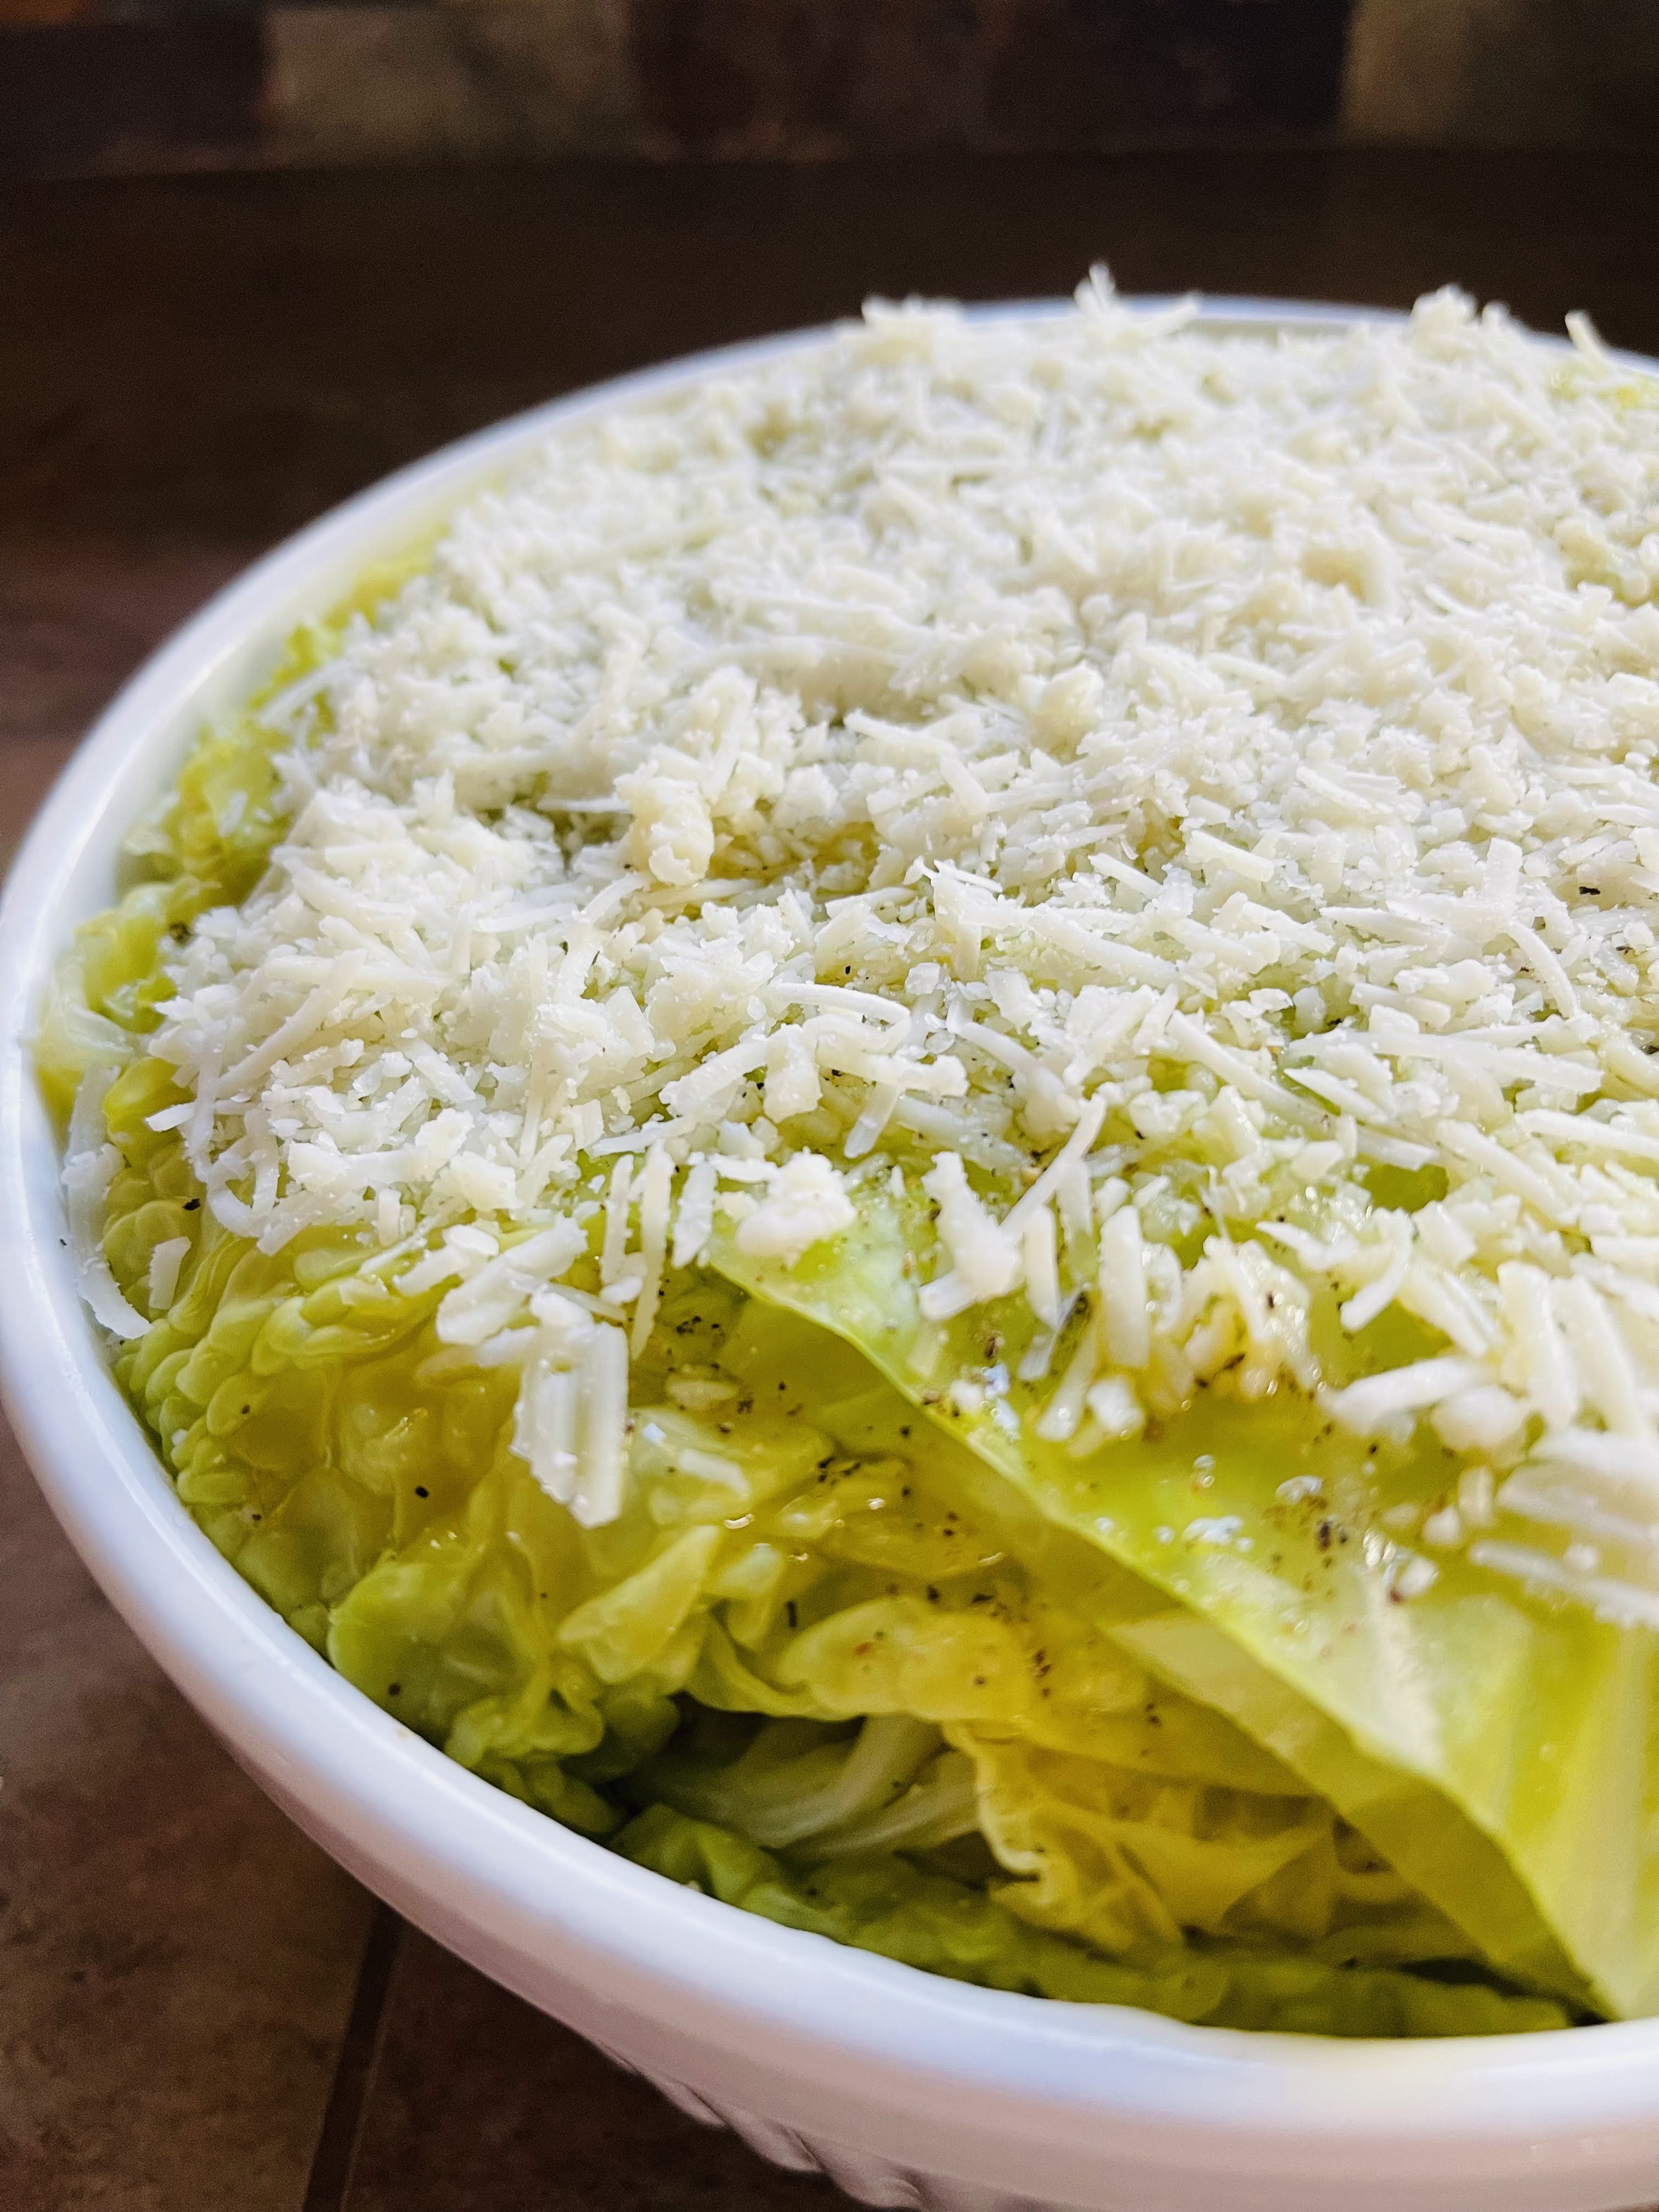
Core and separate the leaves from the savoy cabbage, by gently lifting them from the bottom of the cabbage, one leaf at a time. Continue until all large leaves have been removed. This should yield approximately 10-14 leaves. Cook the leaves in a large pot of salted, boiling water for 5 minutes. Drain, and place them in an ice bath to cool them down. Drain once again and place on a kitchen towel, pat them dry and set aside.
Grease the bottom and sides of a deep souffle dish. Place a large attractive leaf on the bottom of dish, allowing it to partially curl up the sides of the dish. Then take 4 additional leaves, and place them from the center and up the sides of the souffle dish covering all the sides.
In a large skillet, cook the ground lamb until it’s no longer pink. Drain if necessary and place in large bowl.
Add 2 tablespoons of olive oil to the skillet and saute the onion, garlic, carrots and red pepper until soft, then toss it all together with the meat in the bowl and add the cooked rice. Add the chopped parsley, 1/2 the cheese, tomato sauce, egg and salt and pepper. Stir to thoroughly combine.
Place 1/4 of mixture on top of cabbage in souffle dish. pushing it to the sides of the dish, then cover with 1 or 2 cabbage leaves depending on their size. Repeat, using 1/4 of filling at a time, then covering with 1 or 2 cabbage leaves. You should have 4 individual layers. Top this with 1 or two cabbage leaves, and fold in any additional leaves that are hanging over the sides of the dish.
Cover the cabbage with remaining half of pecorino. Place in a 375 degree oven for 1 hour. Let it rest for 15 minutes, then invert a serving plate over the souffle dish and flip it over. Cut in 6 slices and serve with additional marinara sauce or passata and additional cheese.
“Cabbage: a familiar kitchen-garden vegetable about as large and wise as a man’s head.” —Ambrose Bierce
A couple weeks ago Val and I were invited to a birthday celebration of a dear friend. His generous gift to us was to make a Greek Meze that included over 14 different plates, celebrating Greece and the surrounding areas. Being the superb cook that he is, Vitali pulled out all the stops! There was hummus, olives, roasted bell peppers, Greek salad, tzatziki, feta, beet salad, fried halloumi, a Greek soup made with dehydrated yogurt called Tranhanas, Spanakopita, Soutzoukakia (Greek meatballs in tomato sauce), stuffed grape leaves, stuffed bell peppers, and my favorite, Stifado (Greek beef stew).
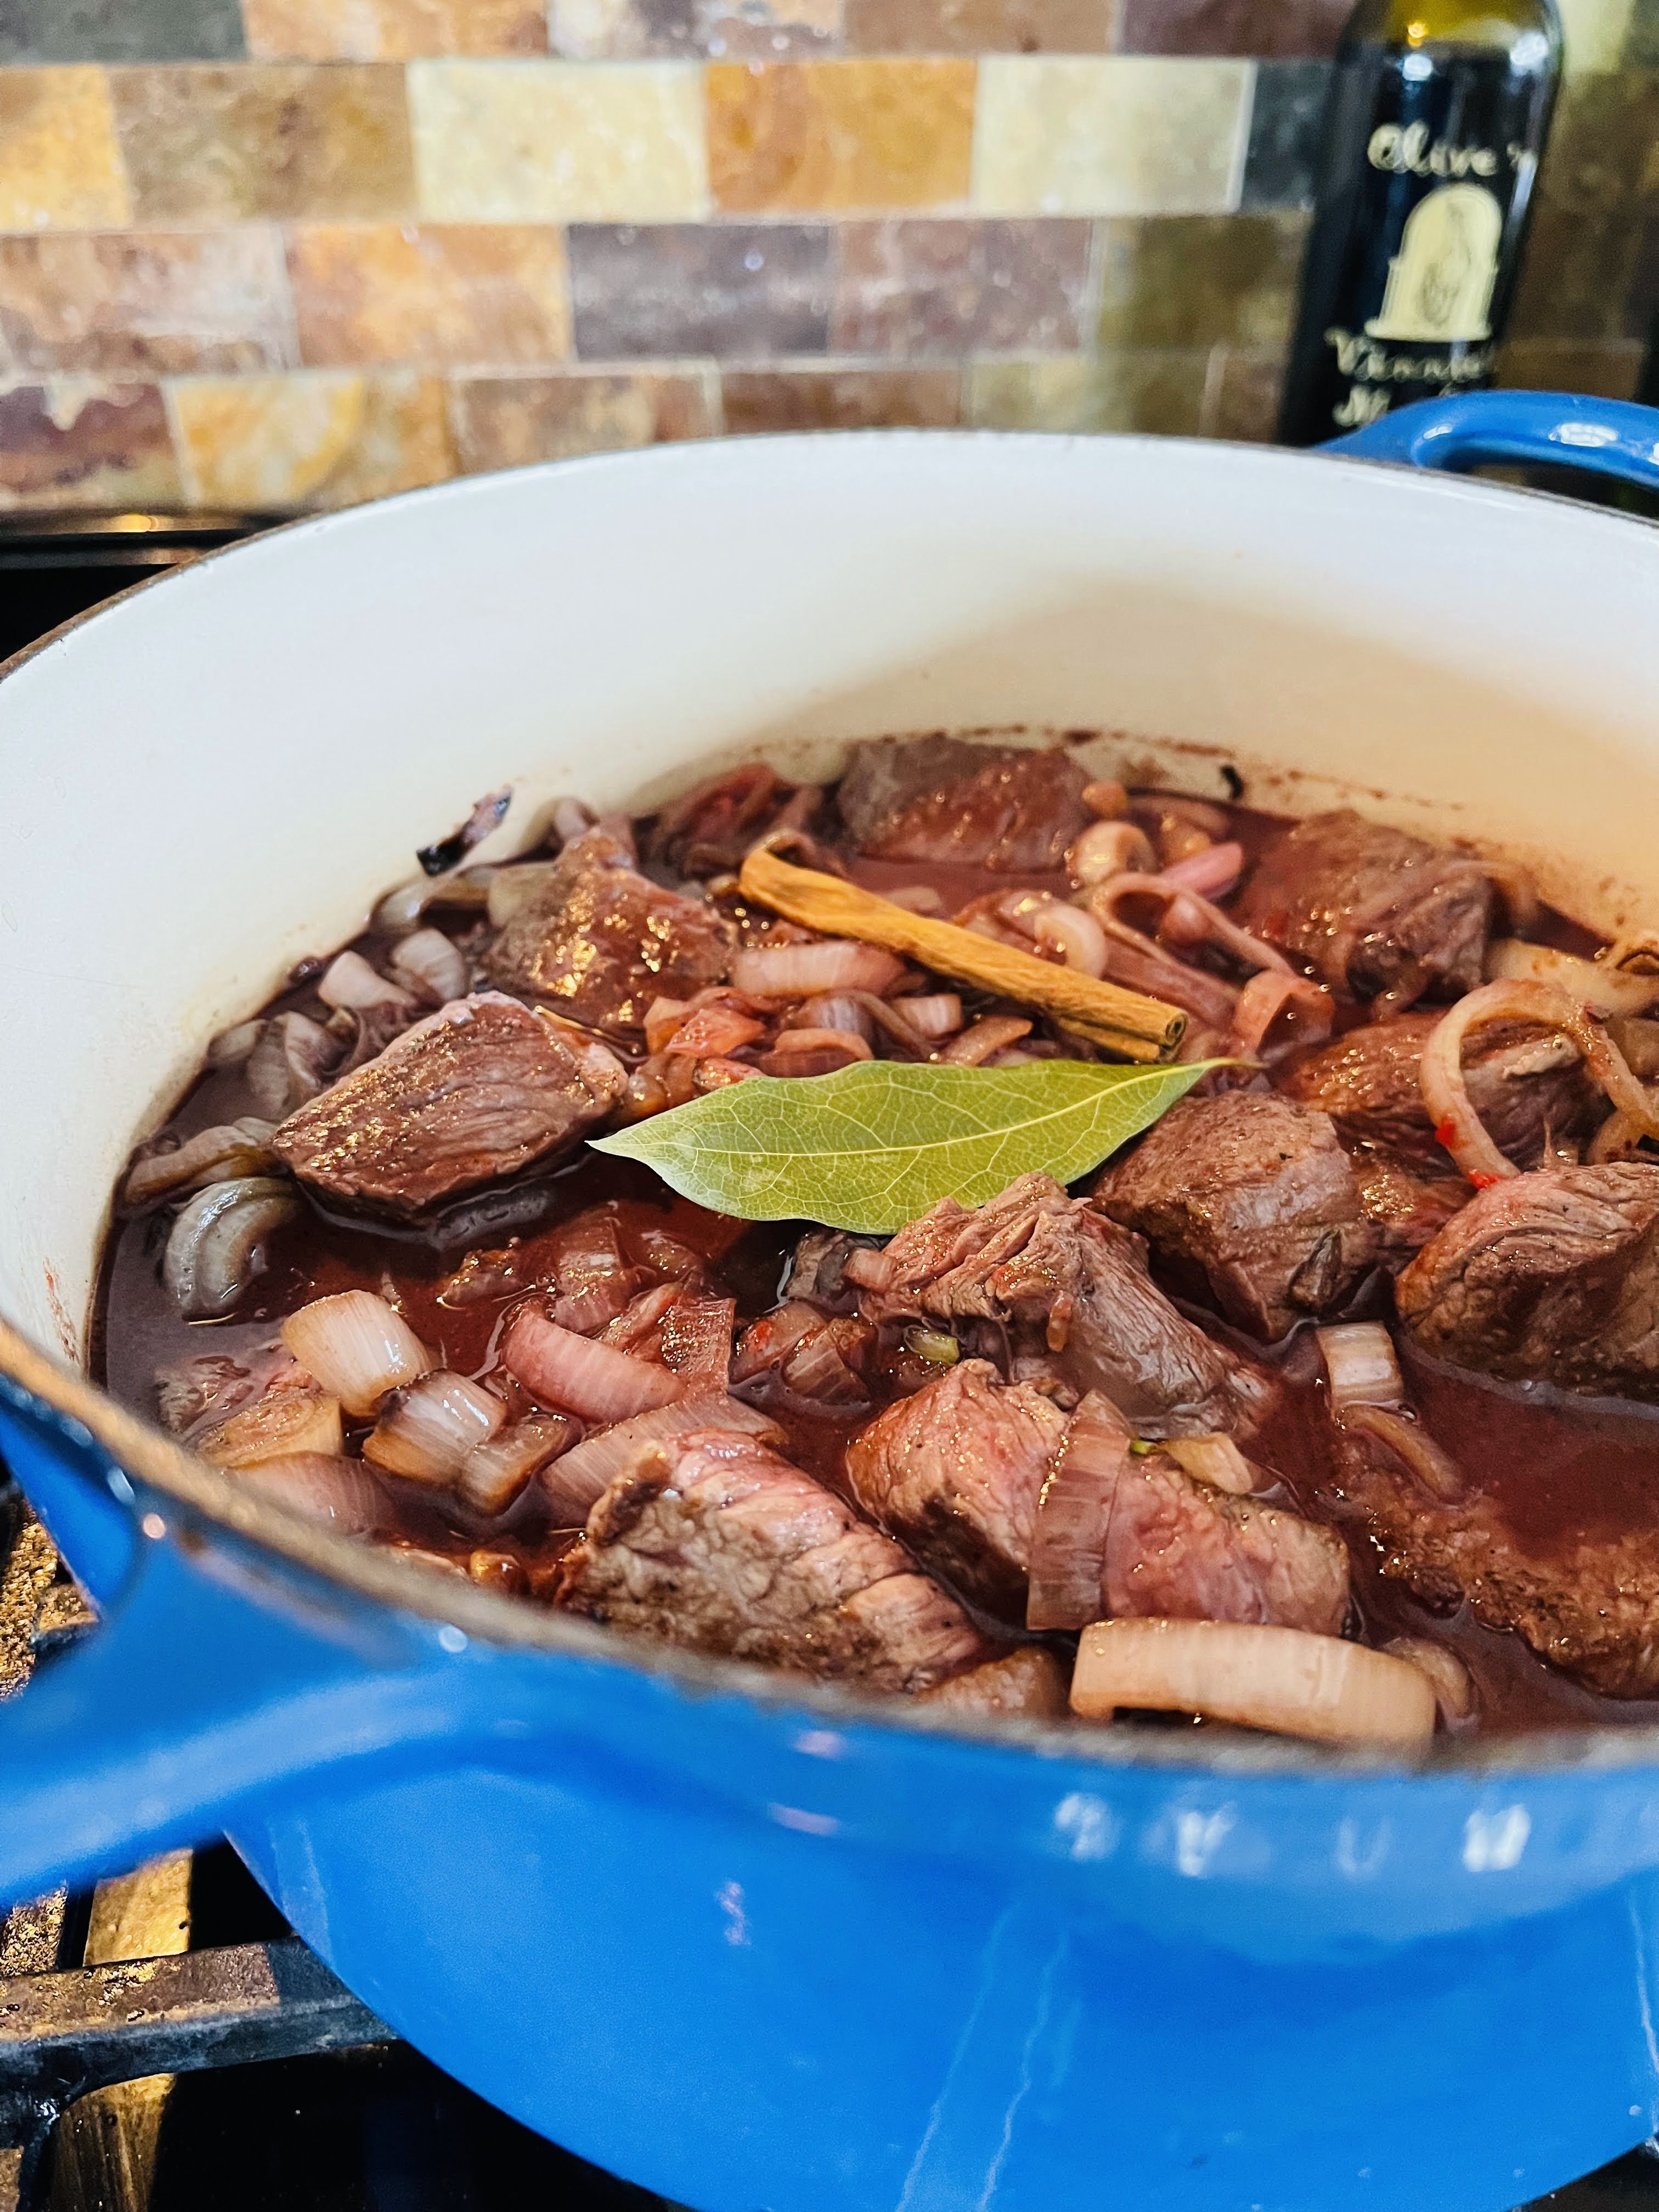
I must admit that I am extremely fussy about beef in general and do not eat it very often. Many times when I try a beef stew, I’m disappointed by the dry texture of the end result (in my defense I’m that way with anything I find overcooked). I guess I’m a bit of a texture freak. However this stew, this Stifado blew my mind! The meat was extremely tender, the sauce beautifully balanced and flavorful. Although I was already quite full, I managed a second helping and was delighted to bring some leftovers home.
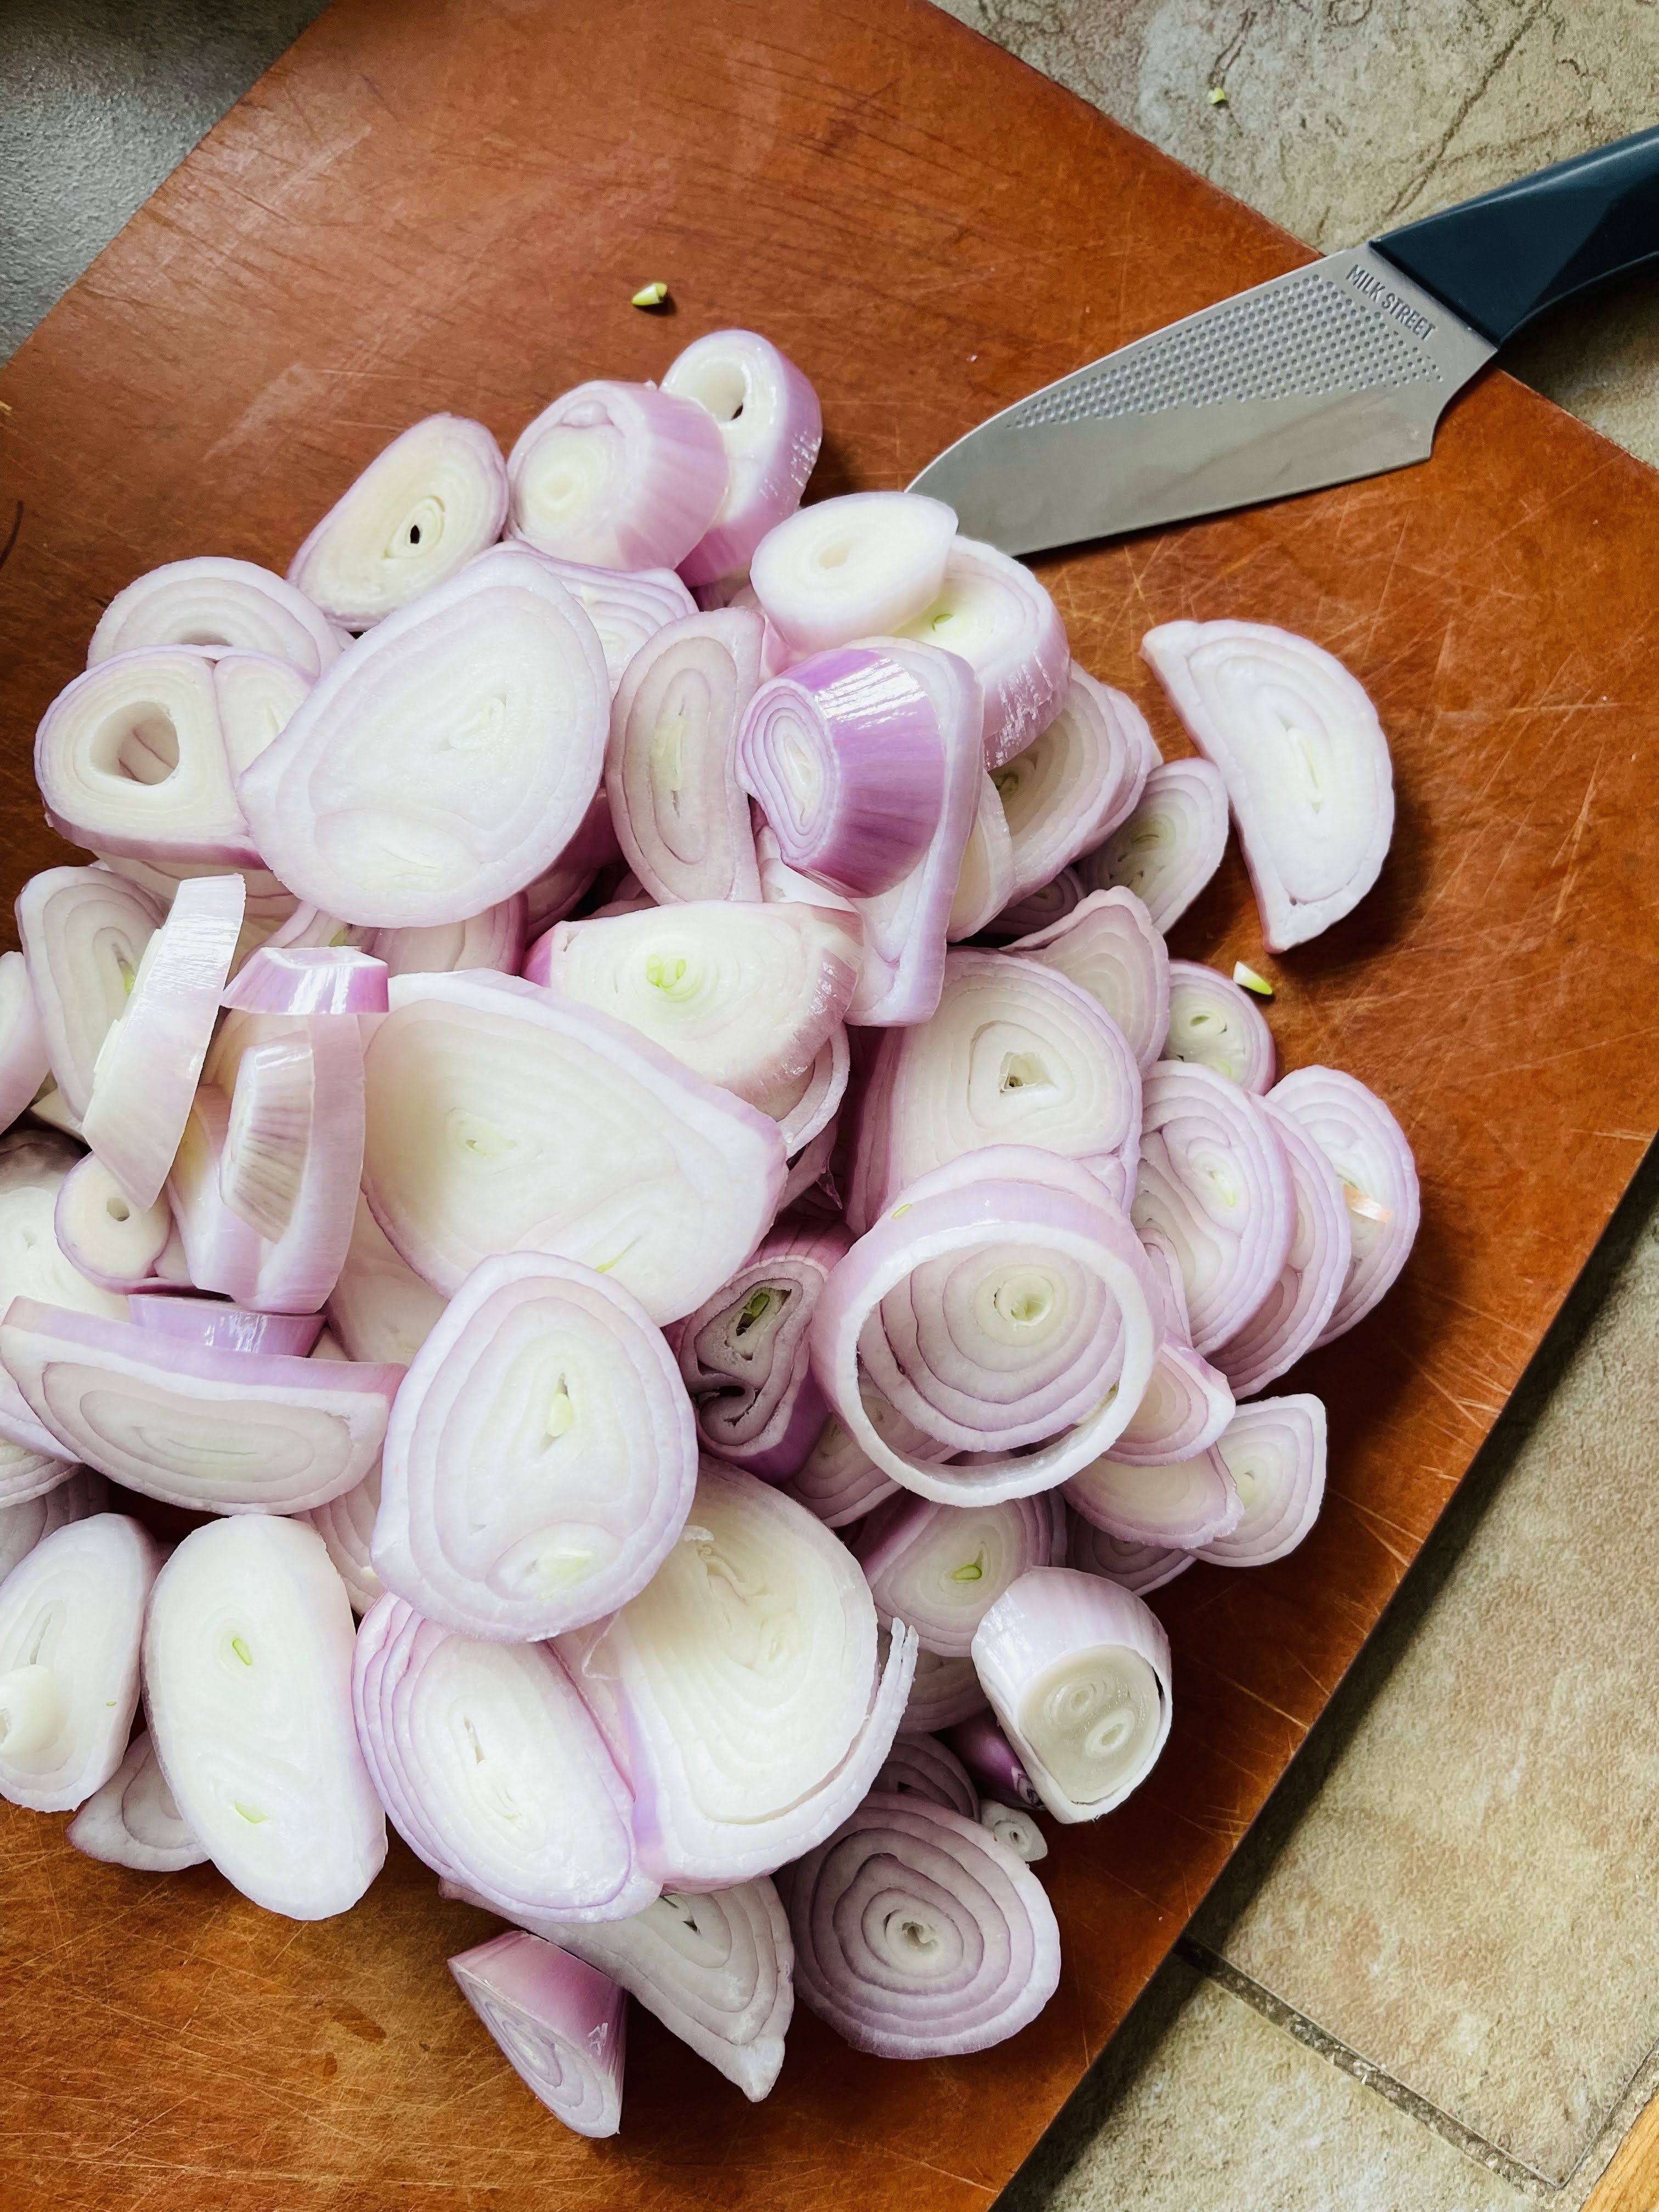
When selecting a chuck roast for this recipe, make sure you select one that is generously marbled. The fat within the meat will help the pieces stay moist. Although Vitali didn’t use a set recipe, the technique is similar to any stew in browning the meat in batches on all sides to seal in the moisture in the meat. The seasoning in this dish is where the magic happens; red wine vinegar, red wine, LOTS of shallots, a couple bay leaves, some Aleppo pepper flakes, ground cumin and a cinnamon stick. Since the sauce is so delicious, simple boiled potatoes are the perfect side, along with plenty of red wine! Don’t forget to kiss the cook!
BEEF STIFADO
INGREDIENTS:
3-4 lbs of good quality chuck roast
3-4 tablespoons olive oil, divided
3 cups sliced shallots
3/4 cup red wine vinegar
1 bottle decent dry red wine (you’ll use most of it, along with a glass for the cook!)
A generous spoonful of tomato paste
2 bay leaves
1 teaspoon Aleppo pepper flakes
1 teaspoon ground cumin
1 small cinnamon stick
INSTRUCTIONS:
Preheat oven to 350 F. Cut the chuck roast into 1.5 inch pieces. Season with salt and pepper on all sides. In a cast iron skillet or something similar, heat 2 tablespoons of olive oil over medium-high heat. Sear pieces in batches, on all sides, making sure to leave some room between each piece so they brown but don’t steam. Place finished pieces in a Dutch oven.
Add 2 more tablespoons of olive to your skillet and saute the shallots, stirring frequently until lightly golden and soft. Add these to your Dutch oven as well. Deglaze the skillet with red wine vinegar, scraping up browned bits. Pour remaining vinegar in Dutch oven. Add tomato paste, cumin and Aleppo pepper, stirring to combine. Pour wine into Dutch oven, enough to almost cover. Add bay leaves and cinnamon stick. Cover and place in oven for 90 minutes. Uncover and roast for 15 minutes more.
Let sit for 10-15 minutes. Serve with boiled potatoes and sprinkle with chopped fresh parsley.
Serves 4-6
“Greece is the most magical place on Earth” – Kylie Bax.
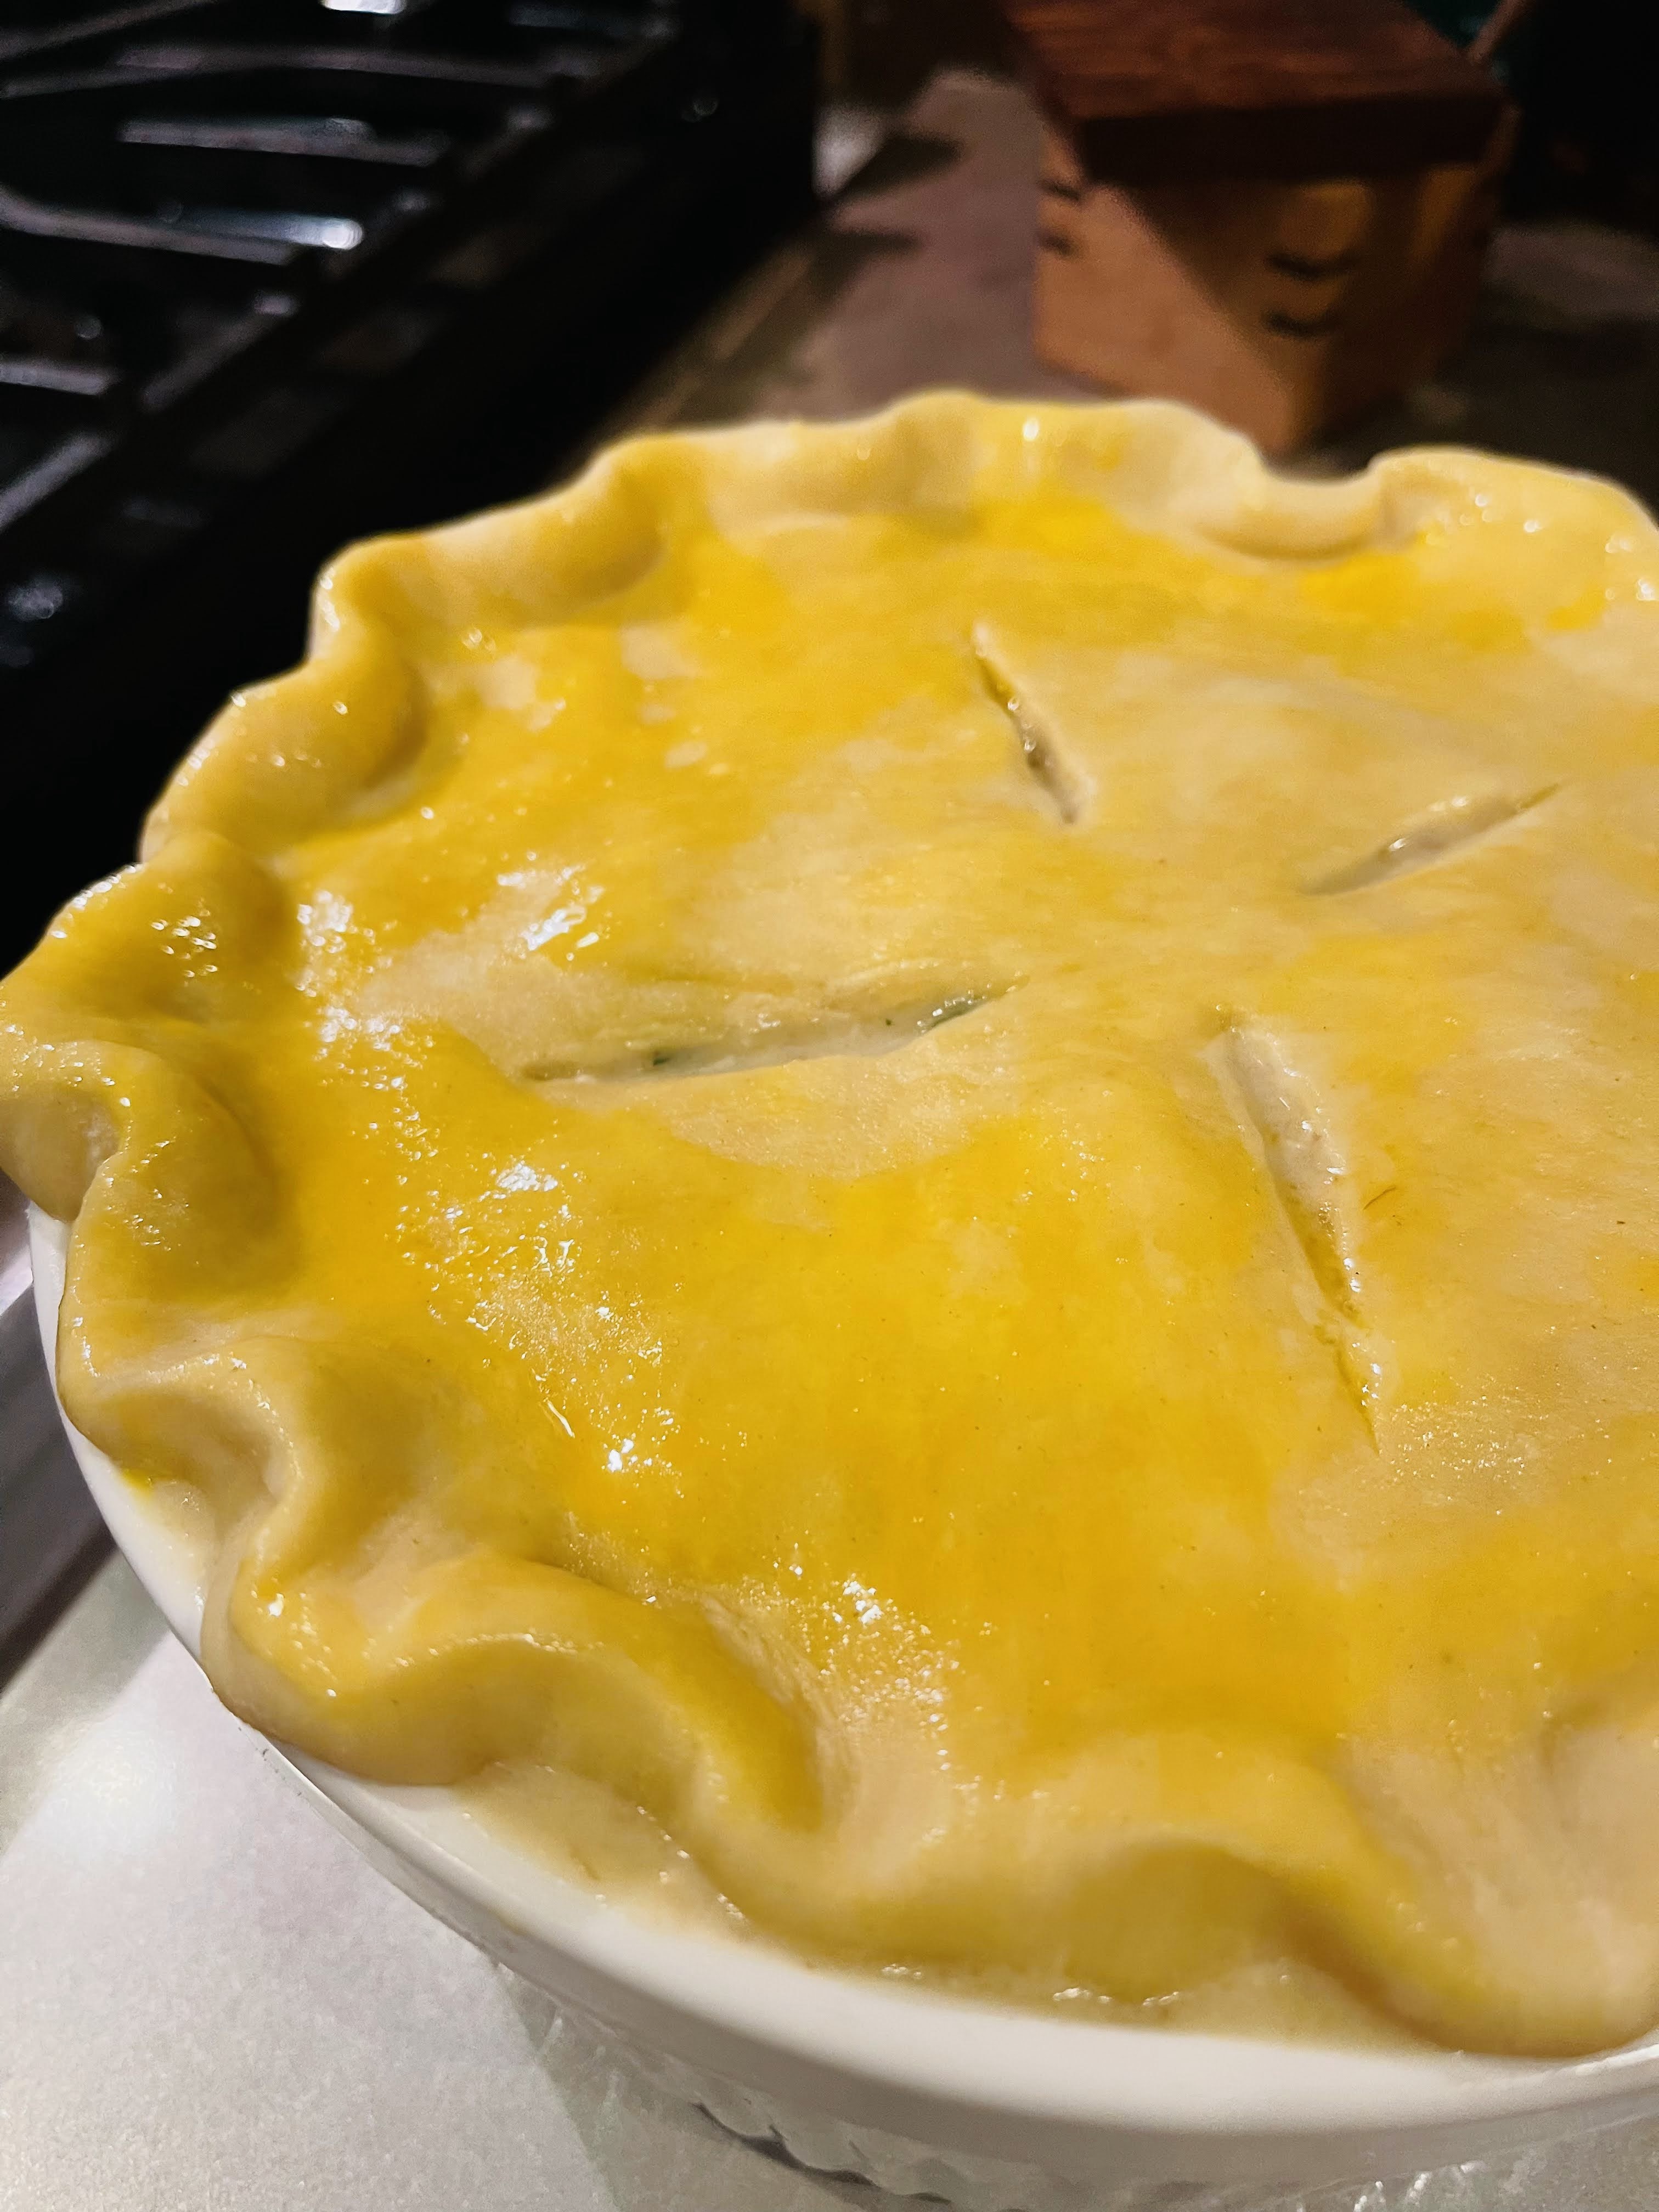
Comfort seems to be short supply these days. Climate change, avian flu, war, nasty politics, and the greyness of winter press in on us from all sides. I know when I’m tired of listening to all the noise, I head to my kitchen to fill it with the soothing scent of comfort food. Although Val and I have different opinions on what that looks like, we do agree that my Chicken Pot Pie is one of the top three. Featuring an easy homemade crust, basic ingredients, and leftover rotisserie or roasted chicken. Each ingredient adds to the savoriness of this warming and delicious pie. It may be cold outside, but you’ll be warm within.
BRICKYARD FARMS CHICKEN POT PIE
FOR THE PIE CRUST:
3 cups flour (I use Bob’s Red MIll Fine Pastry Flour)
1 tablespoon sugar
1 teaspoon salt
3/4 cups cold butter, cut in pieces
1/3 cup shortening, cut in pieces
1/2 cup ice water
INSTRUCTIONS:
Pulse the flour, sugar and salt in a food processor to combine. Add butter and shortening; pulse until crumbly. Slowly add ice water through feed tube and pulse until it forms a ball. Dust silicone baking mat with flour; place ball on mat and cut in half. Wrap one half in plastic wrap, then place in freezer for future use. Wrap remaining one and place in the refrigerator until ready for use.
FOR FILLING:
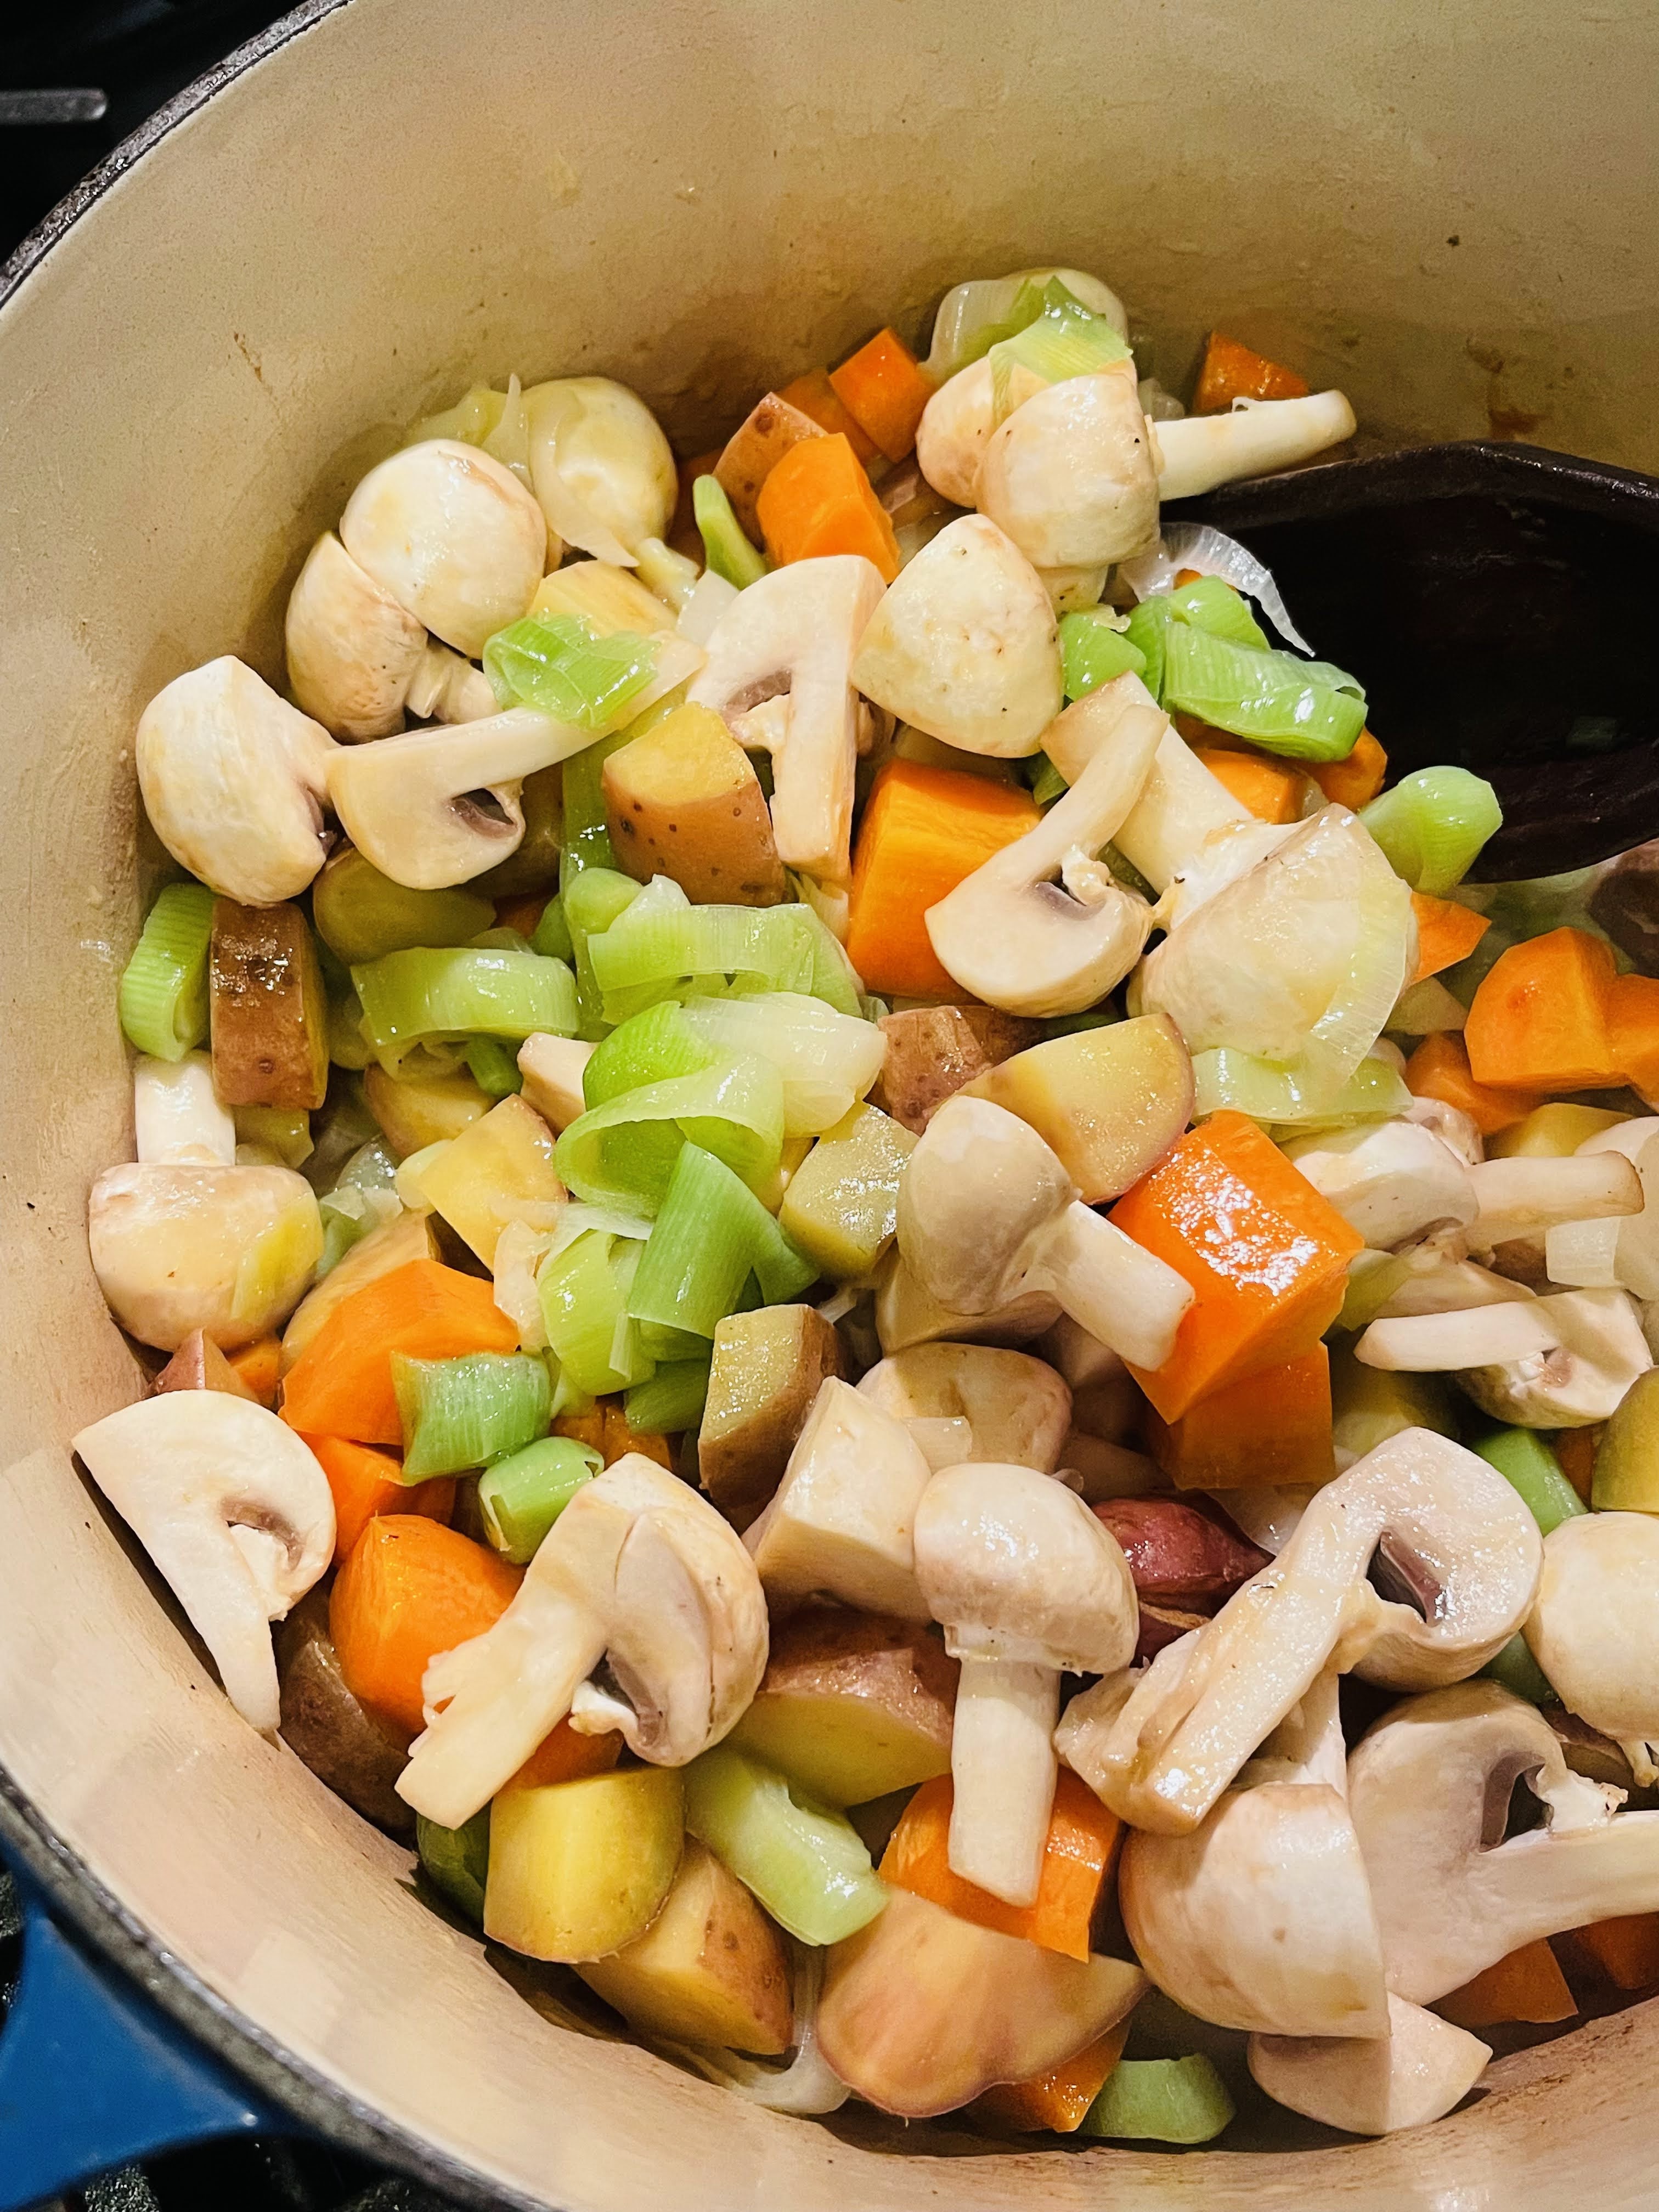
4 cups shredded rotisserie or roasted chicken
5 tablespoons unsalted butter
2 cups red-skinned potatoes, cut in 1/2 inch chunks
4 carrots, peeled and cut into 1/2 inch pieces on the diagonal
1 large leek, white and pale green parts only. sliced thin and washed
6 ounces cremini mushrooms, cut in 1/4 inch slices
Zest of 1 lemon
1 tablespoon fresh thyme leaves
5 tablespoons flour
1 cup whole milk or half and half
2 cups chicken stock, homemade if possible
1/4 cup flat leaf parsley, chopped
Kosher salt and freshly ground black pepper to taste
1 egg yolk
1 tablespoon heavy cream
INSTRUCTIONS:
Pre-heat oven to 375 degrees F. In large, high-sided skillet, melt butter over medium-high heat. Add potatoes and cook, stirring occasionally for 4-5 minutes, or until the potatoes start to turn golden.
Add leeks, carrots and mushrooms, and cook for an additional 4-5 minutes more.
Add your flour and cook, stirring constantly for 1 minute. Add milk and chicken stock, then bring to a simmer. Cook until thick and bubbly, stirring constantly, about 3-4 minutes.
Add reserved chicken pieces, parsley, thyme leaves, lemon zest, kosher salt and freshly ground black pepper. Mix thoroughly.
Fill your souffle or ceramic dish with filling.
Roll out in a circle on silicone mat a little larger than the dish you are using for your pot pie. Cut a small opening with a sharp knife to let steam out. Roll loosely around your rolling pin and place on top of your pot pie.
Make an egg wash of 1 egg yolk and 1 tablespoon heavy cream. Brush crust with egg wash. Place pie on baking sheet and bake for 35-40 minutes, until crush is golden. Remove from oven and let rest for 10 minutes. Serve hot.
I love comfort food – it’s the basis of everything.–Katie Lee
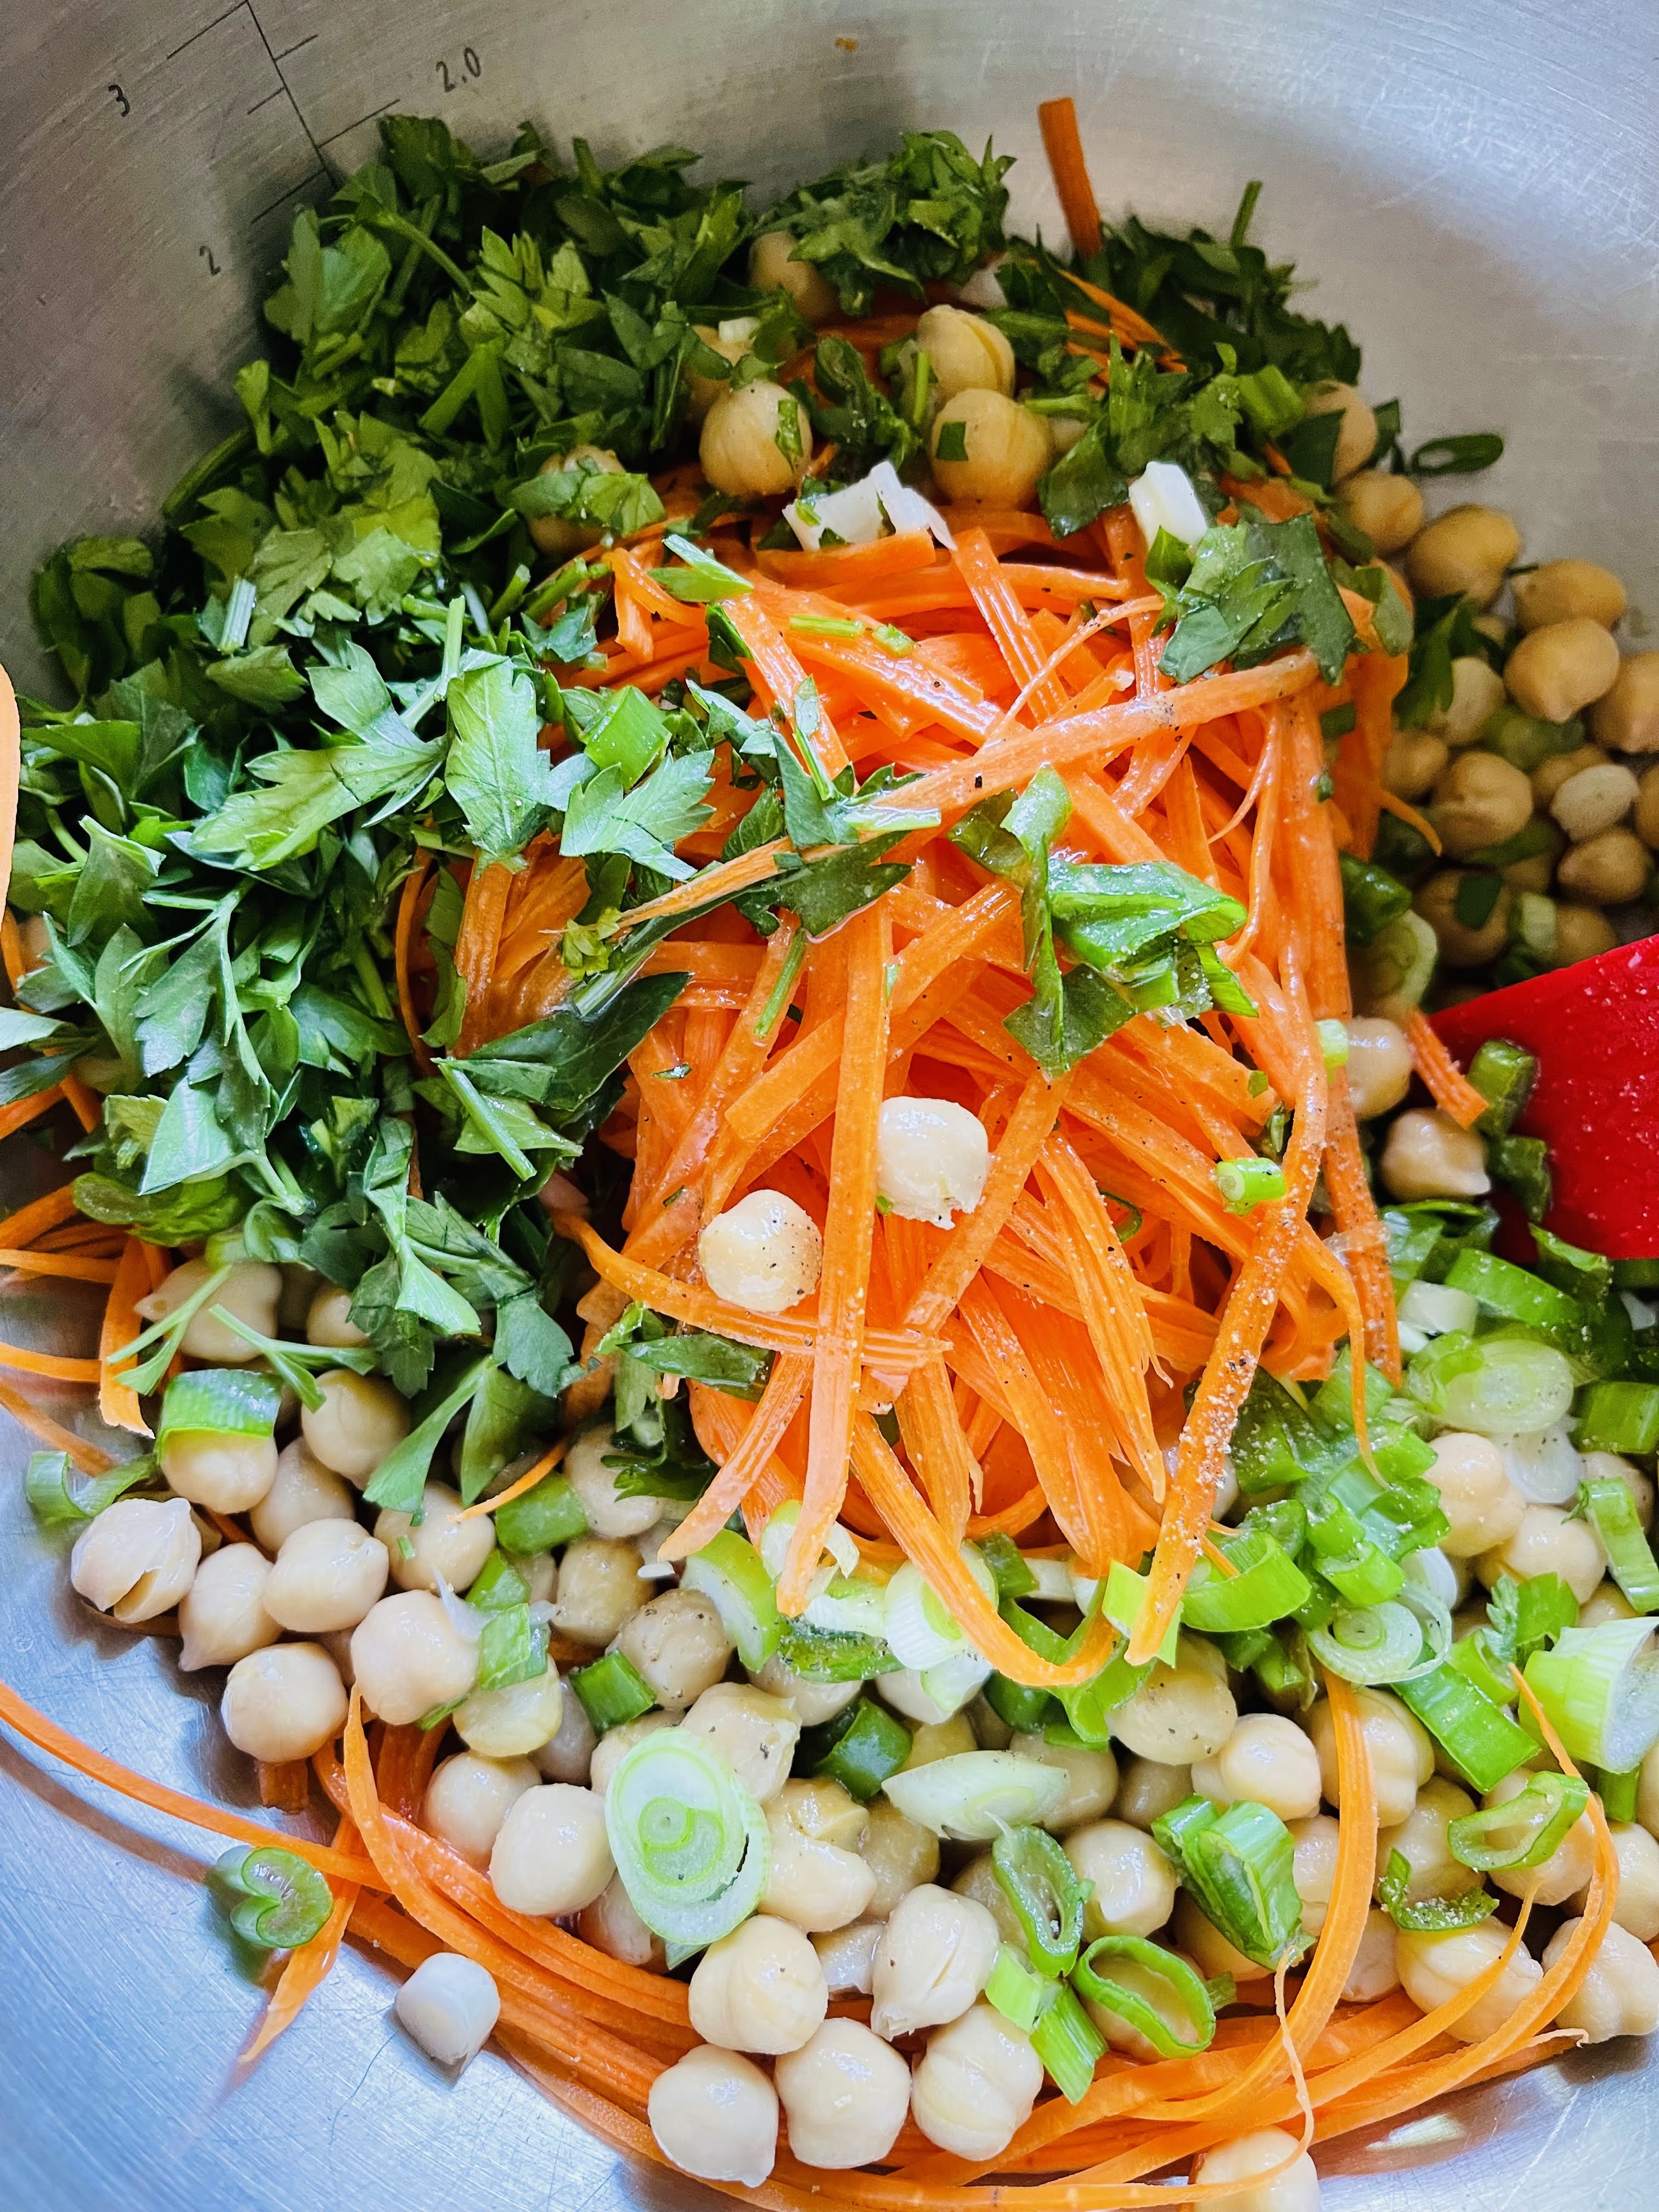
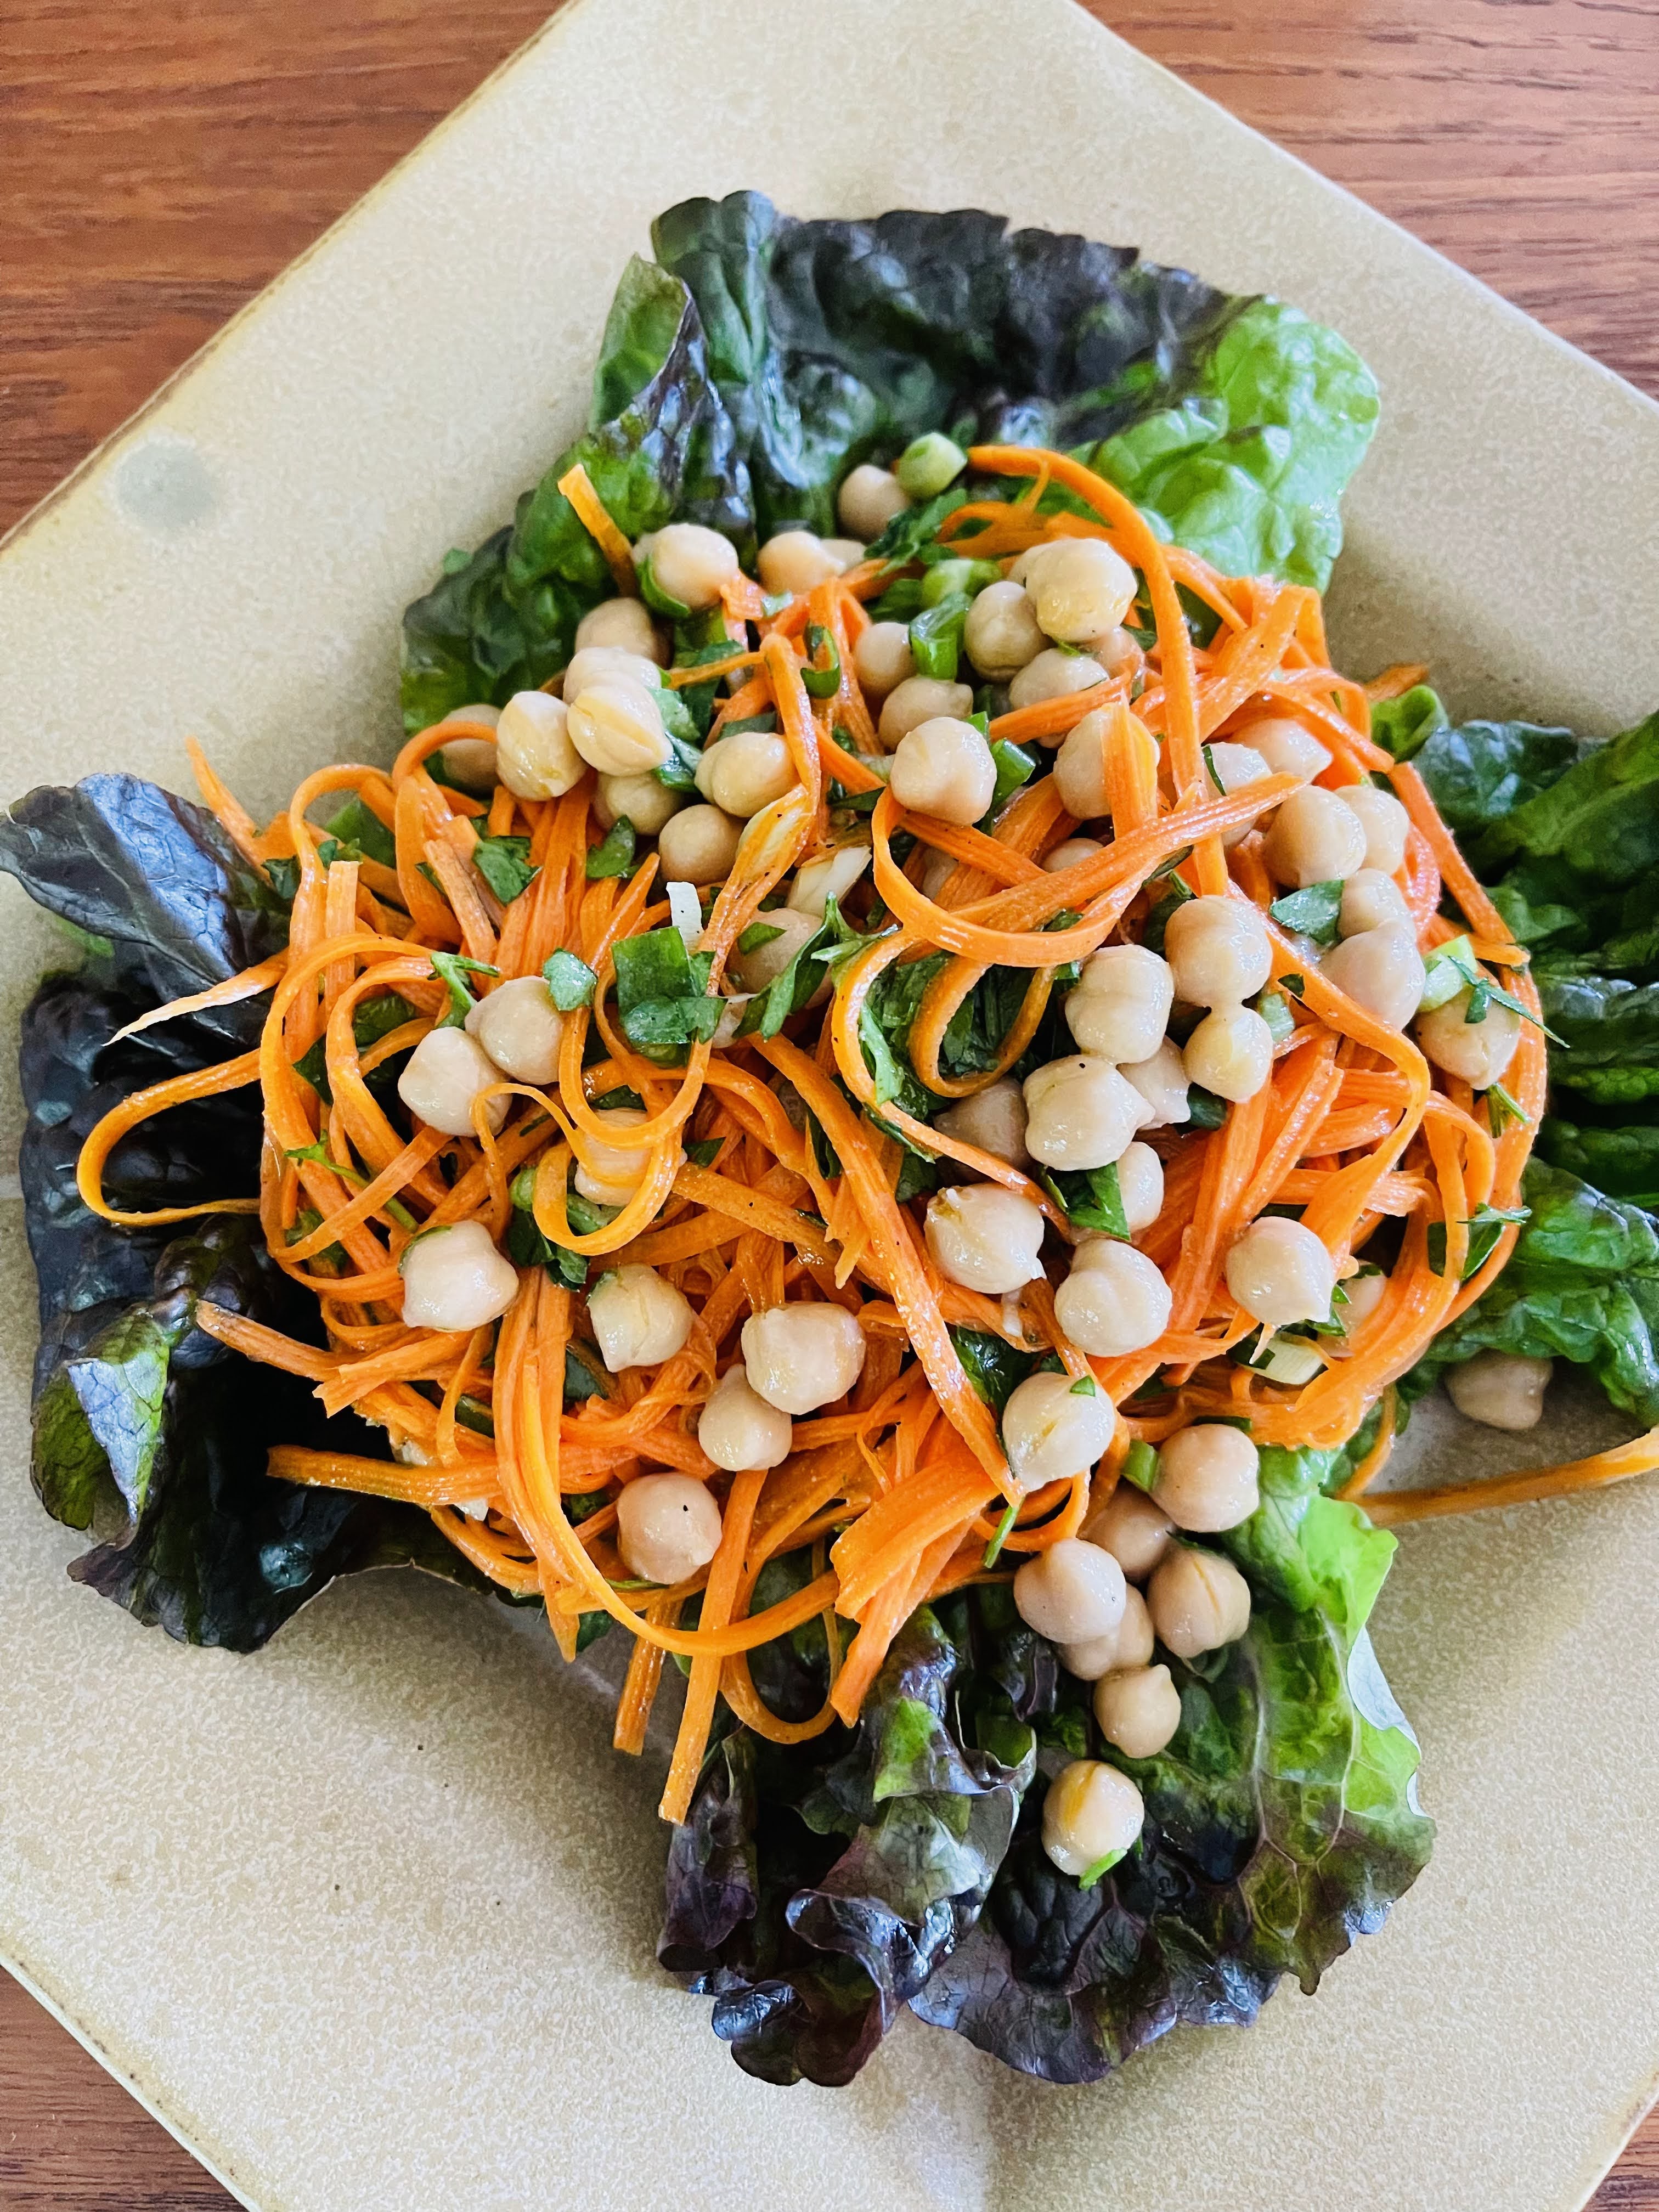
I have always appreciated the versatility of vegetables, as the possibilities are endless. It certainly doesn’t hurt that we are vegetable farmers. There are times when fresh, simple ingredients will make combinations shine. The French are masters of this approach to cooking. This is a salad that can be tweaked on so many levels. Herb choices can be varied, such as parsley, mint, cilantro, or a mixture. If you want to bulk it up, it’s so easy to add chickpeas or cannellini beans. You could add sliced radishes, snap peas, or snow peas. Think color and texture. Frankly, I can’t get enough of this salad!
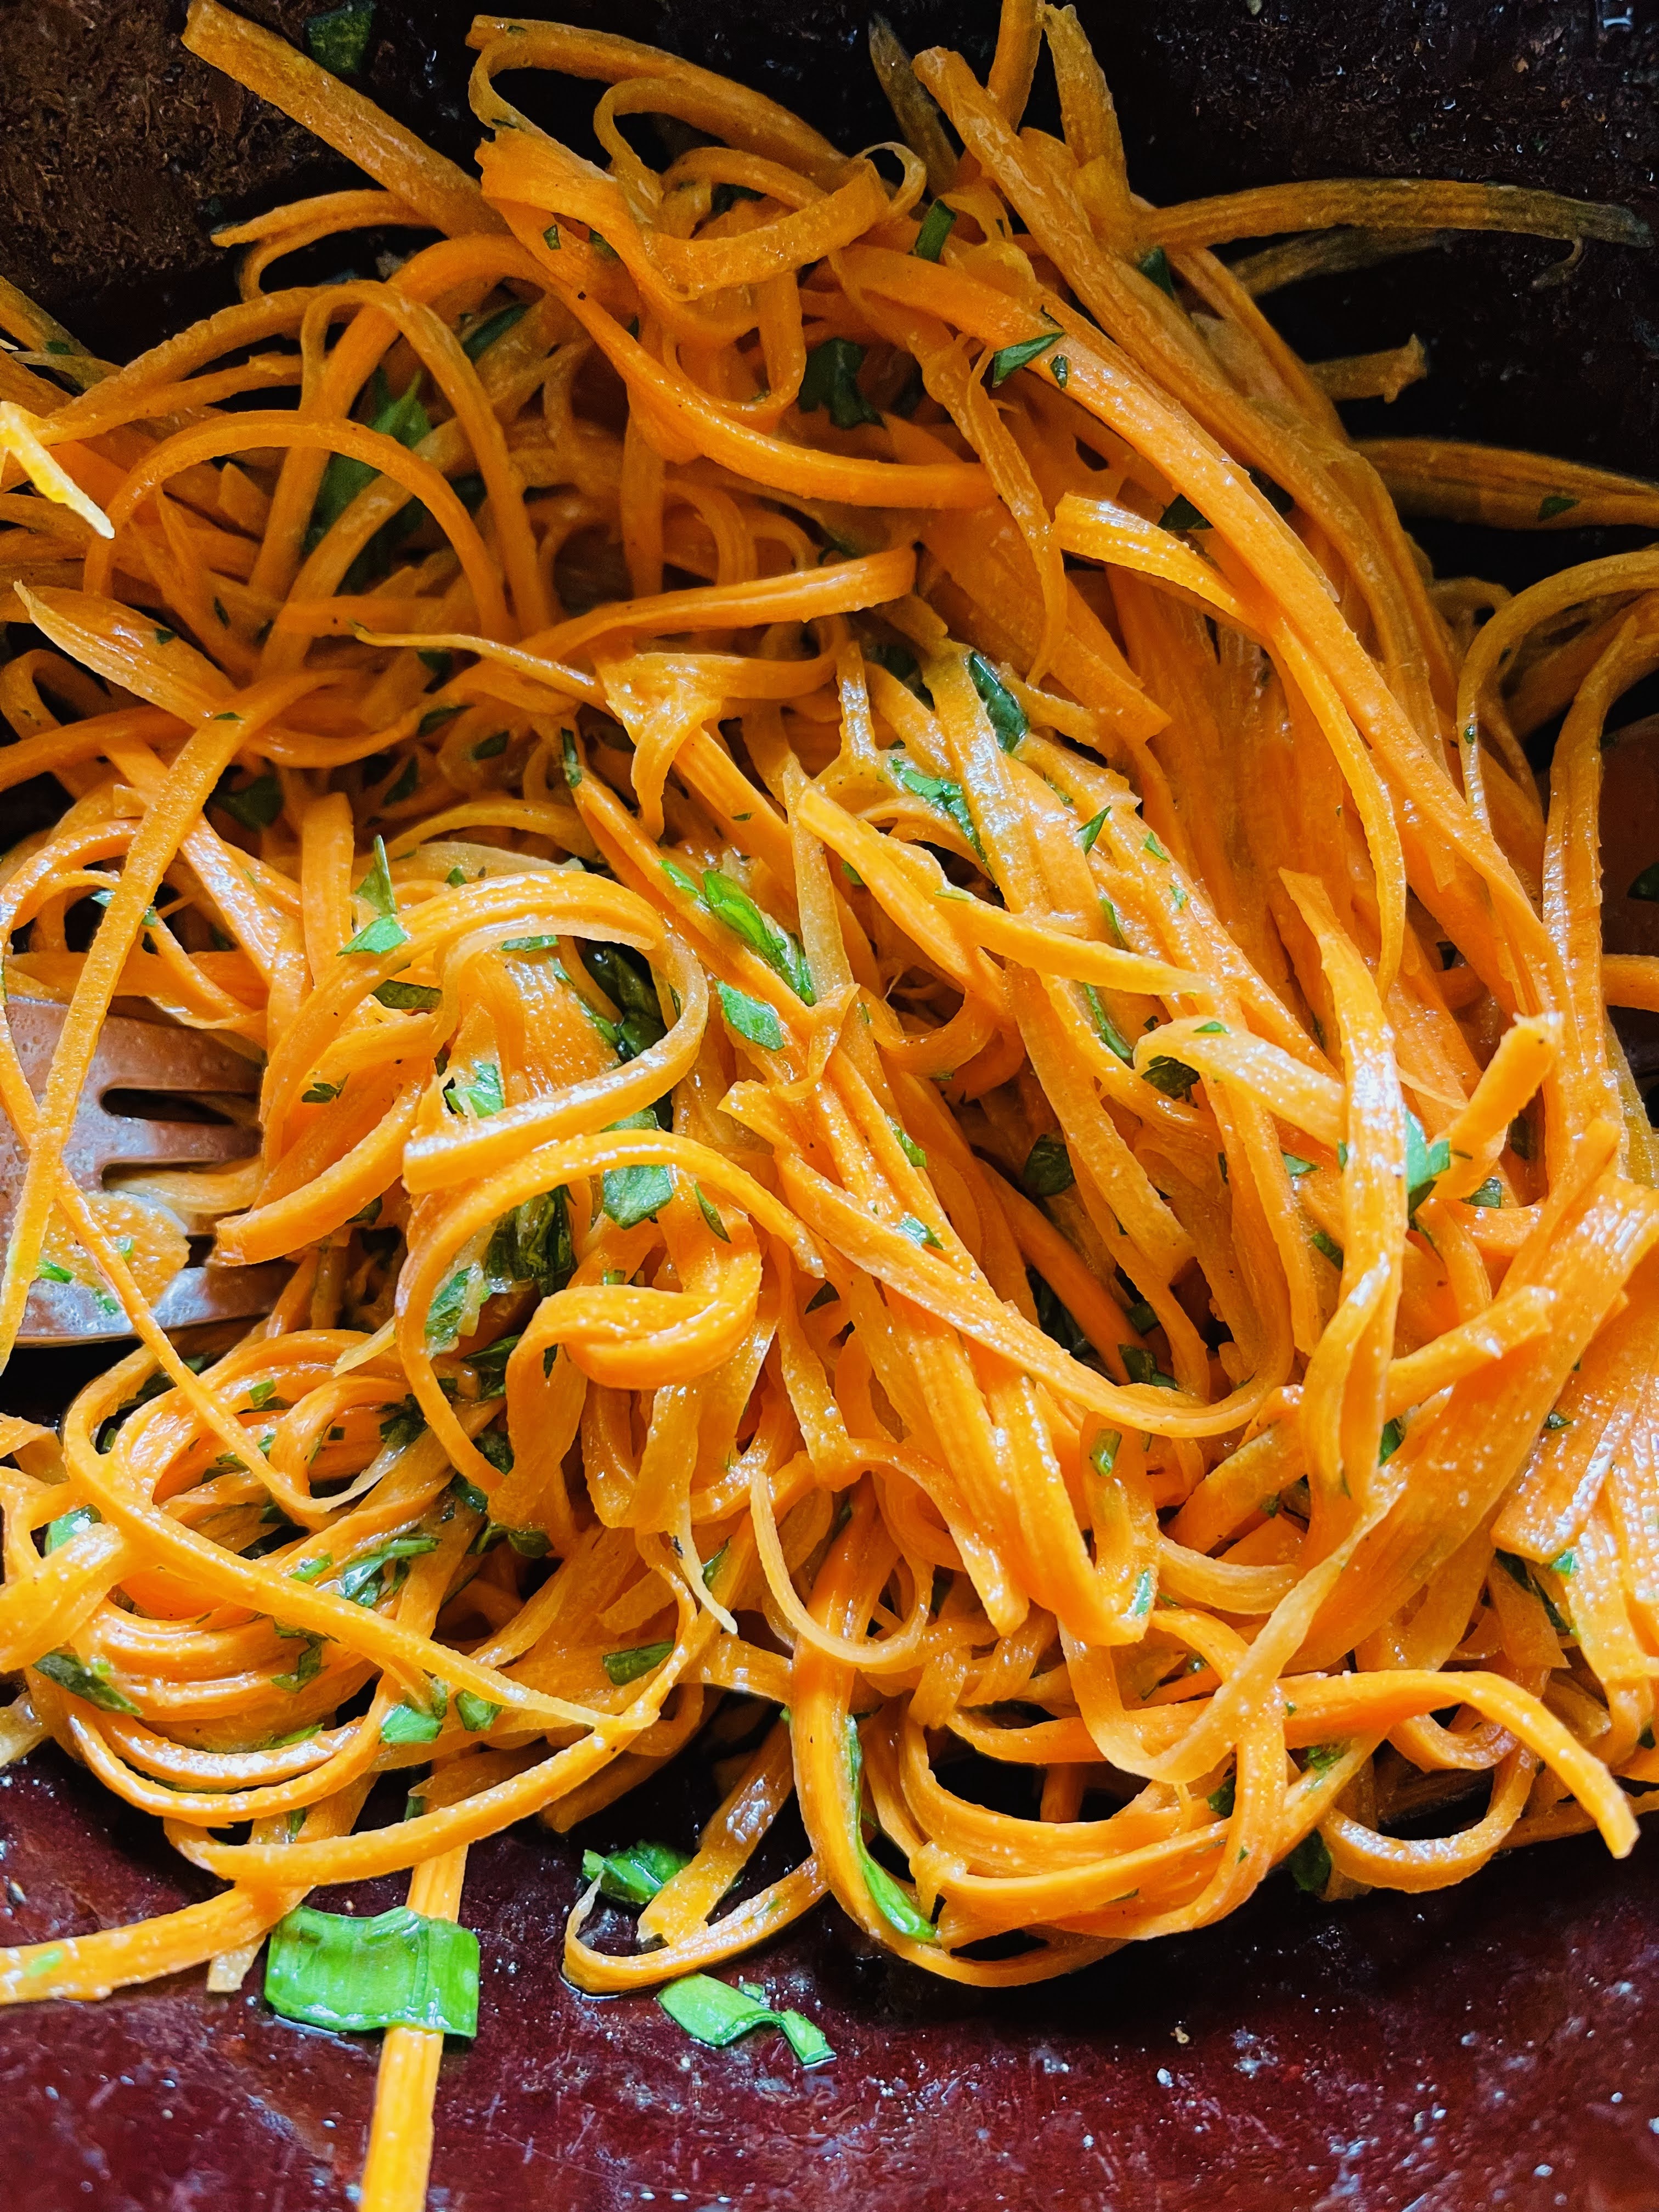
Typically, this salad uses grated carrots, but I find that they become slightly mushy when used as the centerpiece. I prefer to use a julienne peeler as it gives it more loft and texture interest. I’ve used a few of these peelers over time and have not been plused. However, I finally found one that works perfectly as advertised. The Sunkuka Julienne Peeler, is made of stainless steel and performs beautifully. This salad also holds for up to 3 days in the refrigerator.
FRENCH CARROT SALAD WITH LEMON DIJON VINAIGRETTE
INGREDIENTS:
1 pound carrots, peeled and julienned
2 scallions, sliced thinly
1/4 cup fresh parsley, chopped
2 teaspoons Dijon mustard
Juice of half a lemon
1.5 tablespoons avocado oil
1.5 tablespoons good quality extra-virgin olive oil
2 teaspoons local honey
Sea salt and freshly ground black pepper to taste
INSTRUCTIONS:
Peel and julienne carrots. Place in a large bowl. Add scallions and parsley (and any other salad ingredients you choose).
In a pint mason jar, combine avocado and olive oil, Dijon, lemon juice, honey, salt and pepper. Place lid on jar and shake vigorously. Add to salad and toss gently. Serve on a bed of lettuce.
OPTIONS:
1 can of chickpeas, drained and rinsed
1/2 cup radishes, thinly sliced
1 cup snap peas, sliced in thirds
1 cup snow peas, sliced in thirds
1/4 cup cilantro and/or mint
Serves 4
The majority of my diet is probably vegetables, but I’m not a vegetarian or vegan. –Abigail Spencer
It’s been cold here, very cold; and there’s nothing more satisfying in winter than a warm bowl of soup. I typically make a soup at least once a week. One of my favorites is anything showcasing beans. They’re cheap, healthy and hardy. With very little forethought you can serve up a soup that will delight anyone lucky enough to dig into a bowl of it. Today let’s focus on cannellini bean soup. You can get a bag of these beans for a couple bucks, which will give you a far superior result (particularly for soups) than you will get with canned. Although soaking your beans overnight is a small extra step it will allow for a much creamier texture in the end; which is one of the hallmarks of a great bean soup.
You can approach this soup in several ways to adjust for personal preferences. For example you can use either vegetable or chicken stock. One thing I can’t emphasize enough is just how important it is to use homemade stock. We all use carton stock in a pinch, but your end result will be just that, and will taste like well, carton stock. No worries though, you won’t have a swat team coming through your windows if carton stock is all you have.
I also like near the end of simmering adding some kind of green. Here, you have many options such as spinach (fresh or frozen), kale, or Swiss chard. If you are using frozen make sure to thaw and wring out as much moisture as possible before adding it to your soup. If using kale or Swiss chard, make sure to remove the thick stems are they can be rather tough, and we want to retain some healthy green color in the end result.
As far as herbs go, you can use fresh or dried; rule of thumb being 3:1 ratio. In other words, 1 tablespoon fresh, or 1 teaspoon dried.
HARDY CANNELLINI BEAN SOUP
INGREDIENTS:
2 cups dried cannellini beans, soaked overnight in water 2 inches over the level of the beans. Add 1/2 teaspoon baking soda to water.
1 medium-sized yellow onion, diced
2 celery stalks, diced
2 large carrots, peeled and diced
3 garlic cloves, pressed
2 medium-sized potatoes, peeled and cut into chunks
1 tablespoon olive oil, plus more for serving
2 tablespoons tomato paste
1/3 cup white vermouth (the alcohol will cook out once it’s evaporated)
1 tablespoon fresh rosemary
1 tablespoon fresh thyme
2 cups vegetable or chicken stock (homemade preferred)
1/2 teaspoon sweet Hungarian paprika
1-2 teaspoons sea salt, plus more to taste
1/2 teaspoon freshly ground black pepper, plus more to taste
INSTRUCTIONS:
Soak 2 cups dried cannellini beans overnight, covering the beans with 2 inches of water and adding 1/2 teaspoon of baking soda to the water. Drain the next day and place in a large Dutch oven or soup pot with a tightly fitting lid. Cover them with 3 inches of water and 1/2 teaspoon baking soda. Add 2 cloves of garlic lightly smashed, and 1 bay leaf. Bring to a boil, cover leaving a little space open for the lid and lower heat to medium-low. Cook beans for 40-60 minutes, or until soft. Drain beans and set aside.
In the same pot, warm the olive oil over medium heat. Once oil is shimmering, add the diced onion, carrot and celery. Cook, stirring often until the onion has softened and is turning translucent, about 5-7 minutes.
Add garlic, beans, tomato paste, potatoes, rosemary, thyme and paprika. Cook stirring frequently, about 1 minute.
Add the vermouth, stir well and let it simmer until it has evaporated, cooking for an additional 2 minutes.
Add stock of your choice, and a good pinch of salt and pepper. Raise the heat and bring the mixture to a boil, then cover the pot, reduce heat and cook gently for 20 minutes. When the potatoes are soft, and the soup is thick and creamy, add the greens of your choice. Stir to wilt the greens, yet keeping their color and some texture.
Taste and adjust the seasoning. You may need additional salt, depending on your personal preferences.
Ladle into bowls, and drizzle with some extra-virgin olive oil.
I think many of us would agree that in the winter, soups and stews are so comforting. There is something about their warmth and aroma that is deeply satisfying. When I’m not eating at the table, I have a particular bowl that fits nicely in the palm of my hand. I love to spoon soup from it while staring out on the landscape outside my writing window. It is then when I feel particularly satisfied on multiple levels.
Root vegetables in particular work well in soup. When you combine these with homemade stock you have something nourishing and healthy to offer your family. Maybe it just feeds our soul. One of my favorites soups that is on constant rotation is Minestrone. It can literally be any combination of vegetables you choose or have on hand. Add some beans and greens and you are all set.
BRICKYARD FARMS MINESTRONE
INGREDIENTS:
1 medium onion, chopped
3-4 cloves garlic, minced
3 tablespoons olive oil
2 cups sweet potatoes, cut in cubes
2 cups carrots sliced on the bias
2 cups zucchini, cubed
2 quarts homemade chicken or vegetable stock; or 2 cartons organic stock
1 (15 oz) can fire-roasted tomatoes with juice
1 (15 oz) can cannellini beans, drained and rinsed
2 teaspoons Italian seasoning
4 cups baby spinach OR Swiss chard OR kale, stemmed and chopped
Freshly grated Parmesan or pecorino cheese (optional)
INSTRUCTIONS:
In a large pot over medium-high heat, saute onions and garlic in olive oil until soft and translucent. Add carrots, sweet potatoes and zucchini and saute for 4-5 minutes.
Add stock, tomatoes with juice and Italian seasoning. Bring to a boil, then turn down to medium-low and simmer until sweet potatoes and carrots are soft, about 25 minutes.
Add cannellini beans and spinach (or whatever green you choose) simmer just until greens wilt.
Ladle into bowls and top with Parmesan or pecorino.
Serves 6-8
“To feel safe and warm on a cold wet night, all you really need is soup” –Laurie Colwin
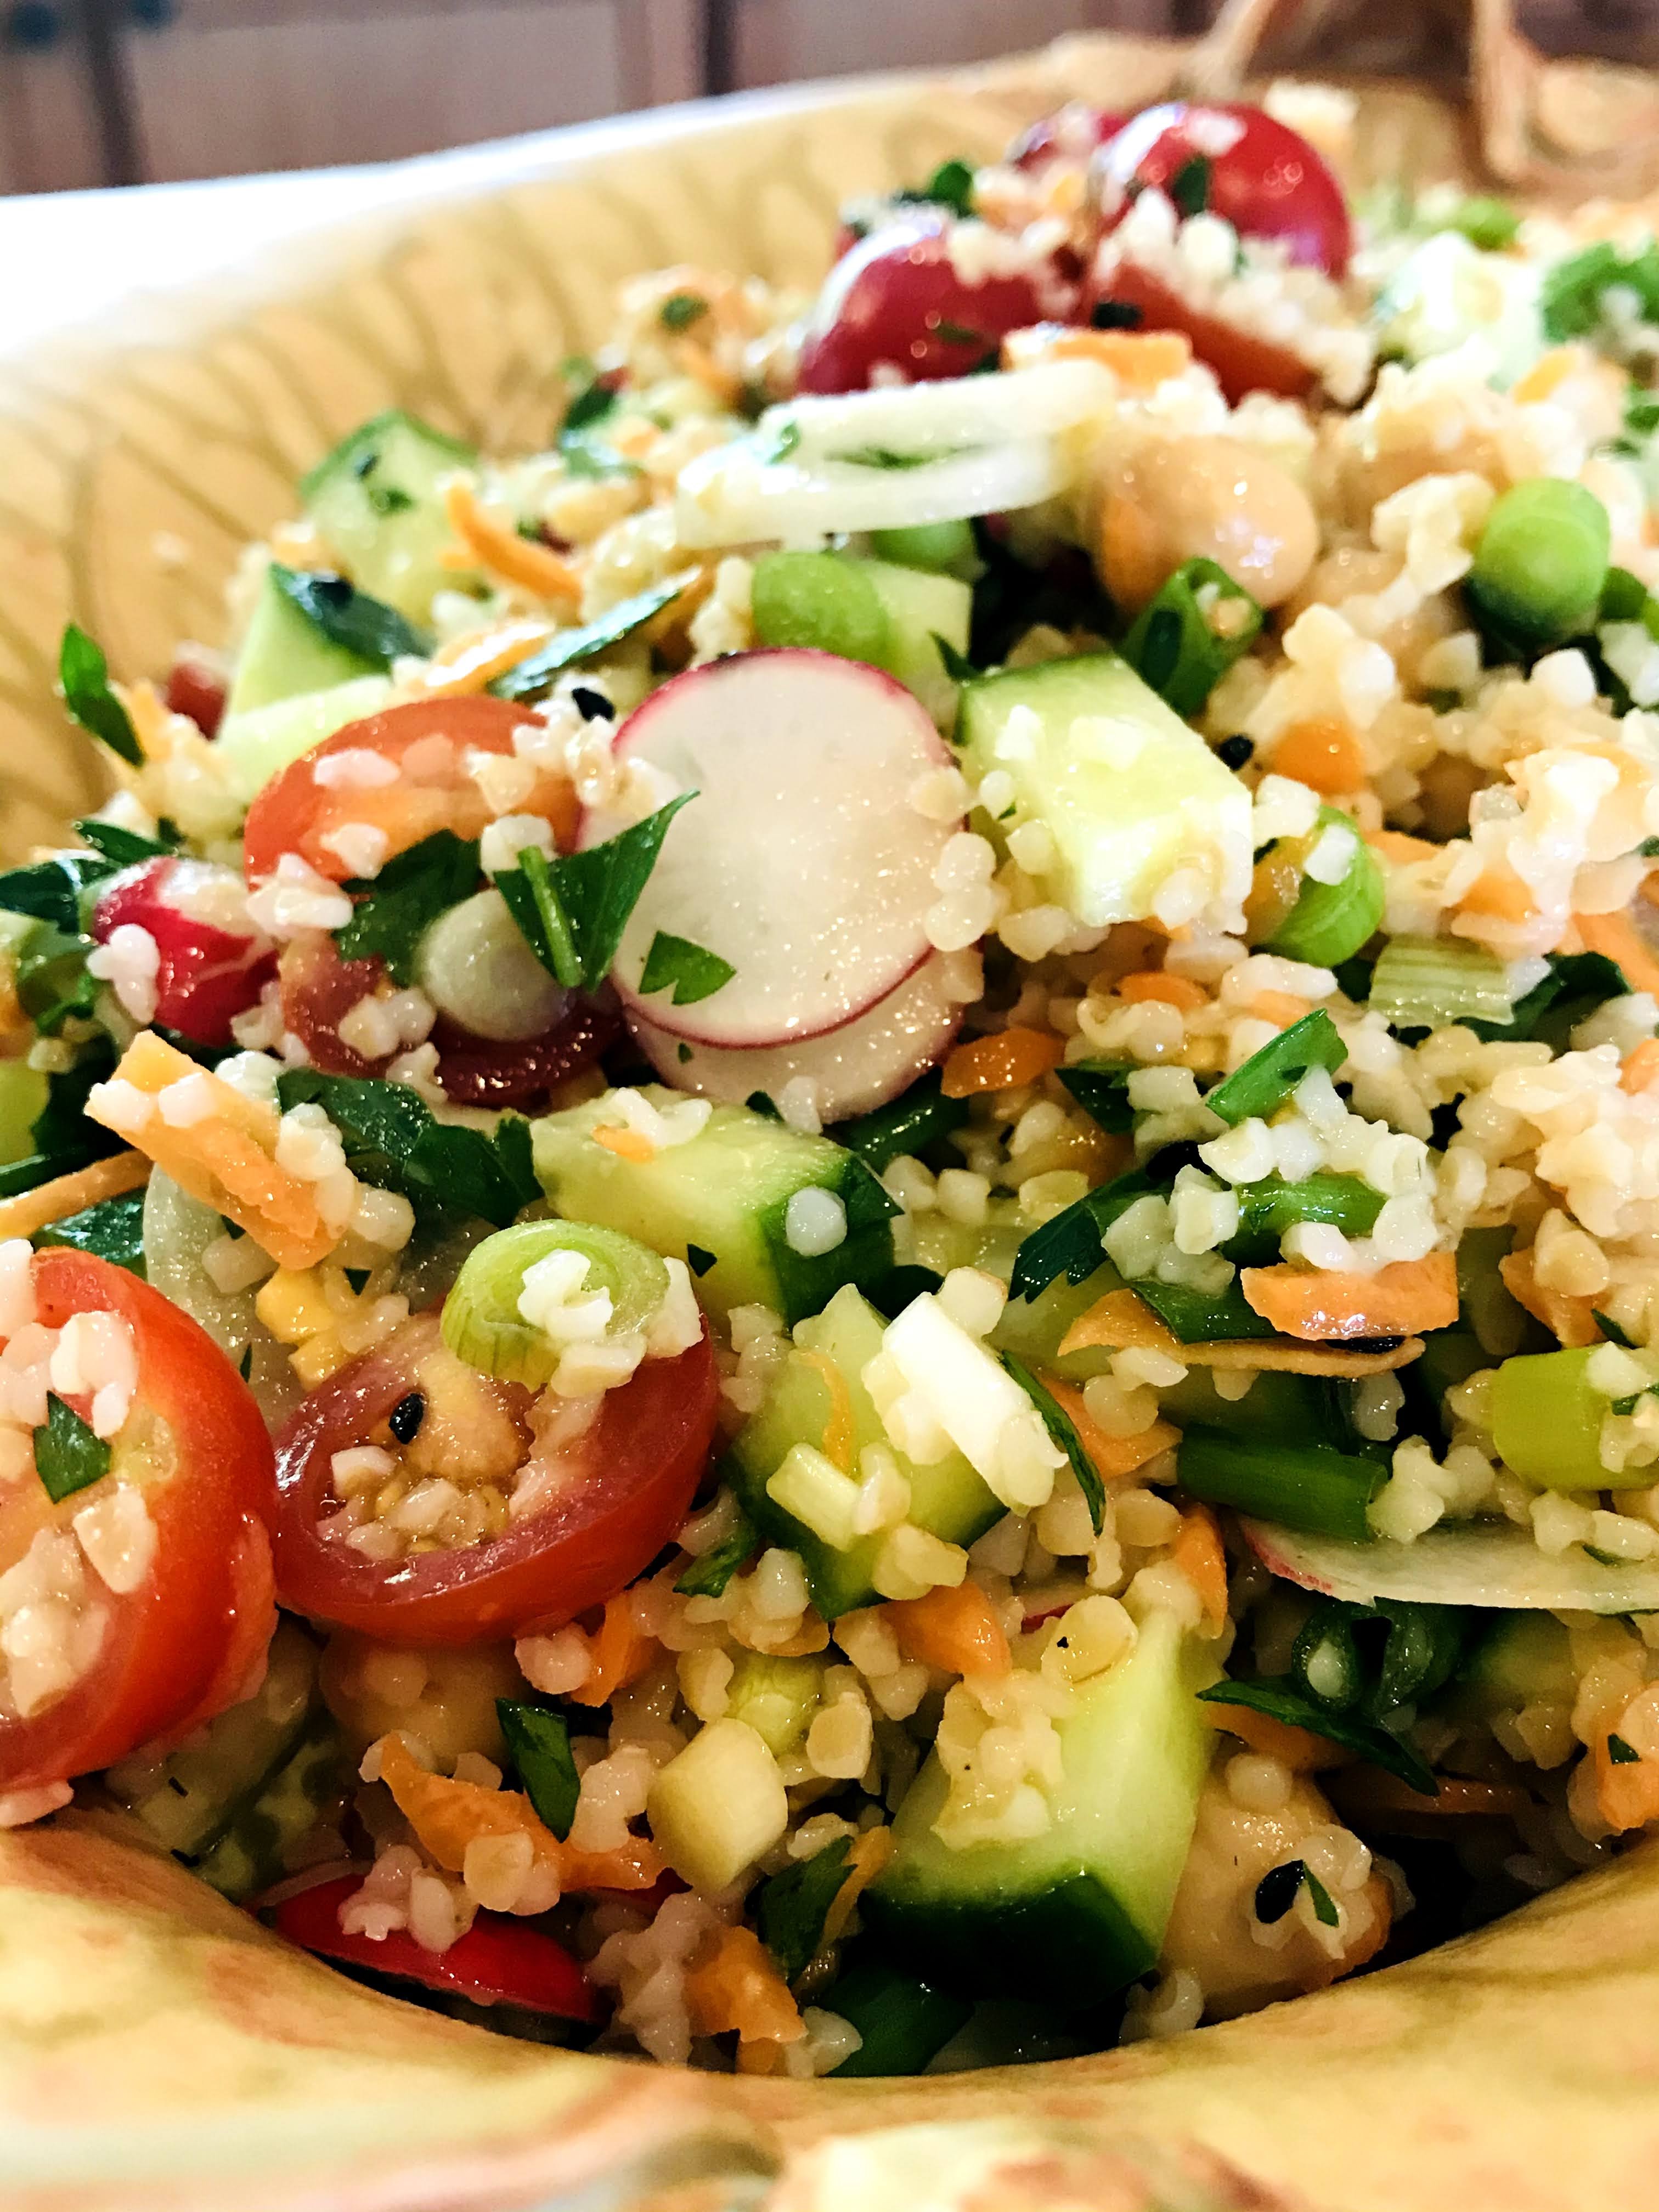
When we’re busy on the farm in the summer, it’s good to have some go-to salads that can be made in advance, and eaten over several days if need be. This a riff on tabbouleh, a Lebanese salad from the Middle East, made primary with bulgur and parsley. Bulgur is made from parboiled or steamed wheat kernels/berries that are then dried, partially stripped of their outer bran layer, and coarsely ground. The result of this process is a highly nutritious grain that cooks relatively quickly. There might be as many recipes for tabbouleh as their are cooks. The ratio of fresh parsley to bulgur is one of the reasons.
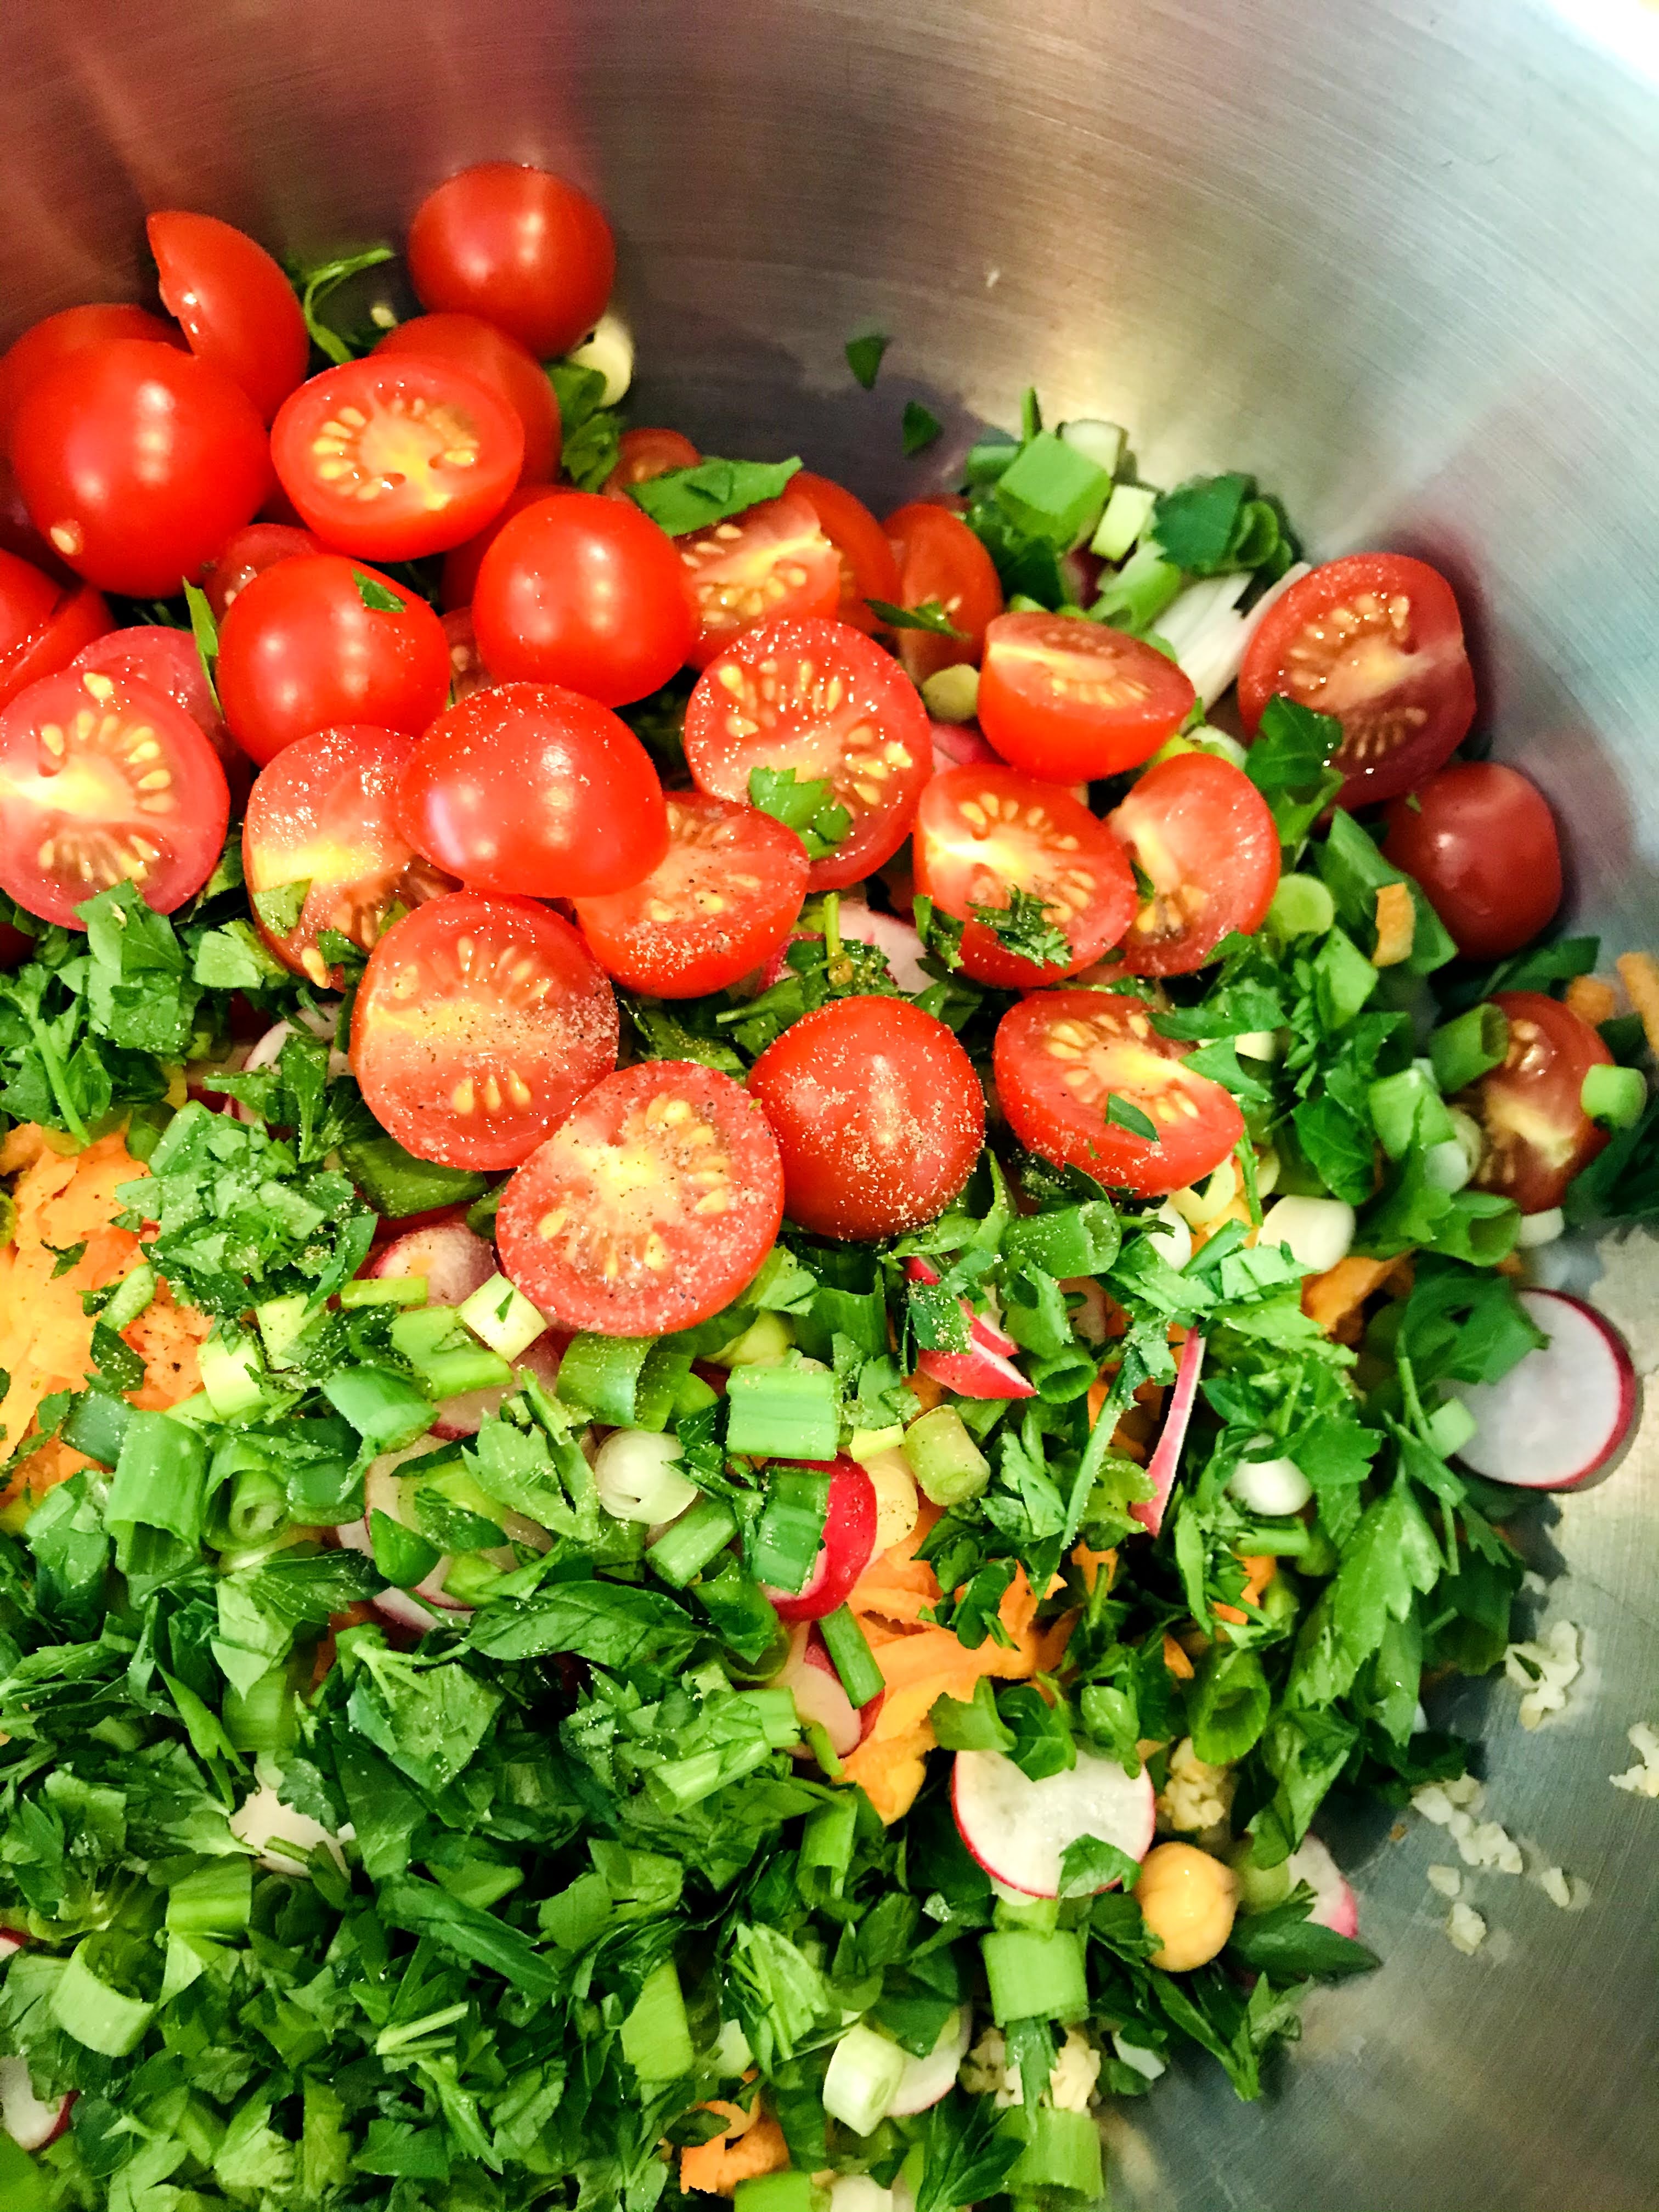
Traditionally tabbouleh is made with bulgur, tomatoes, cucumber, green onions, parsley and mint. Since we are vegetable farmers, I like to load mine up with additional ingredients like radish, grated carrot, and chickpeas. I also like to use a little more bulgur than they might use in the Middle East, making it packed with fiber rich whole grain, complex carbohydrates, and healthy fats.
Although most recipes call for a medium-coarse, or #2 bulgur, I like to use a fine bulgur or #1 for my tabbouleh. If you enjoy a more chewy grain, use the #2 medium-coarse. Either way, 1 cup dried bulgur will yield 4 cups cooked bulgur. I buy my fine bulgur from a Middle Eastern grocery store. At any rate you can adjust proportions and ingredients to your personal preferences, however non-traditional it may be. Just don’t omit the bulgur or fresh parsley altogether. Tabbouleh, although best when fresh, will keep in the refrigerator up to 3 days.
BRICKYARD FARMS TABBOULEH
INGREDIENTS:
1 cup bulgur, #1 or #2
1 can chickpeas, rinsed
1 pint cherry tomatoes, halved
1 medium cucumber, sliced 1/4 inch, then quarter slices
4 green onions, sliced using both white and green parts
6-8 radishes, sliced
2-3 carrots, peeled and shredded on large holes of box grater
1 large bunch curly parsley, chopped
6-8 large mint leaves, chopped
1/2 cup fresh lemon juice
1/2 cup extra-virgin olive oil (quality matters here)
INSTRUCTIONS:
If you are using fine or #1 bulgur: Place 1 cup bulgur in large bowl. Boil 2 cups of water and pour in over the bulgur. Let rest for 10-12 minutes. Fluff with a fork. I like to place it in the refrigerator for about an hour to cool it down. You can also just let it cool in the bowl.
If you are using medium-coarse #2, place 1 cup bulgur in a heavy pot and add 2 cups water, and 1/4 teaspoon kosher salt (optional). Bring to a boil, then turn down to low and cover. Cook for 12 minutes. Take of heat and let stand for 10 minutes more. Fluff with a fork. Let cool to room temperature or place in refrigerator for one hour.
To the cooled bulgur add your halved cherry tomatoes, cucumber, green onions. radishes, chickpeas, grated carrots, chopped parsley and mint.
In a separate bowl or pint mason jar, mix together the lemon juice and extra-virgin olive oil. Mix with a whisk, or shake vigorously to emulsify. Pour 1/2 of dressing over tabbouleh. Mix thoroughly. Add additional dressing just before serving.
Serves 6-8
“What is more refreshing than a salad, when your appetite seems to have deserted you?” –Alexis Soyer
During the fall and winter there is nothing I enjoy more than a steaming bowl of soup. Commercial stocks are inexpensive, plentiful and convenient, but they will never replace homemade. I typically make 36 quarts of chicken, and 24 quarts of vegetable stock each season, and freeze it for future use. Not only does the house smell terrific while it simmers, it is the foundation for all sorts of delicious meals that include soups, stews and risotto. I find that vegetable stock in particular, benefits from a little love and attention to the ingredients.
If you roast or brown the vegetables before you assemble the stock, the caramelization improves the flavor profile. Adding dried porcini mushrooms and tomato paste will impart a savory or umami element that deepens the end result. Unlike chicken stock which is simmered up to 24 hours, vegetable stock is simmered no longer than 90 minutes. The addition of herbs and onion skins add flavor and color to the stock.
VEGETABLE STOCK
INGREDIENTS:
1 ounce dried porcini mushrooms
4 tablespoons olive oil
4 cups chopped onion (save the skins)
2 cups chopped celery
3 cups chopped carrot
2 cups chopped parsnip
1 cup chopped fennel bulb
2 large garlic cloves, smashed (can leave skins on)
1 tablespoon tomato paste
1 tablespoon fresh rosemary
2 teaspoons dried thyme
1 teaspoon black peppercorns
4 bay leaves
1/2 cup chopped parsley
2 large handfuls spinach
INSTRUCTIONS:
Rehydrate dried mushrooms. Place the dried mushrooms in a 4 cup glass Pyrex measuring cup and pour 4 cups boiling water over them. Set aside.
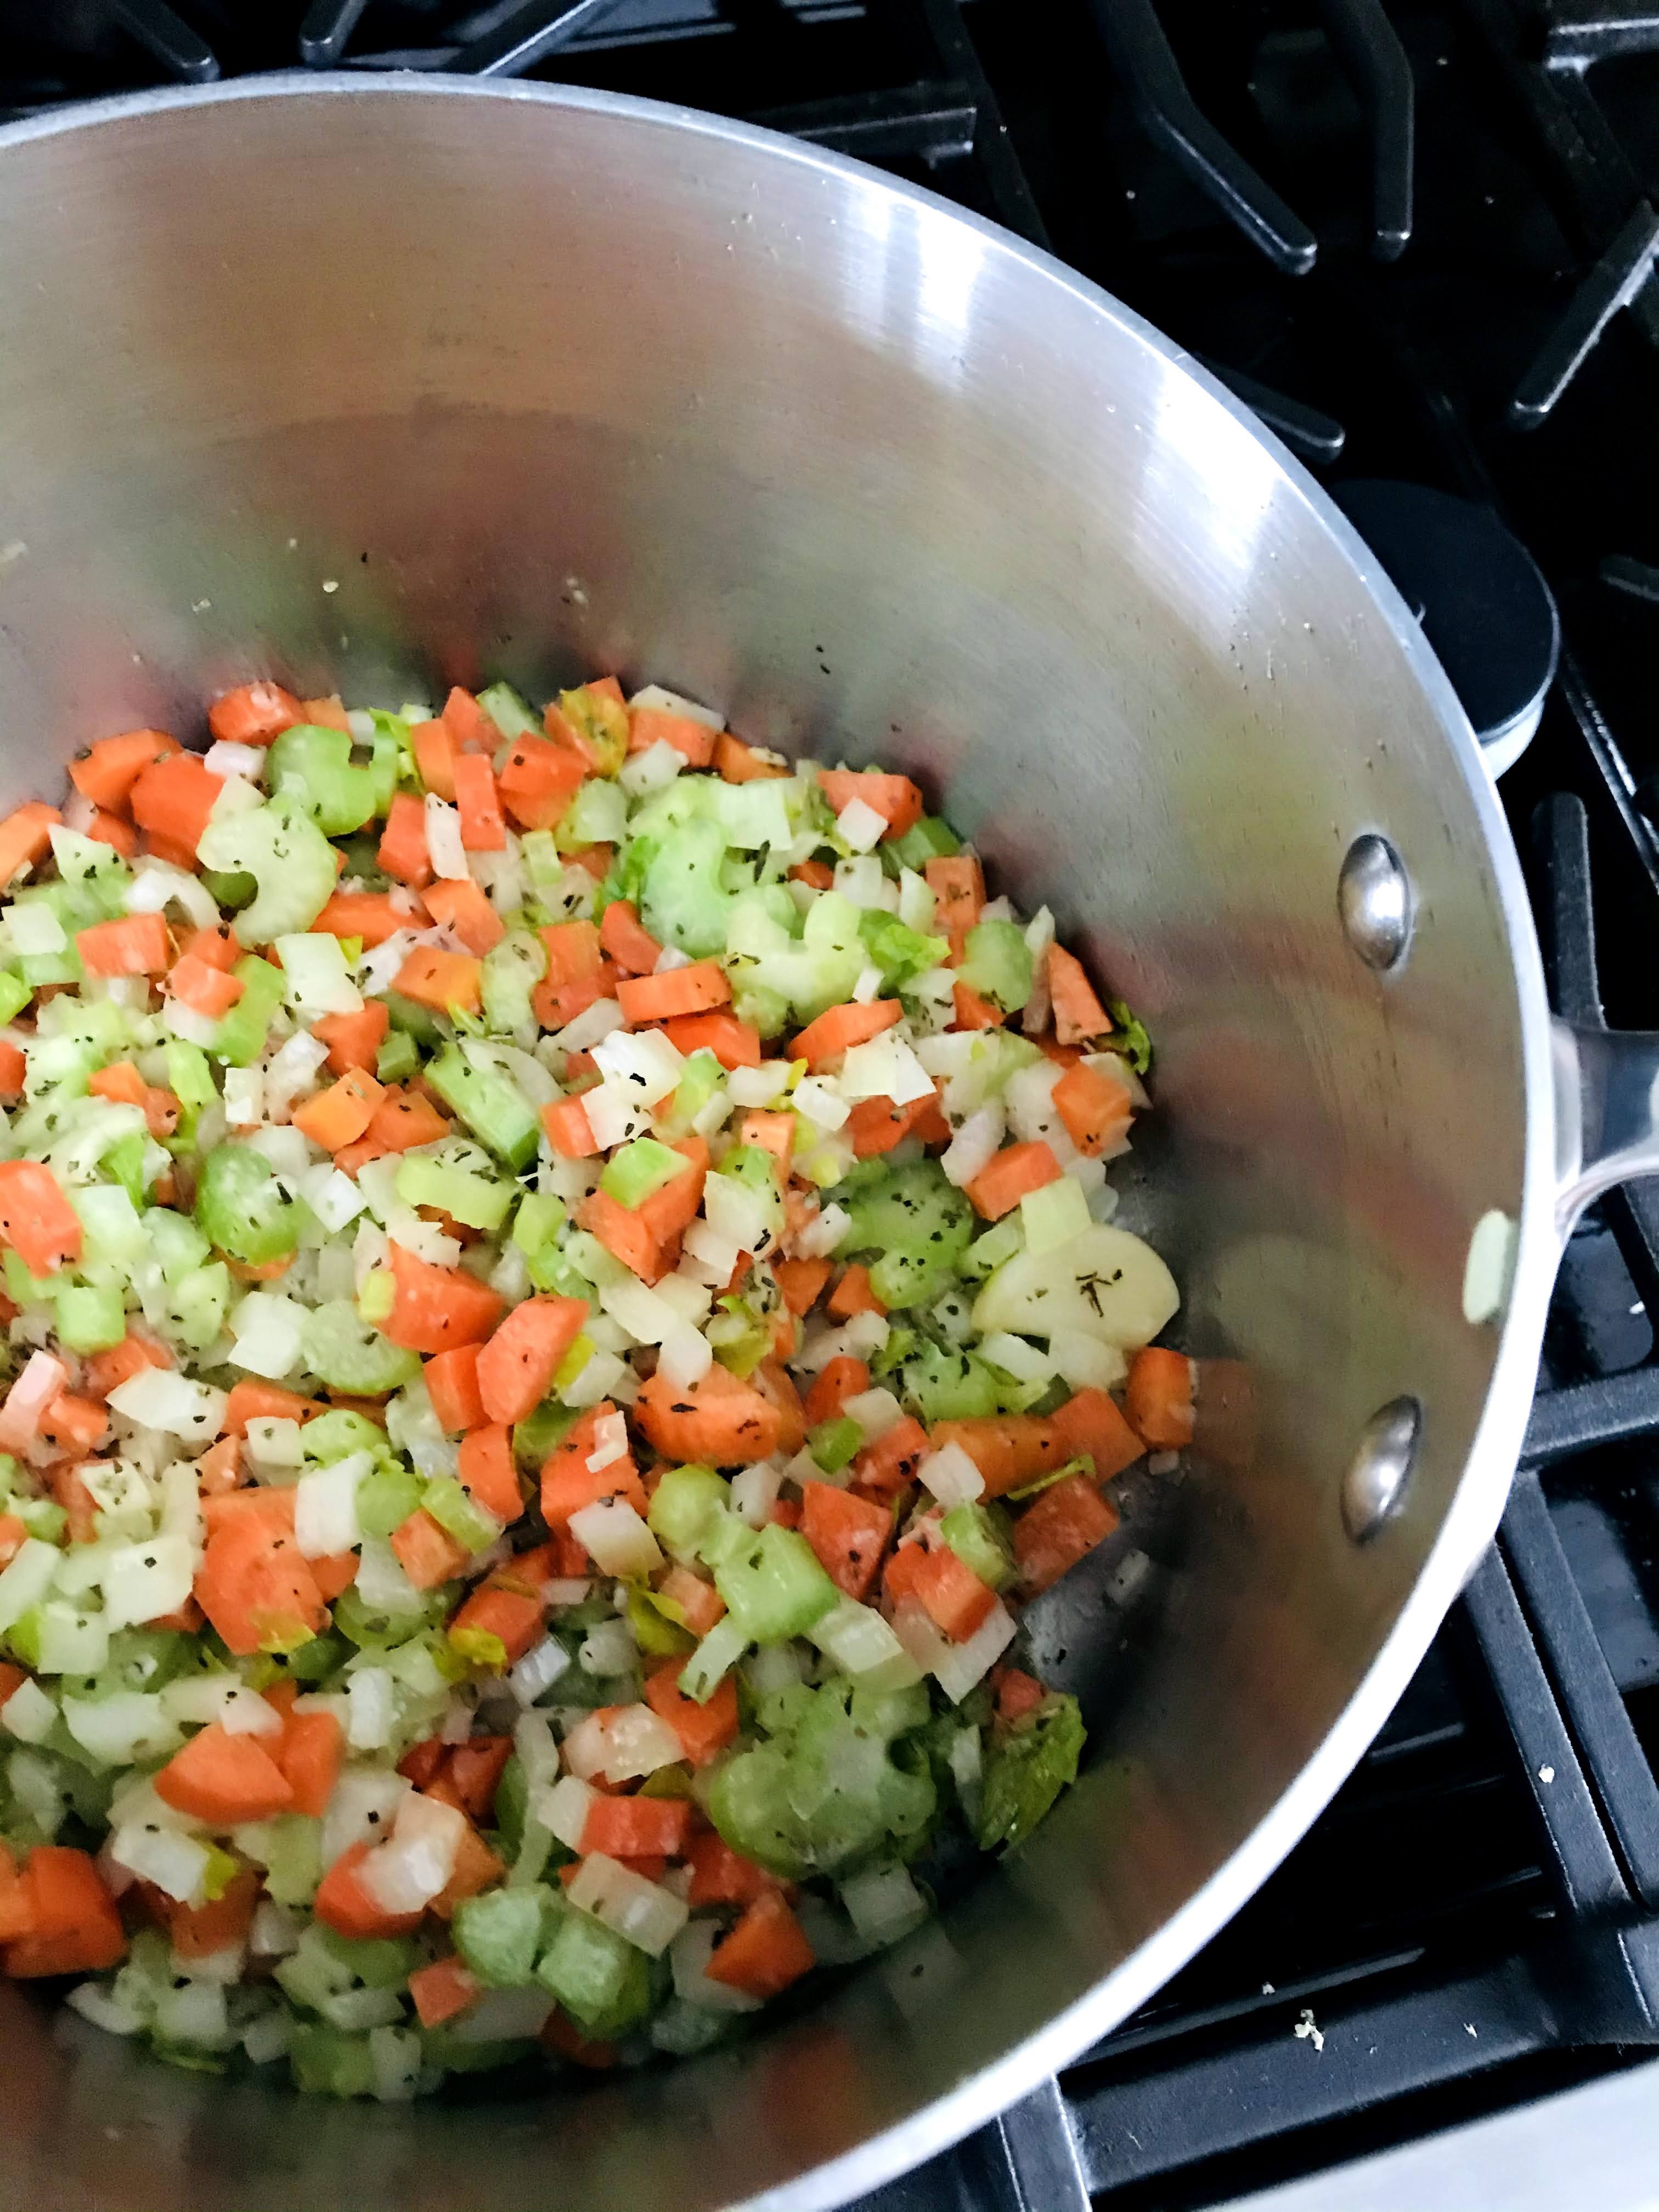
Brown the onions, celery, carrots, parsnips and fennel. Heat the olive oil over high heat in a large stockpot. Add the chopped vegetables and stir to coat. Sprinkle with salt. Cook over high heat for several minutes, stirring only occasionally. Be patient with the browning of the vegetables, as they have a high moisture content. It may take 10-15 minutes or longer to brown them.
Add the garlic and tomato paste and stir to combine. Cook, stirring often, for 2-3 minutes, or until the tomato paste begins to turn a rusty color.
Add the mushrooms and their soaking water, the rosemary, thyme, onion skins, peppercorns, bay leaves, parsley and 4 additional quarts of water. Bring to a simmer, then lower heat to low. After 45 minutes add spinach. Continue to simmer for a total of 90 minutes.
Strain the stock with a basket skimmer or slotted spoon, removing all the big pieces of vegetables and mushroom. Discard or compost. Set up a large bowl with a wire mesh strainer in it. Line strainer with a layer of cheesecloth. Using a ladle or 2 cup measuring cup, pour stock through strainer. When the liquid slows down, you may have to change the cheesecloth.
Pour into jars, or 1 quart plastic deli containers and chill or freeze. Make sure you leave 1 1/2 inches of headspace if freezing.
Yields: 4-5 quarts
“The secret to change, is to focus all your energy not on fighting the old, buton building the new.” –Socrates
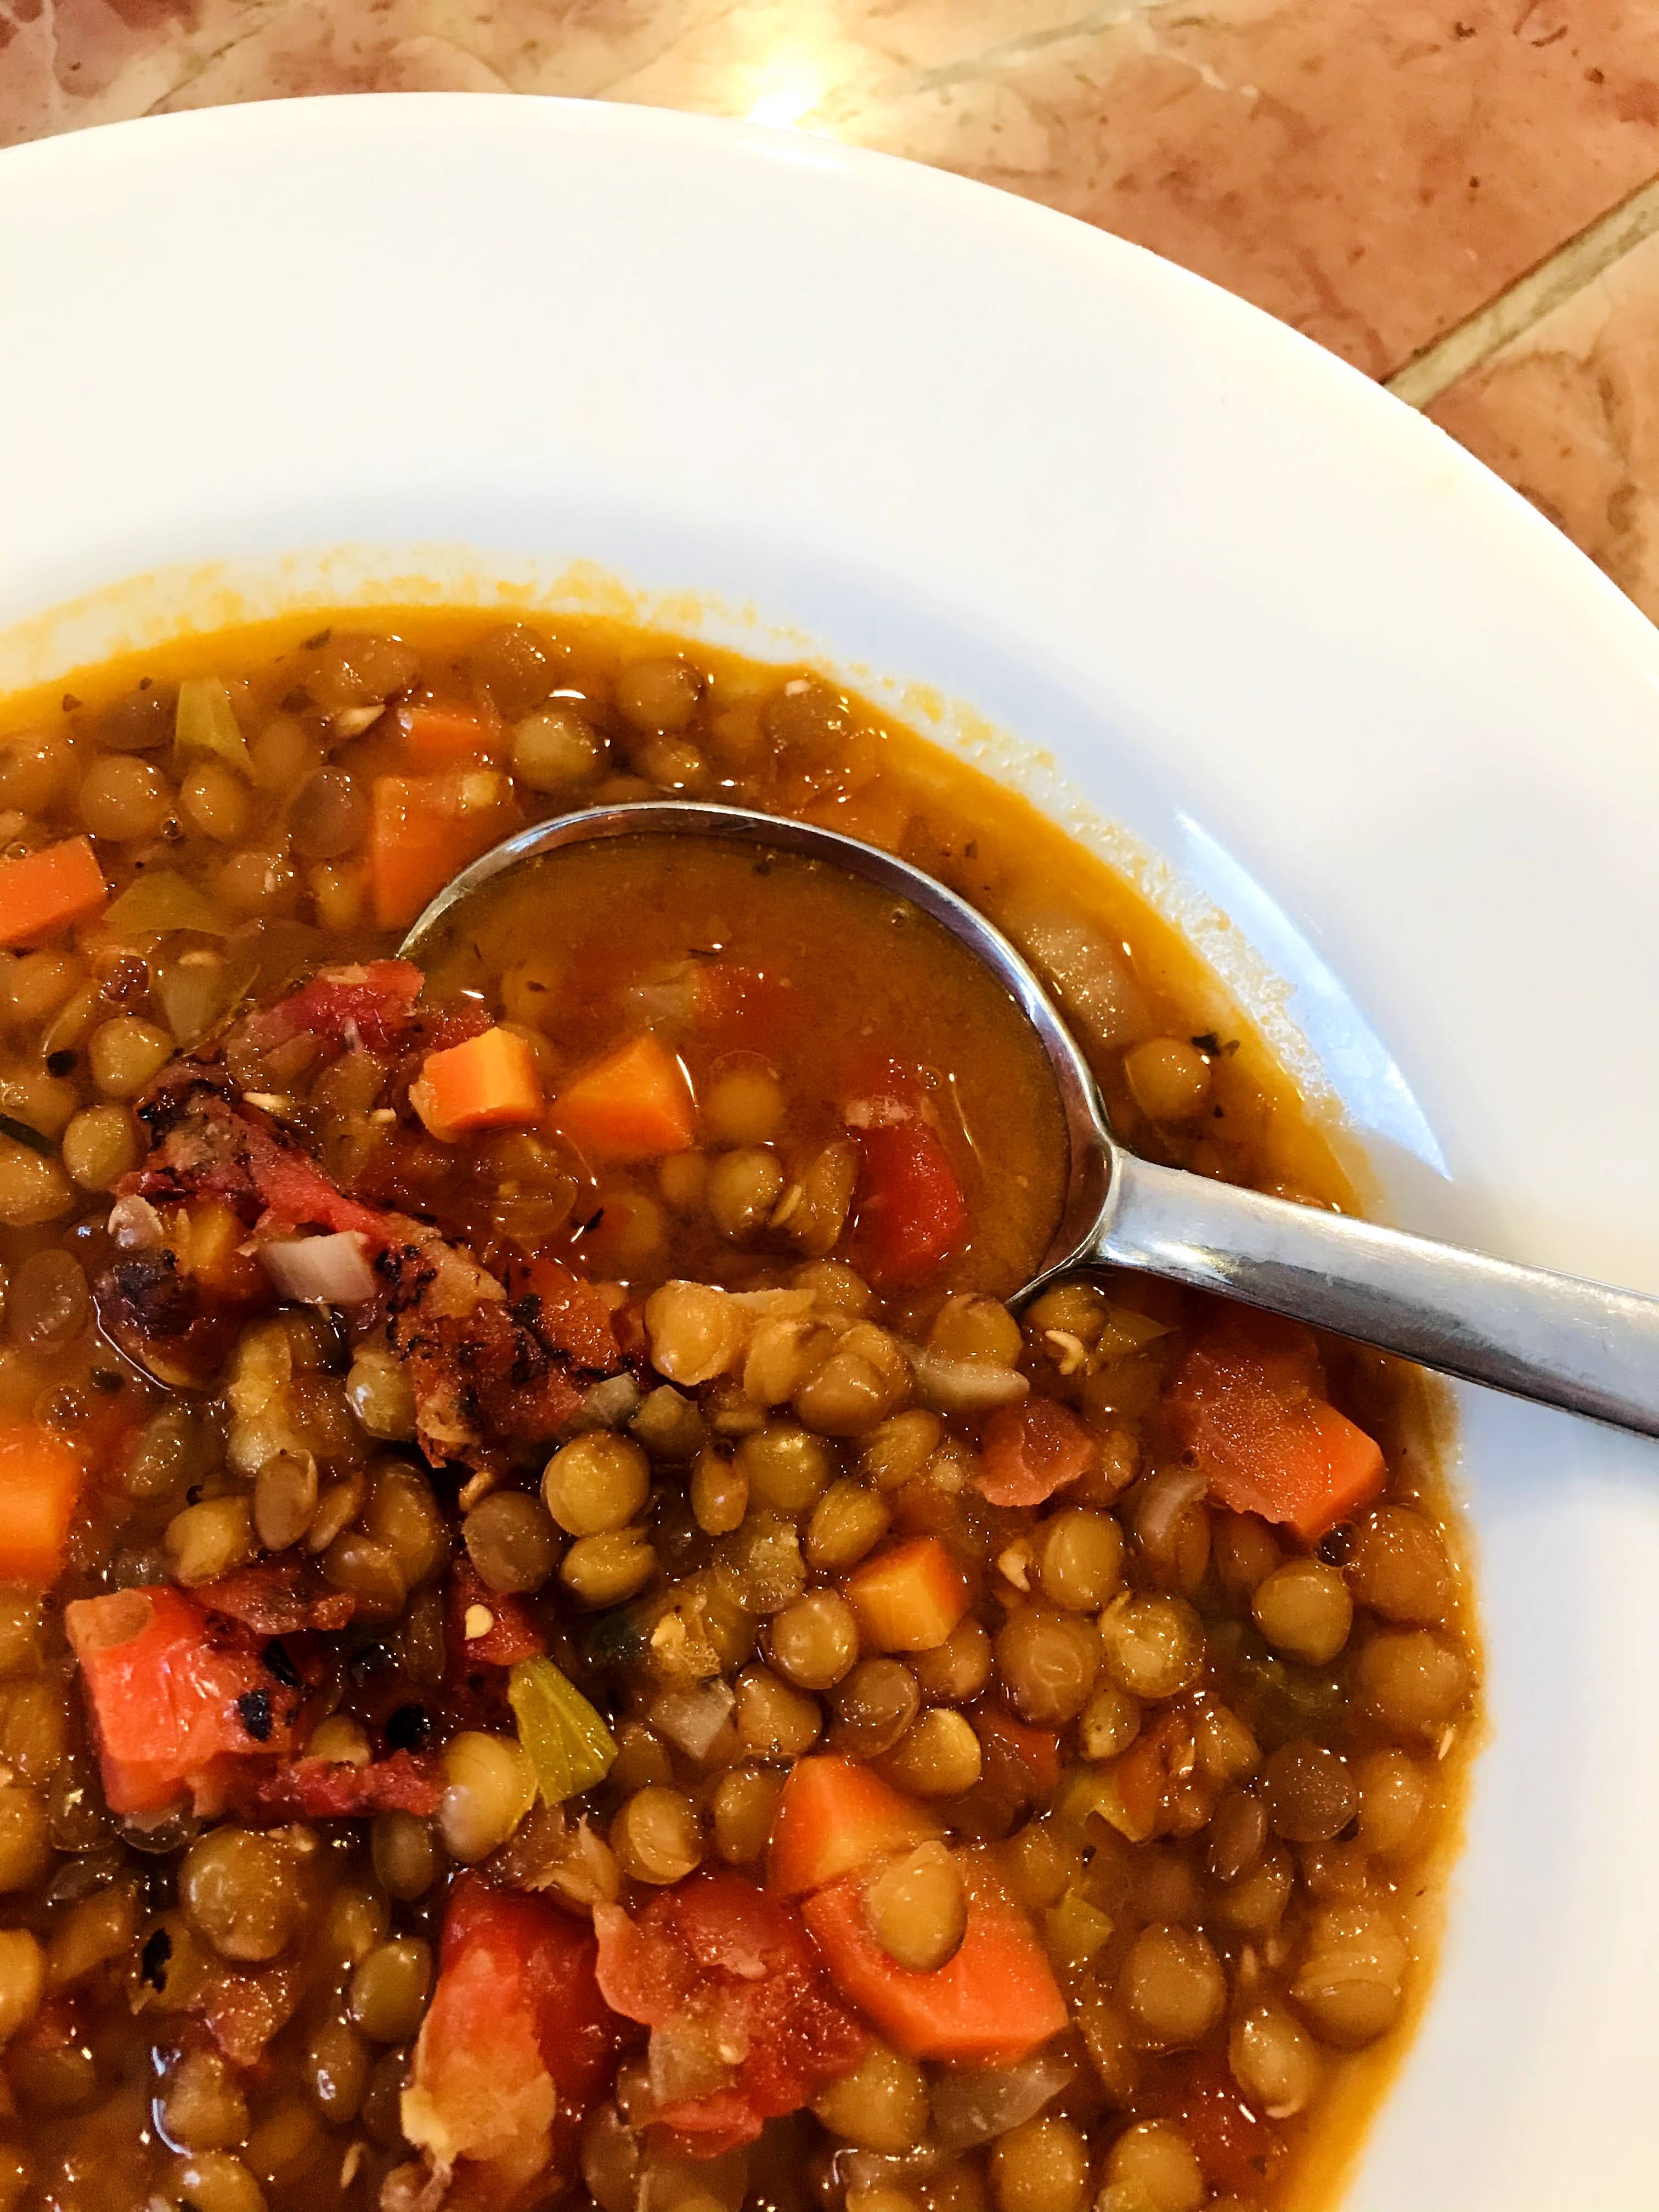
When it comes to food that is inexpensive, versatile, nutrient rich and a pantry staple, nothing can beat beans and legumes. They can be a base for anything from bowls, to entrees, to salads and soups. The two I use the most are chickpeas and lentils. They are cousins and their history dates back to 6000 B.C. Both chickpeas and lentils are still a staple in the Middle Eastern and Indian diets, and are featured in many cuisines throughout the world. They are considered a superfood as they are rich in protein, and are often used as a meat replacement in vegetarian diets. If paired with brown rice or a whole grain they are a complete protein.
Lentils come in a variety of colors, such as brown, green (lentils du Puy), gold, red and even black. Used in French bistro cuisine, they became a favored ingredient. Red lentils cook the fastest and break down quickly, while brown are typically used for soups. Green du Puy hold their shape and are favored for salads. Before using lentils, it is prudent to sort through them for unwanted pebbles or debris. I simply pour them onto a sheet pan and look them over, then transfer them to a wire colander and give them a rinse. The following recipe is beautifully earthy and comes together quickly, making it perfect for a week night. I usually make a large batch, since it freezes well. That way I can thaw a quart and have it on the table without much notice.
COUNTRY LENTIL SOUP
INGREDIENTS:
1 pound bag of brown lentils, picked over and rinsed
8 cups vegetable stock (homemade if possible) or water
2 tablespoons olive oil
1-1/2 cup celery, sliced
1-1/2 cup carrots, cut into small cubes
1 medium yellow onion, chopped
1 teaspoon dried Italian herb blend
1 15.5 ounce can fire roasted tomatoes (I like Muir Glenn)
Kosher salt and freshly ground black pepper to taste
2 tablespoons red wine vinegar
INSTRUCTIONS:
In a large stock pot or Dutch oven, heat olive oil on medium-high. Add celery, carrots and onions to pot and sauté until onions are soft, about 8-10 minutes. Add Italian seasoning and mix.
Next add the rinsed lentils, and mix thoroughly. Add the vegetable stock or water and mix again. Bring to a boil, then cover slightly ajar and simmer on low for 40-50 minutes. Taste lentils to seen if they are soft. If not continue to simmer an additional 10-15 minutes or until done.
Add the tomatoes and their juice. Mix, then heat about 5 minutes. Season with salt and pepper.
Off heat, add red wine vinegar. Ladle into bowls.
Serves: 8-10
“Kindness is like snow—it beautifies everything it covers.” –Kahlil Gibran