Tag Archives: olive oil

Les Carottes, Oui!

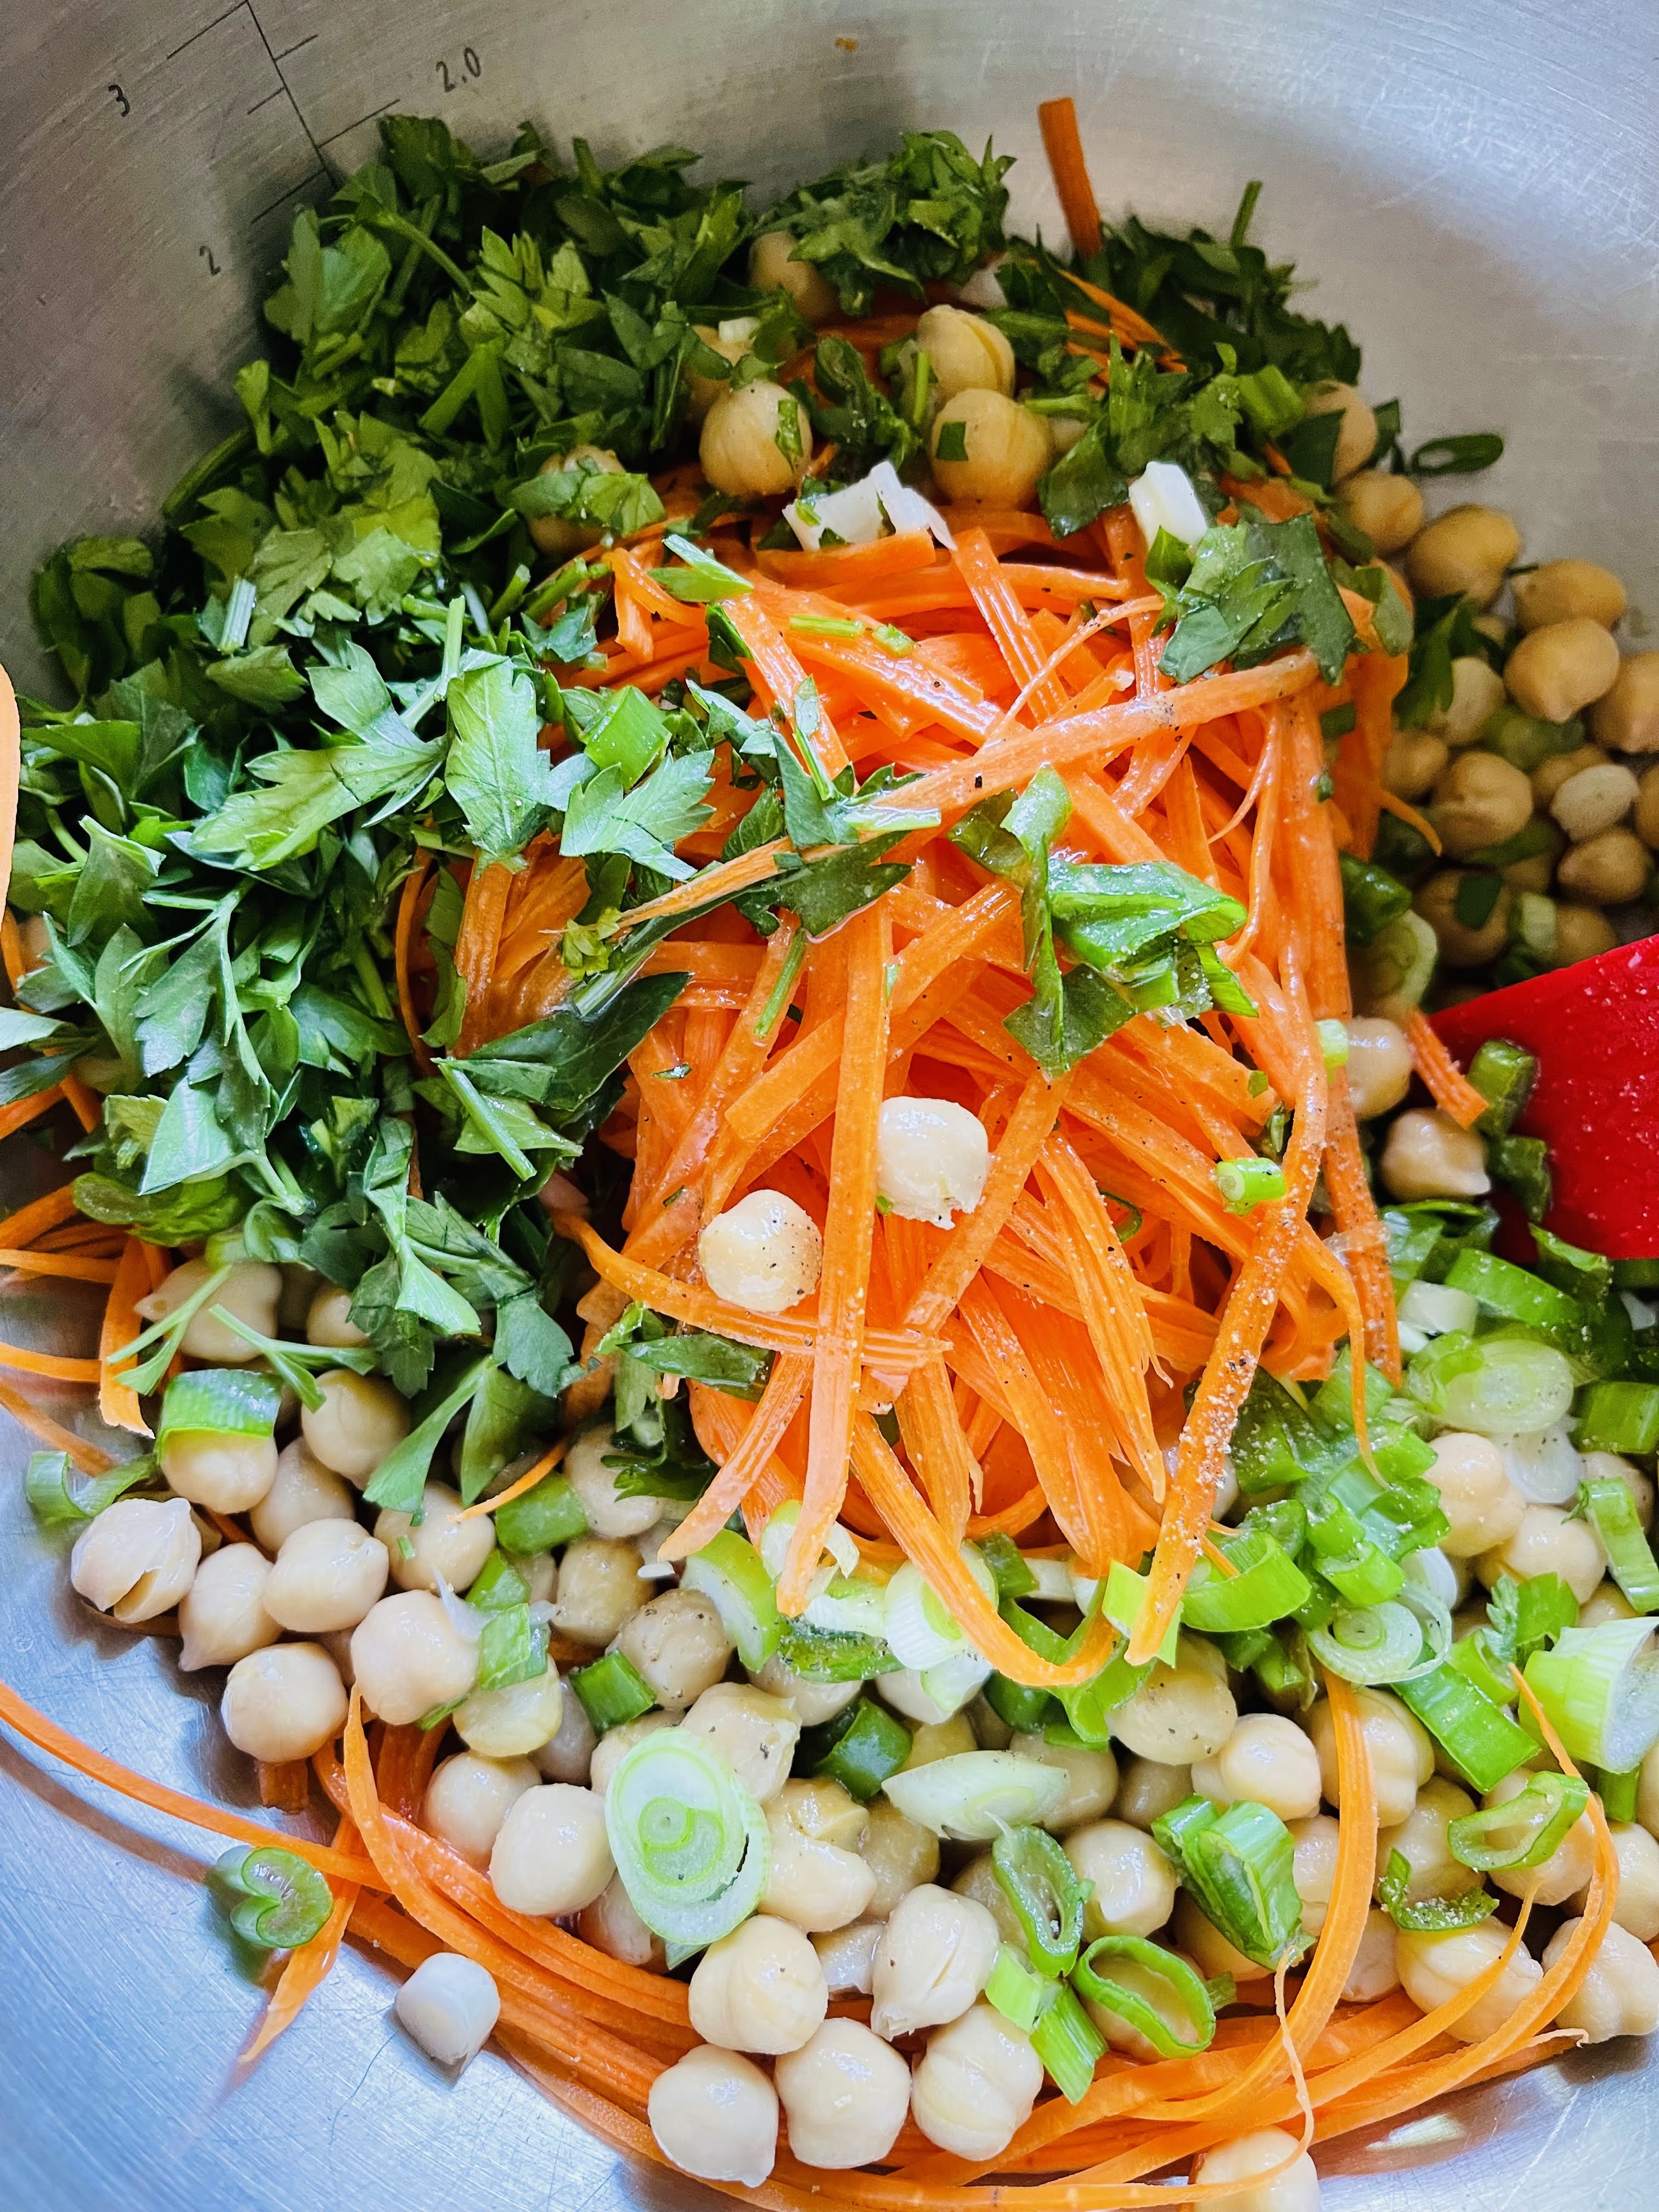
I have always appreciated the versatility of vegetables, as the possibilities are endless. It certainly doesn’t hurt that we are vegetable farmers. There are times when fresh, simple ingredients will make combinations shine. The French are masters of this approach to cooking. This is a salad that can be tweaked on so many levels. Herb choices can be varied, such as parsley, mint, cilantro, or a mixture. If you want to bulk it up, it’s so easy to add chickpeas or cannellini beans. You could add sliced radishes, snap peas, or snow peas. Think color and texture. Frankly, I can’t get enough of this salad!

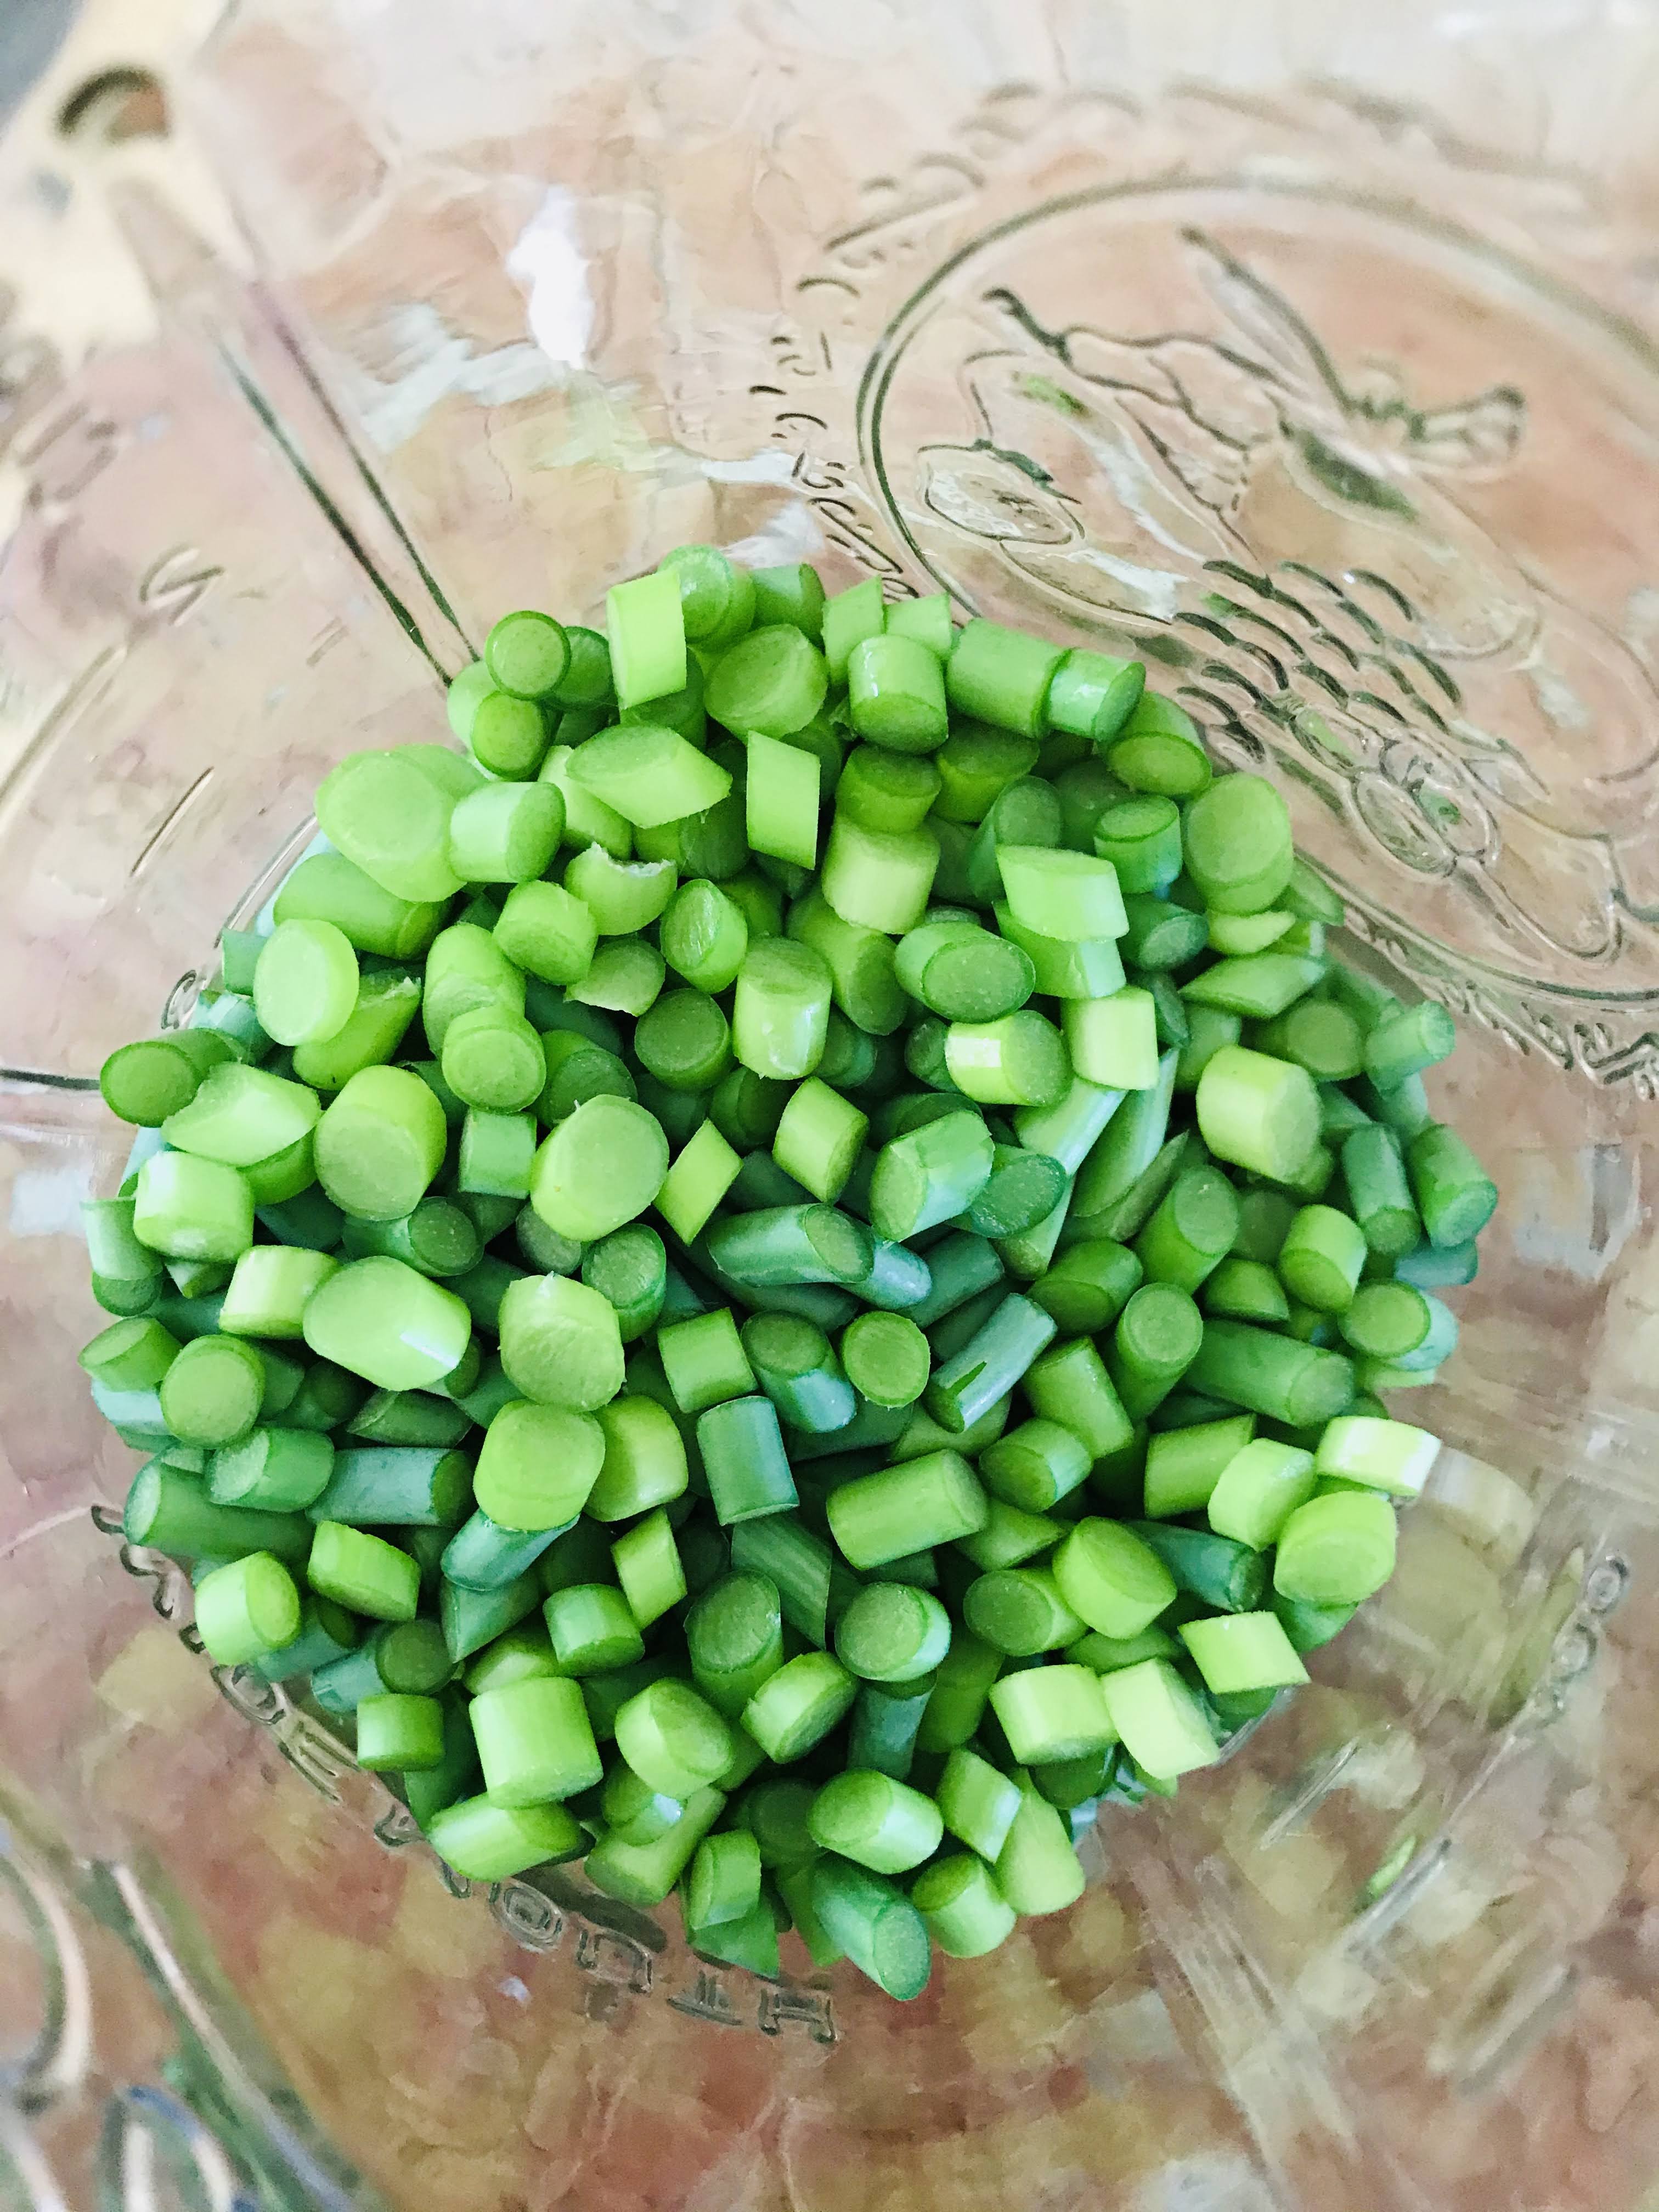
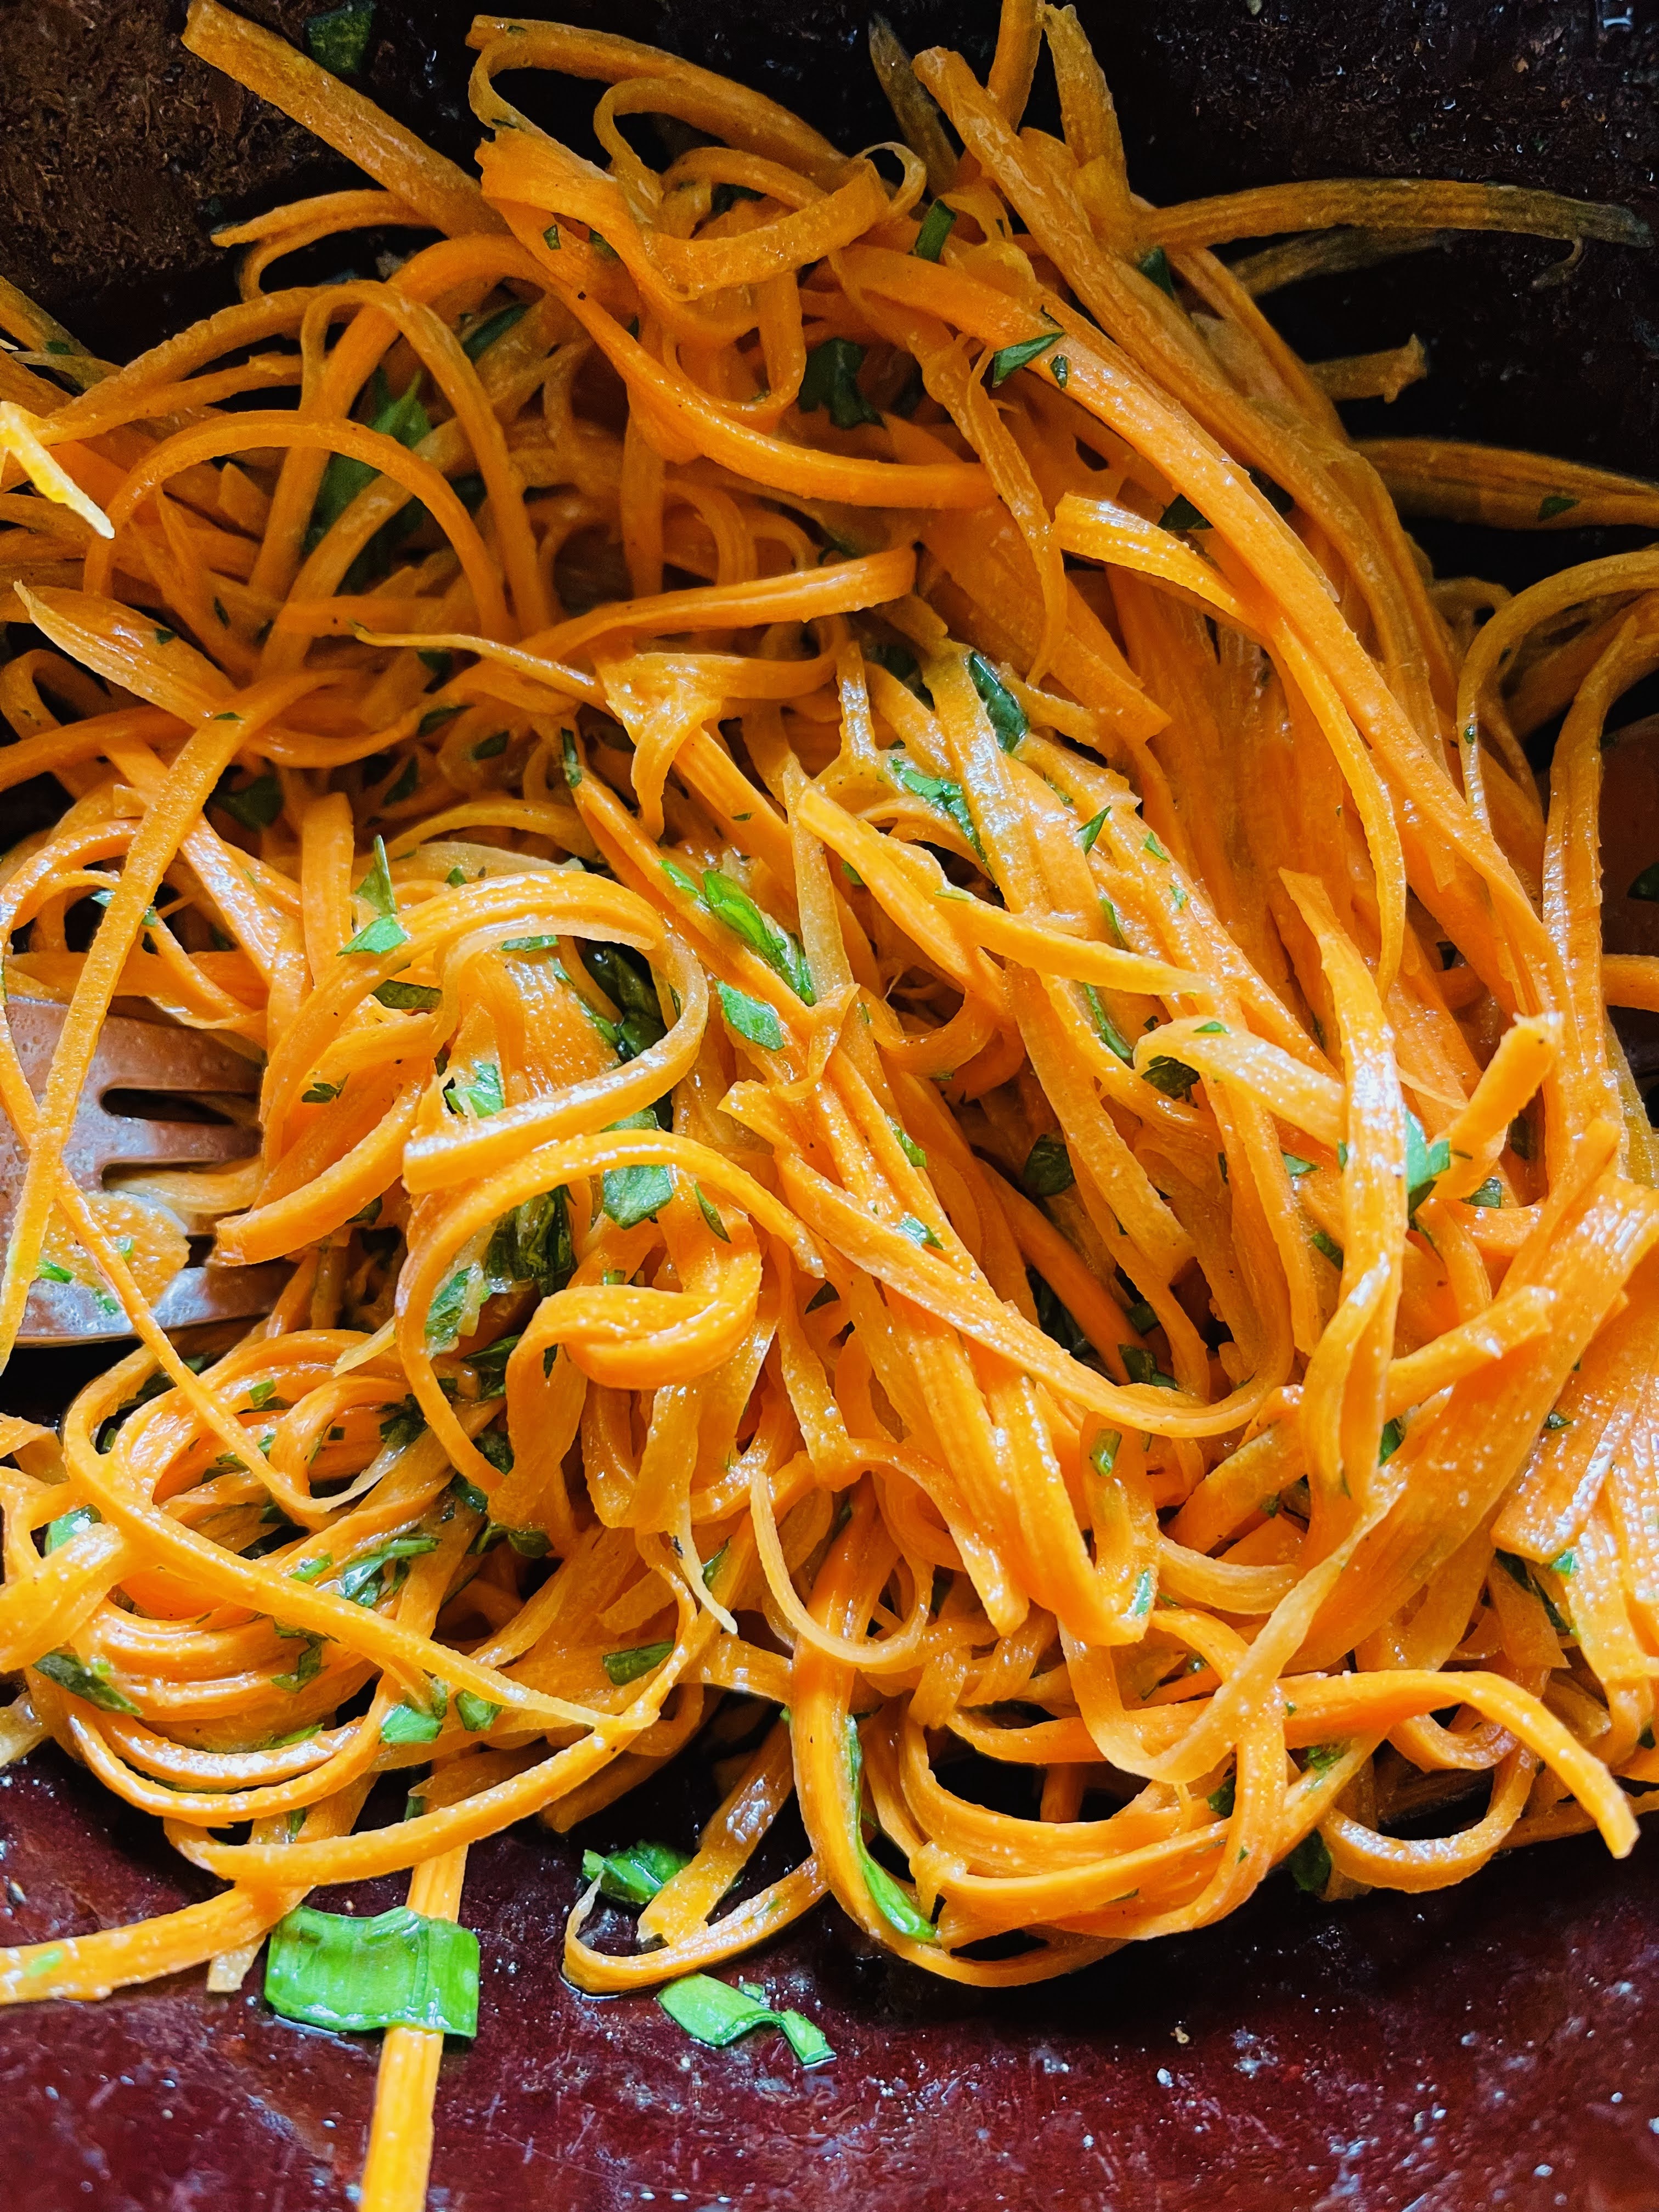
Typically, this salad uses grated carrots, but I find that they become slightly mushy when used as the centerpiece. I prefer to use a julienne peeler as it gives it more loft and texture interest. I’ve used a few of these peelers over time and have not been plused. However, I finally found one that works perfectly as advertised. The Sunkuka Julienne Peeler, is made of stainless steel and performs beautifully. This salad also holds for up to 3 days in the refrigerator.

FRENCH CARROT SALAD WITH LEMON DIJON VINAIGRETTE

INGREDIENTS:

  • 1 pound carrots, peeled and julienned
  • 2 scallions, sliced thinly
  • 1/4 cup fresh parsley, chopped
  • 2 teaspoons Dijon mustard
  • Juice of half a lemon
  • 1.5 tablespoons avocado oil
  • 1.5 tablespoons good quality extra-virgin olive oil
  • 2 teaspoons local honey
  • Sea salt and freshly ground black pepper to taste

INSTRUCTIONS:

  1. Peel and julienne carrots. Place in a large bowl. Add scallions and parsley (and any other salad ingredients you choose).
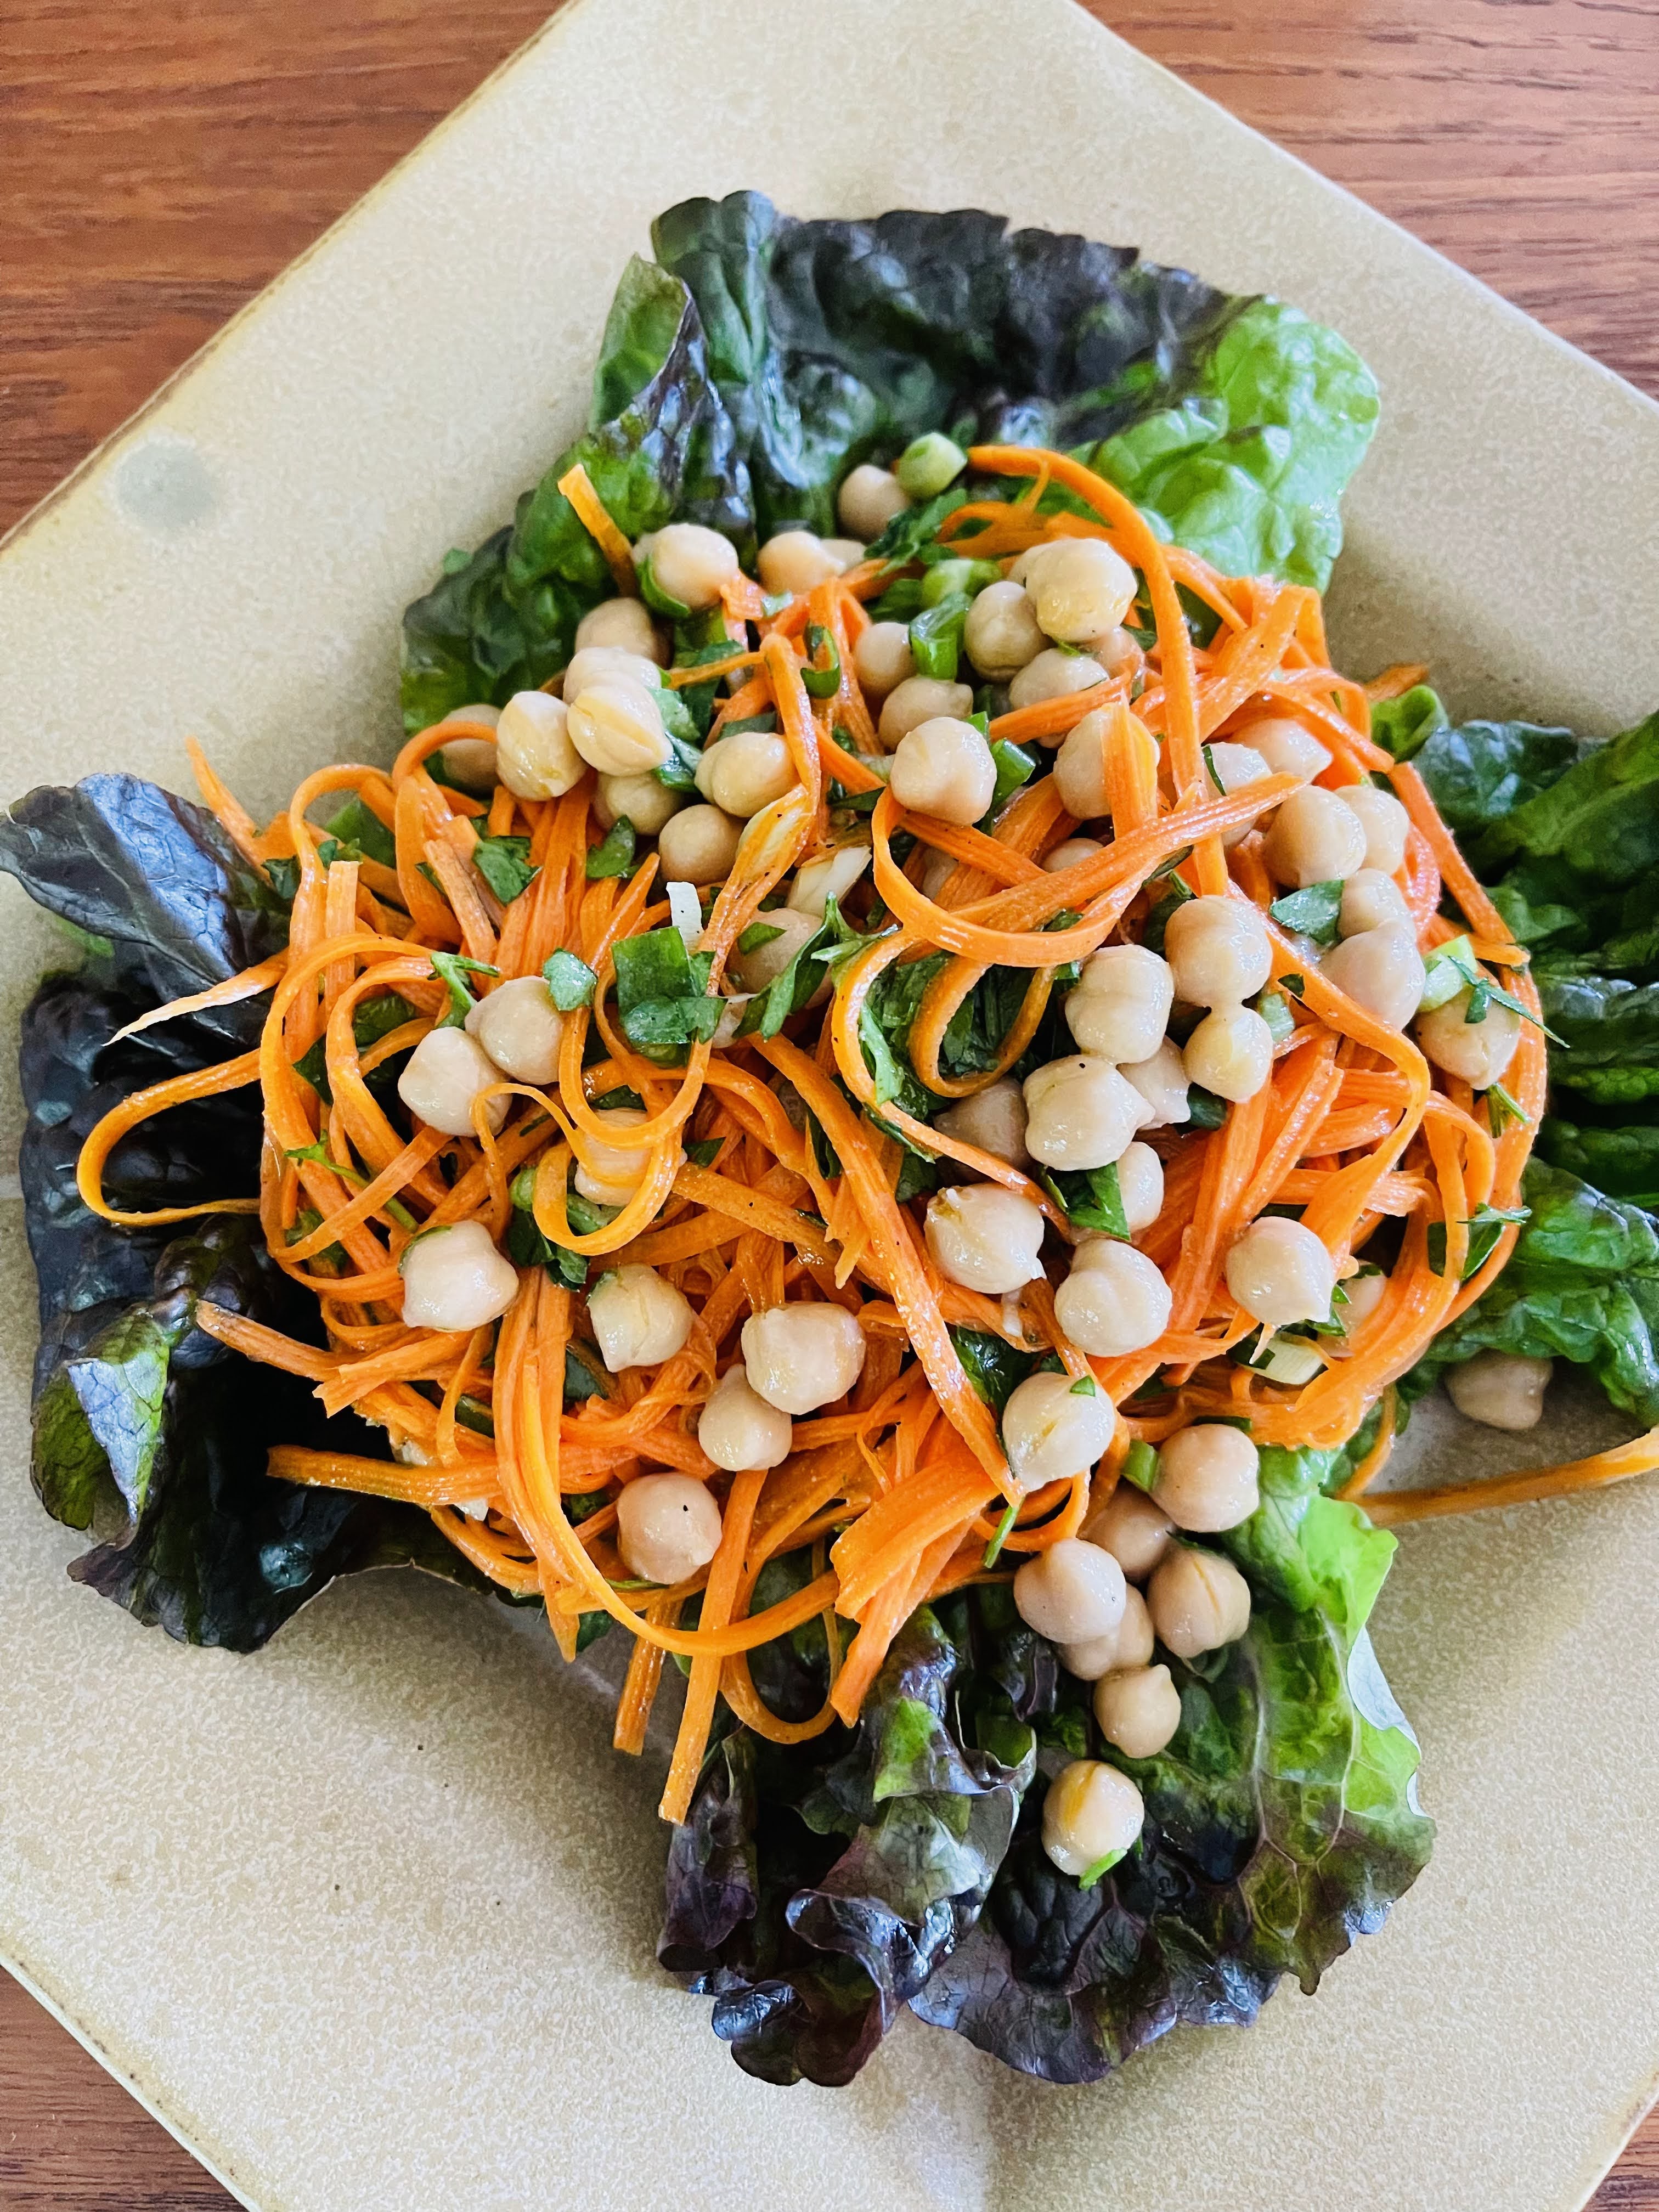
  2. In a pint mason jar, combine avocado and olive oil, Dijon, lemon juice, honey, salt and pepper. Place lid on jar and shake vigorously. Add to salad and toss gently. Serve on a bed of lettuce.

OPTIONS:

  • 1 can of chickpeas, drained and rinsed
  • 1/2 cup radishes, thinly sliced
  • 1 cup snap peas, sliced in thirds
  • 1 cup snow peas, sliced in thirds
  • 1/4 cup cilantro and/or mint

Serves 4

The majority of my diet is probably vegetables, but I’m not a vegetarian or vegan. –Abigail Spencer

Packing A Punch

There are days that start out well, then take an unexpected turn; like yesterday for example. I went to bed a little early and woke up abruptly when I heard a crash. I ran into the bathroom to find Val laying unconscious in a large pool of blood. I’m normally a steady Eddie in a crisis, but ever since Val’s brain surgery two years ago, our mantra has been don’t hit your head! I immediately called 911 to call an ambulance. As I followed the ambulance in my car I thought “Jeez she hasn’t been off our farm since March 9th because of Covid-19, and now we’re off to the emergency room!” After having a cat-scan it was determined that Val broke her nose and suffered a concussion. The good news was I brought her back home at 4:00 a.m. this morning. The lesson learned was don’t take a power slide on a tile floor. Floor 1, Val 0.

There are some punches that I can appreciate; like the first fresh garlic of the season. My go to recipe is Iberian Garlic Shrimp and boy does it pack a punch! Combine 2 heads of fresh garlic with roasted cherry tomatoes and sauteed shrimp and you have yourself a bowl full of yummy! Make sure you have a baguette to sop up all that goodness.

IBERIAN GARLIC SHRIMP

INGREDIENTS:

  • 1 pint cherry tomatoes
  • 2 heads fresh garlic, cloves peeled and thinly sliced
  • 1/2 teaspoon red pepper flakes
  • 1/2 cup extra-virgin olive oil
  • 2 pounds large raw shrimp (13-15 count) shelled and de-veined
  • Juice and zest from one lemon
  • 16 ounces linguine, cooked in salt water according to package directions
  • 1/4 cup fresh parsley, chopped
  • 1/4 cup finely shredded pecorino

INSTRUCTIONS:

  1. Preheat your oven to 400 degrees F. Place cherry tomatoes on baking sheet lined with foil. Pour 2 tablespoons olive oil over them and roll them around with your hands. Sprinkle with flake, or sea salt. Roast in upper 1/3 of oven for 25-30 minutes.
  2. Place a large pot of salt water to boil. Cook linguine according to package directions. Drain.
  3. In a large pan over medium-high heat, combine olive oil, red pepper flakes and garlic. Saute garlic until softened, but not brown, about 2-3 minutes.
  4. Add shrimp and saute, tossing frequently until just done, about 2-3 minutes. If you think it needs additional time, take it off! It will continue to cook off heat.
  5. Place drained pasta in a large serving bowl. Top with shrimp and oil; then with roasted cherry tomatoes. Sprinkle with lemon juice and zest, then chopped parsley and pecorino cheese.

Serves 4-6

img_6518

img_6520

“Instead of giving up in the face of adversity, you should face it with a positive attitude and a smile.”  —Anurag Prakash Ray

Escape To Your Garden

As we approach the solstice, we enter the time where we start seeing results from our hard work. We don’t have the advantage of greenhouses, so we get excited when the first radishes are pulled and our garlic scapes peek their pointy little heads out of the hard-neck garlic. Garlic scapes are one of those early culinary treasures that let us know we are getting closer to our garlic harvest. Look for them at your local farmers market where you can often buy them in quantity at a decent price. We sell ours in 30 count bundles.

There are so many ways to use these little gems. I chop and freeze several quarts for use throughout the year (you don’t even have to blanch them!) They are excellent in soups, pesto, scrambled eggs and potato salad. This salad in particular is a favorite, as it has no mayonnaise, making it a hit at picnics and potlucks. It’s simple, yet packed with flavor. I find I make it several times each summer. It’s excellent with virtually anything grilled.

BRICKYARD FARMS SCAPE POTATO SALAD

INGREDIENTS:

  • 2 pounds new potatoes or Yukon Golds, (skins on if new, peeled if larger)
  • 1/3 cup extra-virgin olive oil
  • 1 cup garlic scapes, sliced in 1/4 inch pieces
  • 2 tablespoons Dijon mustard
  • 1 tablespoon sherry vinegar
  • Flaked salt (I use Maldon) salt and freshly ground black pepper to taste
  • 1 cup pitted and quartered kalamata olives
  • 1/2 cup chopped fresh parsley

img_6537

img_6541

img_6542

INSTRUCTIONS:

  1. If using new potatoes, leave whole, then cut in half after you drain them.  If using larger Yukon Golds, vertically slice in quarters, then slice each quarter into forkful pieces.  Boil potatoes in salted water until just done, about 10 minutes. Drain.
  2. Saute scapes in olive oil on medium heat for 2-3 minutes. Mix the Dijon mustard, sherry vinegar, and salt and pepper with a whisk. Add this to the sauteed garlic scapes.
  3. Pour over warm potatoes and fold in gently. Add kalamata olives, and mix again. Garnish with fresh parsley
  4. Serve warm or at room temperature. This will last in the refrigerator for up to 5 days (if there’s any left!)

Serves: 6-8

img_6543

“We might think we are nurturing our garden, but of course it’s really our garden that is nurturing us.”  —Jenny Oglow

Talking Heads

We absolutely love vegetables. I guess that is one of the reasons that we are vegetable farmers. I have seen multiple recipes for roasting whole heads of cauliflower. In fact I think it’s a ‘thing’. Two years ago I created a Ras el Hanout spice mix that I have used on endless things, from Lamb Ragu, to Moroccan Almonds, to this roasted cauliflower. The mix is savory more than just hot. I feel that you have a party in your mouth when you taste it. You can find this mix in my new cookbook Twisted Basics: Laugh, Cook, Eat! It is also available on this blog by searching for Moroccan Almonds. This would accompany anything on the grill, particularly lamb chops. We ate it with leftovers and were swooning!

WHOLE ROASTED CAULIFLOWER

INGREDIENTS:

  • 1 medium to large cauliflower
  • 1 1/2 teaspoons Ras el Hanout
  • 3 tablespoons unsalted butter
  • 3 tablespoons extra virgin olive oil
  • 1/2 teaspoon sea salt
  • Several grinds of fresh black pepper

img_6356

img_6357

img_6358

INSTRUCTIONS:

  1. In a pot large enough to hold the head of cauliflower, fill with cold water and 1 teaspoon of salt. Clean cauliflower by removing outside leaves and cutting core horizontally so it sits level.
  2. Bring water to a boil and place cauliflower head in the pot with the core on top.  The whole head does not have to be submerged. Cover with lid and cook for 6 minutes. Lift with slotted spoon and place in wire mesh strainer for 15 minutes.
  3. Preheat oven to 375 degrees F. Place head of cauliflower in a casserole dish that gives it several inches around it.
  4. Melt butter, oil, salt, pepper and Ras el Hanout over low heat. Baste with butter and spice mixture. Bake for 20 minutes. Baste again. Bake for an additional 25 minutes. Your cauliflower will take from 45 to 90 minutes depending on its size. Baste every 25 minutes until a metal skewer inserted in center indicates that the cauliflower is soft. Let rest for 10 minutes.
  5. Slices into wedges.

Serves 4-6

img_6360

Laughter is the brightest, in the place where the food is.”  –Irish Proverb

And The Walls Came Tumbling Down

What is it about walls that seems to bring out a collective reaction of distaste?  Let’s face it our political discourse has taken on a polarized view of such things.  But the wall I’m referring to is a wall we can all agree on.  Brickyard Farms uses “The Wall” to showcase our amazing hard-neck garlic.  The first week we have German White and the next week is for Music (yes the hills are alive).  It is incredibly satisfying to sell about 2500 head of garlic each of those weeks.  For those of you not familiar with hard-neck garlic, it is distinctly different from the soft-neck garlic you purchase in your local grocery store.  Most soft-neck garlic is grown in China and is required by law to be refrigerated during overseas transport.  When garlic is refrigerated it changes the sugars to starch and makes the garlic bitter.  It also signals to the garlic that spring has arrived and it needs to grow.  This is why you typically find a green sprout in the center of each clove.

img_4830

img_4831-1

Many of our customers purchase in bulk; anywhere from 60-250 at a time.  We are humbled by the support and enthusiasm over the years for this savory allium.  We typically store 200 heads for our personal consumption.  In addition to this I roast an additional hundred head to use in soups and stews.  When garlic is roasted it becomes beautifully sweet and nutty.  Typically garlic is roasted as a whole head with most of its papers in tact.  You simply cut the tips of each clove, baste it with olive oil, wrap it in foil and roast it in a 375 oven or on your grill for 50-60 minutes.  This works well when you are thinking of a luscious appetizer; but I want to freeze it for future use.  The method I describe here will yield two six-cube silicone ice cube trays of roasted garlic; each cube being the amount of one large head of garlic (although you can purchase bulk quantities of pre-peeled garlic I would NOT recommend it).  My suggestion is that you go to your local farmers market and stock up!  Fresh garlic season is usually July-August; and if you’ve never had fresh garlic you are in for an incredible treat!  Once they’re frozen, you just pop out the cubes and place them in a zip-lock freezer bag or container and they’re ready for something yummy when you are.

Roasted Garlic In Quantity

img_4836

Ingredients:

  • 15-20 medium size heads of garlic (remember, fresh is best)
  • Good quality extra-virgin olive oil
  • 1 teaspoon coarse sea salt (I use Maldon)

METHOD:

  1. Preheat oven to 375 degrees F.  Peel all your garlic and place in an 8×8 or 9×9 ceramic dish.
  2. Pour enough olive oil in the dish to cover the garlic cloves halfway.  Toss to coat.
  3. Sprinkle coarse salt over garlic and cover with aluminum foil.
  4. Roast in oven for 30 minutes, then remove foil.  Roast for an additional 30 minutes or until soft and slightly golden.  Let cool.  Place in ice cube trays using any oil in the dish to cover each cube (I use a teaspoon in each one, then cover with additional oil if needed).
  5. Freeze overnight.  Remove from trays and put in zip lock bags or freezer containers.

img_4833

img_4834

img_4835

img_4848

“There is no such thing as a little garlic!”  —Arthur Baer


Swimming In Heirloom Tomatoes!

Rich, roasted tomato sauce!

Rich, roasted tomato sauce!

This just seems like the right time to re-blog this post, since we are at the height of tomato season!  After making a “double” batch of roasted sauce today, the yield was 4 pints of tomato stock (I use this for soups or risotto) 8 pints and 3 quarts of rich tomato lusciousness!

Basics with a Twist

I know….it’s my third tomato post, but what in the world is August for if not tomatoes?  When I returned home from market on Friday and unloaded the van, I went into the barn to find every available surface covered with tomatoes.  I went about pulling and packing for the following market day.  We have a large garbage can for the fruit that has ‘gone south’ and can’t be used.  This gets divided between our chickens and our compost pile.  The tomatoes that are merely bruised or damaged in some way I put to the side to roast in slices and freeze.  By the time I was finished sorting for Saturday, I had a whole tub of heirlooms.  I realized that these would take way too much time to roast in slices.  I needed to do something different.  I was staring at the vibrant colors of Caspian Pinks, Cherokee Purples…

View original post 493 more words

Romancing The Garlic

Hard-neck garlic drying

Hard-neck garlic drying

July is garlic time here at our farm,. We’re busy harvesting, cleaning, hanging and selling heady, beautiful hard-neck garlic. It’s an intense time for a small farm such as ours.  Each step of the process is by hand so although time consuming, it’s definitely a labor of love.  There’s nothing quite like fresh garlic and many of our customers buy large quantities. When stored properly garlic can last well into the following year, while adding that welcome punch to so many recipes.  One way to preserve garlic is to make a “confit”.  The French verb confit means “to preserve.” The term confit in our country has come to mean to poach something in fat at a low temperature for a long time.

Peeled garlic ready to poach

Peeled garlic ready to poach

During the growing season I am always looking for ways to preserve and extend each crop.  Many times while harvesting garlic we have ‘dingers’; heads that we accidentally sink a shovel into or rip the roots off by pulling a little too hard.  We collect these and rather than resign them to the compost pile, we turn them into a delicious garlic confit. These make wonderful hostess or Christmas gifts and can be used in a variety of ways. Try them as a dipping oil for crusty artisan bread, add them to bean soups, to pasta, mashed potatoes or even roasted red peppers for a great bruchetta.  The possibilities are endless, limited only by your imagination.  Who wouldn’t love a jar of this liquid gold?

Garlic Confit:

  • 4 cups whole garlic cloves, separated and peeled
  • Small handful of fresh woody herbs (approximately 8-10) such as thyme or rosemary
  • 1 bay leaf, 8 peppercorns, or 1/2 teaspoon red pepper flakes (try different combinations, as these are entirely optional)
  • 3 cups extra virgin olive oil

Place garlic, herbs, oil and any additional ingredients you have chosen in a medium heavy saucepan.  Cover a cook over very low heat for about 30 minutes.  Don’t allow the oil to rise above 200 degrees F.  You may see small bubbles rise to the top.  To check for doneness, take a paring knife and test a clove.  It should be very soft; if not, poach for an additional 10 more minutes.

Remove pan from heat, keep covered and allow to cool to room temperature.  Using a clean spoon, divide garlic, herbs and oil among resealable jars. (I use 1/2 pint jelly jars)  Can be kept in the refrigerator for up to 4 months.

Garlic ready to slowly poach

Garlic ready to slowly poach

Liquid Gold

Liquid Gold

“The combination of olive oil, garlic and lemon juice can lift the spirits in winter.”

—Yotam Ottolenghi

Many Shades of Green

After working in the heat and humidity today, we decided it was high time to remove the storm windows in our screened-in porch.  It’s really our “family room” during the summer.  Our dining room table is temporarily retired and we open the french doors.  It is here that we have our morning coffee, our evening cocktail, eat our meals and play endless games of domino’s. Overlooking the lake, surrounded by trees and our flower gardens, it is our sanctuary at the end of a hectic farm day.

After a shower and Bloody Mary, I wanted to make something in contrast to the heavy humidity of the past several days.  Remembering I had purchased beautiful English cucumbers from Real Food at the farmer’s market on Saturday; it was time to turn them into a refreshing chilled soup.  This is super easy and just right for those night’s when your tired but want something quick and healthy.  The olive oil gives this soup a creamy texture.

Tangy Cucumber Soup:

  • 3 Persian or English cucumbers, ends trimmed and coarsely chopped
  • 1/2 cup Greek yogurt
  • 1/4 cup buttermilk
  • 3 cloves garlic, pressed
  • 3 Tbsp. fresh lemon juice
  • 2 Tbsp. fresh chives, chopped
  • 3 Tbsp. fresh dill or cilantro, chopped
  • 1/2 cup extra-virgin olive oil (omit if you choose to drink this as a smoothie)
  • Kosher salt and freshly ground black pepper to taste

Place all ingredients except the olive oil in a blender.  Puree until smooth.  With the blender still running, gradually add the olive oil until incorporated.  Transfer to a bowl and chill for at least an hour.  Ladle into bowls and garnish with additional dill or cilantro.

Serves 4

Chilled soup or smoothie, you be the judge

Chilled soup or smoothie, you be the judge


“Live within your harvest.”  —Persian Proverb