Tag Archives: brickyardfarms

The Beet Goes On

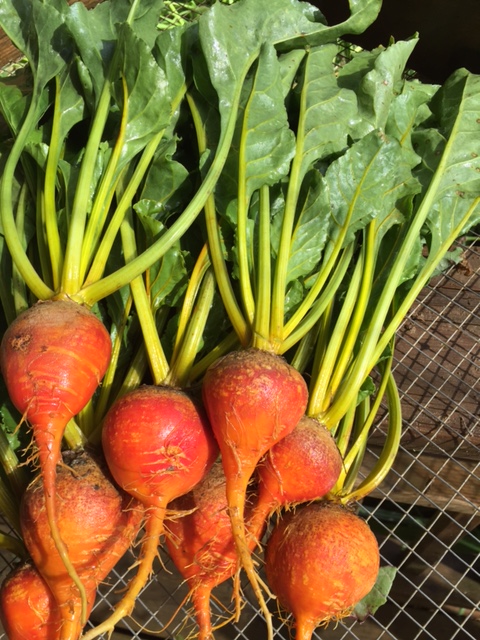
Until I moved to our vegetable farm I absolutely hated beets and avoided them at all costs.  Yet here I am staring out at the drifted snow and frozen lake with a bowl of borscht in my hand.  The smell alone is enough to make you swoon.  I feel a sense of gratitude for learning to love the darn things.  Our farm is committed to growing vegetables without chemicals (which can significantly alter their flavor) so when I tried them again I was surprised by their inherent sweetness.  What was I thinking?  They are one the best things you can eat; full of essential vitamins and minerals.  They are low in calories and sodium along with assisting in the reduction of inflammation in the body.  They also support heart, digestion and brain function.  So what’s not to like?  There’s nothing like a bowl of warm goodness to set you straight.

INGREDIENTS:

  • 2 tablespoon extra-virgin olive oil
  • 1 medium leek, cleaned and sliced thinly (make sure you use the light green part as well)
  • 2 garlic cloves, finely minced
  • 1 medium red onion, peeled and chopped
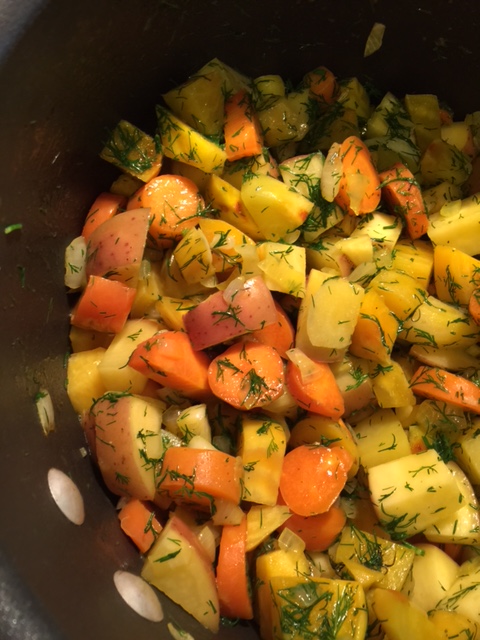
  • 4-6 carrots, peeled and grated on the large holes of a box grater
  • 1 large sweet potato, peeled and cut into bite size chunks
  • 6 small or 3 large beets, peeled and cut into bite size chunks
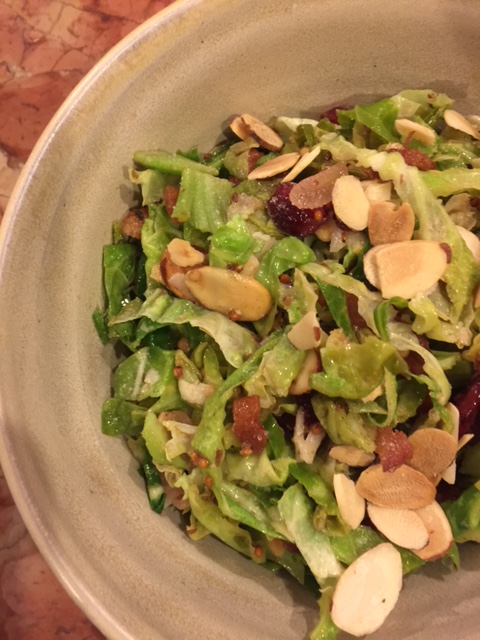
  • 3 cups of thinly sliced red cabbage
  • 1/4 cup minced fresh dill
  • 8 cups organic vegetable stock (or homemade of course)
  • 1/4 cup red wine vinegar
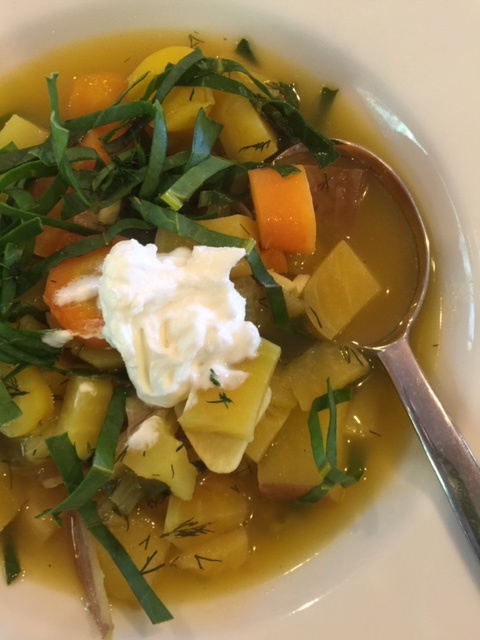
  • Greek yogurt to serve (optional)

IMG_2048

INSTRUCTIONS:

  1.  Heat the olive oil in a soup kettle or Dutch oven on medium high heat.
  2. Add leek, garlic and red onion.  Saute until soft and translucent.
  3. Add sweet potato, beets and grated carrot.  Cook for 5 minutes stirring frequently.
  4. Add red cabbage, dill and vegetable stock.  Bring to a boil and reduce heat to medium.  Simmer for 30 minutes or until beets are soft when a paring knife is inserted.
  5. Add red wine vinegar off heat.  Serve in bowls topped with a dollop of yogurt if using and sprinkle additional fresh chopped dill on top.

Serves 6-8

IMG_2049

“Soup fills us, nurtures and comforts us.  Soup is the song of the heart and the home.”

Morocca-Tori

I’m always looking for inspiration in the kitchen.  When it comes to regional cuisine, a classic dish can often inspire me to bend the rules.  For example, I love Italian Chicken Cacciatore, with its tomatoes, garlic, onions and capers.  The challenge for me was, its traditional breading always sat a little heavy.  Why not lighten it up, leave the breading off, use Moroccan spices, chickpeas and feta?  The result?  Something similar, yet completely different in tone.  Vegetarian?  Leave out the chicken completely and replace it with roasted butternut squash or zucchini.  The real focus is what the regional seasoning does in relation to everything else.  The Moroccan or North African seasoning called  Ras El Hanout (which means: “top of the shop”) can contain anywhere from 10-100 different spices. I’ve included my version of this savory spice combination.  I highly recommend making it yourself, as you can easily control the heat. I’m hooked on it and keep finding different ways to use it.  You can also find it manufactured by several companies like McCormick or the Teeny Tiny Spice Company. Served over rice, couscous or quinoa, with a simple side salad of mixed greens tossed with vinaigrette and you have a dinner that’s comes together quickly and is sure to please.

IMG_1797

Moroccan Chicken Thighs:

  • 6 bone-in, skinless chicken thighs
  • 1 Tablespoon olive oil
  • 1 Tablespoon butter
  • 1 medium onion, sliced vertically into thin strips
  • 4 garlic cloves, minced
  • 1 Tablespoon Ras El Hanout*
  • 1 28 oz. can Muir Glen Organic Crushed Tomatoes
  • 1 cup organic chickpeas, rinsed and drained
  • 1/4 cup (2 oz.) crumbled feta
  • 1/4 cup fresh parsley, minced
  • 2 cups of cooked rice, couscous or quinoa

*Kim’s Ras El Hanout:

  • 2 teaspoons ground nutmeg
  • 2 teaspoons ground coriander
  • 3 teaspoons ground cumin
  • 2 teaspoons ground ginger
  • 2 teaspoons turmeric
  • 2 teaspoons Kosher salt
  • 2 teaspoons cinnamon
  • 1 1/2 teaspoons cane sugar
  • 1 1/2 teaspoons freshly ground black pepper
  • 1 1/2 teaspoons sweet paprika
  • 1 teaspoon cayenne pepper (add a bit more if you want more heat)
  • 1 teaspoon cardamom powder
  • 1 teaspoon ground allspice
  • 1/2 teaspoon ground cloves

Mix all the spices together and store in airtight container.

  1. Preheat oven to 375 F. Melt butter and olive oil in 12-inch skillet over medium heat.  Saute garlic and onion until soft, about 4-5 minutes.
  2. Add Ras El Hanout and simmer an additional 2 minutes.
  3. Add crushed tomatoes and stir to combine.  Take off heat.  Spoon about a 1/2 cup of the sauce into a 8 x 8 casserole dish.  Place chicken thighs on top of sauce.
  4. Sprinkle chickpeas around chicken.  Spoon the rest of the sauce over the chicken.  Sprinkle feta over sauce.
  5. Bake uncovered for 45-50 minutes, or until bubbly and chicken thighs are done.
  6. Remove from oven and sprinkle with minced parsley.
  7. Serve over rice, couscous or quinoa.

Serves: 3-4

IMG_1798

IMG_1799

“The forest not only hides your enemies, but its full of your medicine, healing power and food.”  —African Proverb

Beyond Lettuce

I’m a huge fan of salads.  I could eat one everyday, particularly since we grow so many ingredients for them during the farm season.  When I was on a restricted diet following my recent surgery (the first 10 days were liquids) what I missed the most was a variety of texture.  God, just give me some crunch, something to chew!

Often times, when purchases from the farmer’s market are limited and the choice of lettuces from the grocery store are packed in plastic containers, picked over a week ago, you simply have to get out of the box.  If you want texture you have to get beyond the Honeymoon Salad (lettuce a lone!) and look for more seasonal fare.

There are many veggies that work beautifully in the winter for salads.  Try combining both fruit and vegetables like pear and butternut squash or kale, chickpeas and pomegranate seeds.  Nuts such as almonds, pine nuts or pepitas, hard-boiled eggs and hard or soft cheeses also work.  Try all kinds of cabbage, broccoli, cauliflower or one of my favorites: Brussels sprouts.

Any type of cabbage pairs well with the smokey taste of bacon or pancetta. This gives you the option of making a warm dressing with some of the fat by adding something acidic like lemon juice or vinegar.  Get creative! Seasonal winter salads can be warm or cold.  They can be the center or side of a meal. You are only limited by your own imagination!

Brussels Sprout Salad With Warm Bacon Vinaigrette:

IMG_1744

  • 1/4 cup red wine vinegar
  • 1 generous tablespoon whole-grain mustard
  • 1 teaspoon sugar
  • Kosher salt and freshly ground black pepper to taste
  • 2 shallots, thinly sliced
  • 6 slices bacon, chopped into 1/2 inch pieces
  • 2 lbs. Brussels sprouts, trimmed, halved and sliced thin using a mandolin or knife
  • 3 ounces shredded Pecorino cheese
  • 1/3 cup dried cranberries, chopped
  • 1/2 cup sliced almonds, toasted
  1. Whisk together vinegar, mustard, sugar and 1/2 teaspoon salt in small Pyrex measuring cup.  Add shallot, cover and heat in microwave for 30-60 seconds or until steaming.  Stir, then cover and let come to room temperature, about 15 minutes.
  2. Cook bacon in deep 12-inch skillet over medium-heat until crisp, stirring frequently.  Drain bacon on paper towels.  Add shallot mixture off-heat, stir until combined.  Add shredded Brussels sprouts and toss with tongs until dressing is evenly distributed and sprouts are slightly wilted, about 3 minutes.
  3. Transfer to serving bowl.  Add Pecorino, dried cranberries and almonds and toss to combine.  Season with salt and pepper to taste. Serve immediately.

IMG_1745

Serves 4-6

IMG_1746

“What a wild winter sound,— wild and weird, up among the ghostly hills…. I get up in the middle of the night to hear it. It is refreshing to the ear, and one delights to know that such wild creatures are among us. At this season Nature makes the most of every throb of life that can withstand her severity. ”  –John Burroughs, “The Snow-Walkers,” 1866

Beautiful Bones

As a foodie, farmer and cook, I enjoy doing many things from scratch.  With my surgery a week away, I’ve been organizing recipes for my 10 day post-op liquid diet and wanted to include some homemade chicken or beef broth. I recently came across the benefits of bone broth.  Although similar to stock, bone broth is more rich in flavor and nutrients, making it a healing food.  Gelatin, found in the joints and knuckles of bones, is one of the most prominent “super foods” for healing a troubled digestive system.  It protects and heals the mucosal lining of the digestive tract and helps to regenerate cells.  It also aids in the absorption of nutrients.  Marrow, found in the larger bones such as the femur, helps to strengthen bones and connective tissues, as well as supporting the immune system.

Bone broth is a time-honored tradition with a long history.  It is not an accident that chicken soup was given for ailments from colds to upset stomachs.  Its soothing qualities help support the immune system.  it is one of the most nutrient-dense foods you can find.  It protects your joints with natural glucosamine, and the glycine in it helps us sleep better.  Bone broth is a rich source of collagen that will feed your skin, hair and nails.  The title of “super food” is well deserved.

Bone broths of all kinds are inexpensive to make and will reward you ten-fold with flavor and nutrients not found in any commercial product.  Be sure to choose your bones carefully from 100 percent grass-fed and finished cows, pastured chickens, and wild-caught fish.  Seek out a local, sustainable farmer or fisherman.  I have found that I prefer to make bone broth from chickens in a crock pot, and beef broth in the oven.  The choice is up to you.  Either way, the bottom line is that you will end up with the most rich and healthful broth you have ever tasted!

Beef bone broth ready for the oven.

Beef bone broth ready for the oven.

Beef Bone Broth:

  • 4 lbs. beef marrow and knuckle bones
  • 1/4 cup raw apple cider vinegar (I prefer Braggs)
  • 2 stalks of celery, halved
  • 3 carrots, halved
  • 3 onions, quartered
  • 4 cloves garlic, peeled
  • Handful fresh parsley
  • 2 bay leaves
  • 2 sprigs fresh rosemary
  • Filtered water (as much that will fit into your Dutch oven
  • Himalayan pink salt
  1. Preheat oven to 225 degrees.  Place all ingredients in large Dutch oven and bring to a boil.
  2. Place in oven for 18-24 hours, stirring occasionally.
  3. Let cool, remove bones and vegetables.  Strain through wire sieve lined with cheesecloth.
  4. Season with Himalayan pink salt to taste. I start with a teaspoon.
  5. Chill in large bowl.  Lift off extra fat.  Pour into quart Mason jars.
When chilled, you can see the gelatin, nutrient-dense richness of this broth.

When chilled, you can see the gelatin, nutrient-dense richness of this broth.

“Good broth will resurrect the dead.”  —South American Proverb

Change Happens

I initially started my blog Twisted Basics in response to a health crisis I experienced in 2014.  I thought I was a healthy person; after all, we run a 5.5 acre organic vegetable farm.  Yet I was facing serious gastro-intestinal issues resulting in a blood transfusion, upper GI, colonoscopy and small bowel endoscopy. All these tests proved negative. I also began dextrose iron infusions for chronic anemia.  Since then, I’ve continued to experience fatigue so extreme that I couldn’t live my normal life.  I chose to become gluten-free even though it was determined I was not celiac or wheat sensitive. This choice improved my mental fog, but did nothing for my energy level.

My iron infusions were lasting 60-90 days, where normally they were expected to last 6 months.  Clearly I was still bleeding somewhere.  Several weeks ago I had another upper GI where it was discovered that I had Cameron Lesions on my hiatal hernia.  These lesions are ulcerated tissue and linked to anemia and bleeding.  I was placed on Prilosec and referred to a surgeon.  I could not tolerate the Prilosec due to several side effects.  I became concerned whether or not I would ever get my quality of life back.

After meeting with the surgeon, I have decided to have my hiatal hernia surgically corrected.  There are many approaches for handling gut-health and anemia. With my continued blood loss, diet alone was not enough. Using a combination of traditional and alternative approaches, seems to be the right course for me at this time.  So continues my journey of healing;  which was never simply my physical being, but also my emotional and spiritual self.  Although I have always believed we are what we eat, it is equally important to feed all things that make Kim, Kim.  After surgery I will be on a liquid diet, phasing into a soft diet.  Some dietary changes will be permanent, like portion size and small mouthfuls.  I also realized it was time to face the fear that I can make permanent dietary changes and still be creative and satisfied.  I feel fortunate to love all things fruit and vegetable.  I’m the sort of personality that hates hearing the word: “No!”  I can certainly live with this if I can get my energy and the quality my life back.

We have purchased a juicer and already have a Vita-mix.  That’s when Val and I decided there was no time like the present and have started to juice, smooth and soup our way to health.  Hang in there with me, this particular change is temporary.  Having said that, you will be seeing recipes for all things liquid or smooth.  I did ask the surgeon if Irish whiskey was a viable liquid!

So let’s start this journey with a delicious smoothie shall we?  What I can’t stand is boring food!!  So to that end I will do my best to create interest in all things healthy.  Wish me luck!!

Delicious anytime!

Delicious anytime!

My Go To Smoothie:

  • 1 1/2 cups filtered water, coconut water or almond milk
  • 1 handful spinach or romaine
  • 1 cup fresh or frozen blueberries
  • 1 cup fresh or frozen strawberries
  • 1/2 lemon, juiced
  • 10-12 fresh mint leaves
  • 3 Medjool dates

Blend all ingredients in order listed in a high-speed blender.  Yield: Approximately 12 ounces

“Life is change.  Growth is optional.”

Can’t Beet It!

When I first came to the farm and was getting my sea-legs, I did not like beets.  In fact I’ve never liked beets. When I saw dozens of 100 foot rows planted, I remember asking Val, “Is there really a call for this many beets?”  I soon learned that beets are one of our most popular crops.  I also learned that when you grow food without chemicals, it directly affects the flavor of those vegetables.  You have an opportunity to find how they genuinely taste, which is often incredibly sweet.  Over time, with Val’s encouragement, I learned to not only like beets, but love them!  Now I pickle them, roast them and put them in soups.  When the weather cools off, soups come front and center.  After making borscht for several years with red beets, I began to wonder if it would work with our beautiful golden beets.  Slightly milder in flavor, I knew they would match up equally well with our carrots, onions, potatoes and dill.  It’s a wonderfully satisfying soup.

IMG_1638

IMG_1640


Golden Beet Borscht:

  • 4 cups golden beets with greens, peeled and diced, greens reserved and cut into thin ribbons
  • 2 cups red-skinned potatoes, scrubbed and diced
  • 1 1/2 cups yellow onions, chopped
  • 1 1/2 cups carrots, scrubbed and sliced in disks about 1/2 inch
  • 1 cup celery, chopped
  • 2 cloves garlic, sliced thinly
  • 1 bay leaf
  • 1 cup fresh dill, chopped
  • 1/2 tsp. fennel seeds
  • 4 cups organic or homemade chicken or vegetable stock
  • 1 Tbsp. apple cider vinegar
  • 1 tsp. salt
  • 1/2 tsp. freshly ground black pepper
  • 2 Tbsp. olive oil

IMG_1647


  1.  In a large Dutch oven or soup pot, saute the garlic and onions with the olive oil on medium-high until softened.  Add the remaining vegetables and continue to cook for 5 minutes.
  2. Add the fennel seed, dill, bay leaf, and stock.  Bring to a boil, then simmer until vegetables are soft.  About 15 minutes.
  3. Ribbon the beet greens and add half to soup.
  4. Add the salt, pepper and apple cider vinegar.  Taste and adjust seasoning to your preference.
  5. Ladle into bowls, top with additional beet greens and a dollop of Greek yogurt.

Serves 4

Warm and inviting golden beet borscht


I live on good soup, not on fine words.”   …Moliere


Swimming In Heirloom Tomatoes!

Rich, roasted tomato sauce!

Rich, roasted tomato sauce!

This just seems like the right time to re-blog this post, since we are at the height of tomato season!  After making a “double” batch of roasted sauce today, the yield was 4 pints of tomato stock (I use this for soups or risotto) 8 pints and 3 quarts of rich tomato lusciousness!

Basics with a Twist

I know….it’s my third tomato post, but what in the world is August for if not tomatoes?  When I returned home from market on Friday and unloaded the van, I went into the barn to find every available surface covered with tomatoes.  I went about pulling and packing for the following market day.  We have a large garbage can for the fruit that has ‘gone south’ and can’t be used.  This gets divided between our chickens and our compost pile.  The tomatoes that are merely bruised or damaged in some way I put to the side to roast in slices and freeze.  By the time I was finished sorting for Saturday, I had a whole tub of heirlooms.  I realized that these would take way too much time to roast in slices.  I needed to do something different.  I was staring at the vibrant colors of Caspian Pinks, Cherokee Purples…

View original post 493 more words

Never Too Much!!

We’ve all heard by now the growing importance and benefits of fermentation.  During the growing season when cucumbers, zucchini and other vegetables are so abundant you might be tempted to drop them anonymously on your neighbors doorsteps; it’s a great time to think about the winter larder.  I enjoy putting up food.  There’s nothing better than opening a jar of summer in the middle of winter.  It helps me to appreciate the life we’ve chosen and the obvious health benefits.

I enjoy both the color and flavor of pickled squash.  This recipe is flexible enough to use any squash that seems to be coming out of your ears.  Summer squash, zucchini (any variety) or my favorite, patty-pan.  I select small or medium sized squash as you don’t want the seed cavity to become to large, otherwise your pickles become mushy.  I also don’t use the amount of sugar typically recommended in many recipes; I find the brine way too sweet for my taste.  I typically triple this recipe if I’m hauling out all the canning stuff anyway. These little gems have become family favorites.

Fresh and abundant

Fresh and abundant

Patty-Pan Squash Pickles:

  • 4-6 patty-pan squash, washed, halved vertically and sliced 1/4 inch thick (approximately 12 cups)
  • 2 medium sweet onions, halved vertically and sliced in 1/4 inch thick half moons
  • 2 red, orange, yellow or combination, seeded and sliced in 1/4 inch pieces equally 4 cups
  • 1/3 cup pickling salt
  • Ice cubes
  • 2 cups white vinegar (5% acidity)
  • 1 cup can sugar
  • 1 tsp. mustard seeds
  • 1/2 tsp. celery seeds
  • 1/4 tsp. ground turmeric
Ready for the pint jars

Ready for the pint jars


Toss squash, onion and bell pepper strips with pickling salt in very large bowl.  Cover vegetables with ice cubes.  Cover and let stand for 3 hours.Sterilize pint jars, and prepare lids.  While jars are boiling, drain vegetables, but do not rinse, discarding brine and any unmelted ice.  Combine vinegar, sugar and spices in a small saucepan; bring to a boil over medium-high heat.

Pack squash into hot jars, leaving 1/2 inch head space.  Cover with hot brine leaving 1/2 inch head space.  Seal and process jars for 10 minutes.  Remove jars from water and let stand for 24 hours.  Make sure each jars seals by pushing in the middle of each lid.  They should not pop.  Refrigerate after openings.  Makes 4, 1 pint jars.

Healthy & delicious patty-pan pickles.

Healthy & delicious patty-pan pickles.


“There may be many metaphors for living…. but we have to do the living.”


Abundance 101

Often times, during the growing season fatigue sets in at the end of the day and preparing a meal takes a back seat.  For the past two farm seasons, I’ve been in the process of healing from a major intestinal bleed-out and have not be able to actively weed or harvest vegetables along side Val and our farm hand Zac.  After two days at market, it literally takes the next four or five to rest and recover.  Val my ever-ready bunny continues to be the mover and shaker at Brickyard Farms.  She deals with the additional workload without complaint, always upbeat and positive.  My “job” is to keep up with the bookkeeping, marketing and prepare a decent meal.

I’m embarrassed to admit in the past I have typically approached meal planning with what do I feel like cooking?  Rather than, what do we have and how can I use it creatively?  It has taken time to really grow into a sense of place on our farm.  That left over feeling of entitlement from my previous life sometimes blocks recognizing the incredible abundance we have here.  With 5.5 acres of chemical-free vegetables and easy access to local cheese and meat; why would I choose to cook anything else?  So my current mission is to create meals using only the vegetables  that we grow before anything else is considered.  I allow myself a wide array of condiments and spices, but the foundation comes from the farm.

This week there are carrots, potatoes and tomatoes for starters, so I opted for a roasted concoction inspired by Yotam Ottolenghi.  It was the first time I had added a dressing to warm veggies.  The result made me weep with the realization that there is no lack of anything, only an overflowing abundance.

Warm out of the oven ready to be tossed with the dressing.

Warm out of the oven ready to be tossed with the dressing.

Roasted Vegetables With Caper Vinaigrette:

  • 6 carrots, peeled and cut in 3 inches lengths (for larger carrots, halve lengthwise and quarter)
  • 4 medium red onions, cleaned, peeled and quartered vertically
  • 1/2 cup olive oil
  • 4 fresh thyme sprigs
  • 2 fresh rosemary sprigs
  • 1 head of garlic, halved horizontally
  • salt and freshly ground black pepper
  • 3 medium red skinned potatoes, skin on and chunked or quartered depending on size
  • 20 cherry tomatoes, halved

For the dressing:

  • 2 Tbsp fresh lemon juice
  • 4 Tbsp capers, drained
  • 2 tsp maple syrup
  • 1/2 tsp Dijon mustard

Preheat oven to 375 F degrees.  Place the onions and carrots in a large bowl and add the olive oil, thyme, rosemary, garlic, 1 tsp salt and a few grinds of fresh black pepper.  Toss well and spread out on a large rimmed baking sheet.  Roast for 20 minutes.

While the onions and carrots are roasting, prepare the potatoes.  Add the potatoes to the pan and toss to coat.  Return to the oven and roast for an additional 40-50 minutes.  When the vegetables are cooked through and have taken on a golden color, stir in the halved tomatoes.  Roast for an additional 10 minutes.

Meanwhile, whisk together the lemon juice, capers, maple syrup, mustard and 2 Tbsp of olive oil.  Adjust seasoning with salt and freshly ground black pepper.  Pour the dressing over the vegetables as soon as you take them out of the oven.  Remove head of garlic. Place roasted vegetables in decorative bowl and sprinkle with coarse salt.  Place garlic head on top.  When serving break up head and squeeze garlic paste on each serving.  Pass the Kleenex.

Unexpected lusciousness!

Unexpected lusciousness!

Don't plan on leftovers.

Don’t plan on leftovers.

“The key to abundance is meeting limited circumstances with unlimited thoughts.”

                                                                          —Marianne Williamson


Romancing The Garlic

Hard-neck garlic drying

Hard-neck garlic drying

July is garlic time here at our farm,. We’re busy harvesting, cleaning, hanging and selling heady, beautiful hard-neck garlic. It’s an intense time for a small farm such as ours.  Each step of the process is by hand so although time consuming, it’s definitely a labor of love.  There’s nothing quite like fresh garlic and many of our customers buy large quantities. When stored properly garlic can last well into the following year, while adding that welcome punch to so many recipes.  One way to preserve garlic is to make a “confit”.  The French verb confit means “to preserve.” The term confit in our country has come to mean to poach something in fat at a low temperature for a long time.

Peeled garlic ready to poach

Peeled garlic ready to poach

During the growing season I am always looking for ways to preserve and extend each crop.  Many times while harvesting garlic we have ‘dingers’; heads that we accidentally sink a shovel into or rip the roots off by pulling a little too hard.  We collect these and rather than resign them to the compost pile, we turn them into a delicious garlic confit. These make wonderful hostess or Christmas gifts and can be used in a variety of ways. Try them as a dipping oil for crusty artisan bread, add them to bean soups, to pasta, mashed potatoes or even roasted red peppers for a great bruchetta.  The possibilities are endless, limited only by your imagination.  Who wouldn’t love a jar of this liquid gold?

Garlic Confit:

  • 4 cups whole garlic cloves, separated and peeled
  • Small handful of fresh woody herbs (approximately 8-10) such as thyme or rosemary
  • 1 bay leaf, 8 peppercorns, or 1/2 teaspoon red pepper flakes (try different combinations, as these are entirely optional)
  • 3 cups extra virgin olive oil

Place garlic, herbs, oil and any additional ingredients you have chosen in a medium heavy saucepan.  Cover a cook over very low heat for about 30 minutes.  Don’t allow the oil to rise above 200 degrees F.  You may see small bubbles rise to the top.  To check for doneness, take a paring knife and test a clove.  It should be very soft; if not, poach for an additional 10 more minutes.

Remove pan from heat, keep covered and allow to cool to room temperature.  Using a clean spoon, divide garlic, herbs and oil among resealable jars. (I use 1/2 pint jelly jars)  Can be kept in the refrigerator for up to 4 months.

Garlic ready to slowly poach

Garlic ready to slowly poach

Liquid Gold

Liquid Gold

“The combination of olive oil, garlic and lemon juice can lift the spirits in winter.”

—Yotam Ottolenghi