Tag Archives: appetizer

A Savory Explosion!

There’s something about anything salty and savory that will always get my attention. Olives, capers, anchovies, in any recipe will certainly make me sit up and take notice. One thing that will give your creativity a boost is having a delicious and versatile olive tapenade on hand. During the holidays I try to incorporate it in appetizers, pasta and entrees in general. It keeps well in the refrigerator for a couple weeks, and if your making a larger batch, freezes well for several months.

Consider the following suggestions for using tapenade:

  • Serve it on top of hummus for a savory boost
  • Serve broiled fish with a dollop of tapenade on top
  • Use tapenade to stuff portabella or cremini mushrooms
  • Make a cold pasta with veggies and use the tapenade as the dressing with lemon juice
  • Top burgers with roasted red pepper, cheese and tapenade
  • Toss with steamed baby potatoes
  • Use on pizza to replace tomato sauce
  • Make a sandwich on focaccia with salami, ham, roasted red peppers, tomatoes, red onion, pepperoncini, mozzarella and tapenade
  • Make a wrap of hummus, red onion, roasted red pepper, arugula and tapenade
  • Make a pasta with tapenade, cherry tomatoes and toasted breadcrumbs (recipe to follow)

The possibilities for its use is only limited by your imagination! Although you can purchase store bought tapenade, it’s so easy why not make it yourself for a lot less! This blog will focus on whipping up this flavorful Mediterranean olive spread and a easy, crowd pleasing pasta when you’re busy.

OLIVE TAPENADE (MEDITERRANEAN OLIVE SPREAD)

INGREDIENTS:

  • 6 ounces brine-cured olives, pitted and drained (Manzanillo and or kalamata work well)
  • 6 ounces California black olives, pitted and drained
  • 1 teaspoon anchovy paste or 2 anchovy filets
  • 1/4 cup capers, drained
  • 2 tablespoons fresh flat leaf parsley
  • 3 cloves garlic
  • 3 tablespoons fresh lemon juice
  • Couple grinds fresh black pepper
  • 1/4 cup extra-virgin olive oil

INSTRUCTIONS:

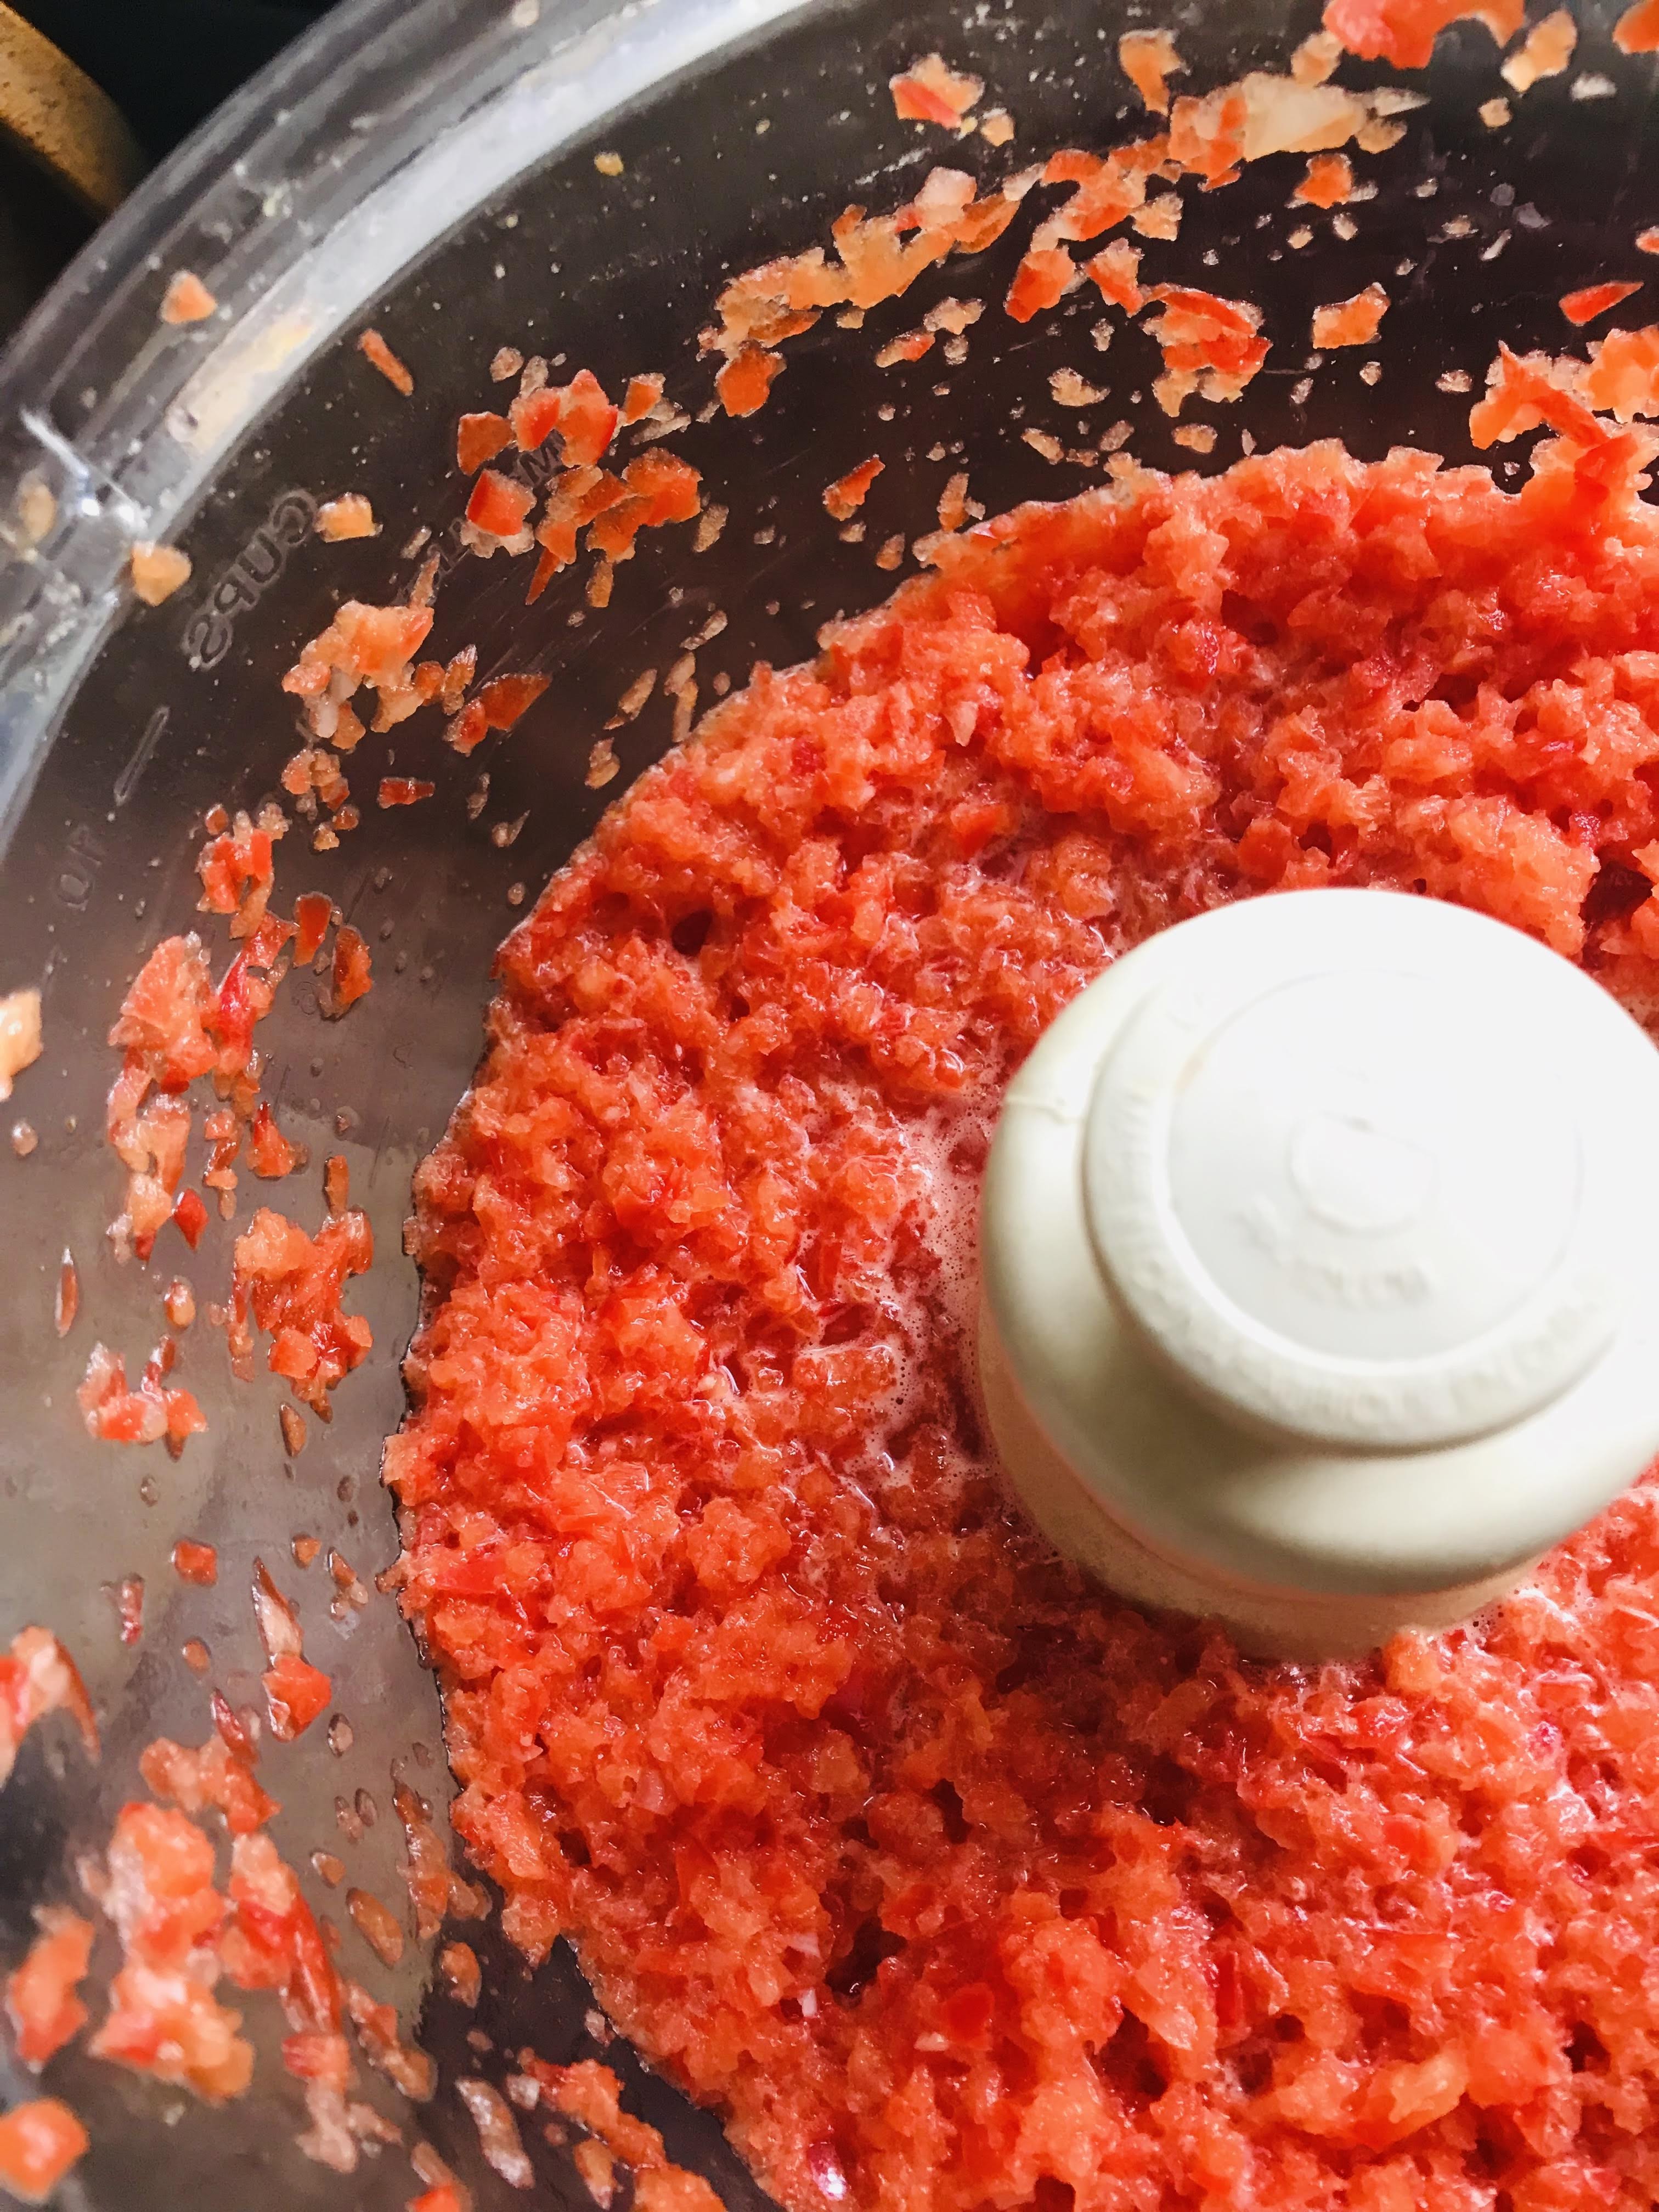
  1. Place drained and pitted olives in the bowl of a food processor. Add anchovy, capers, parsley, garlic, lemon juice, and black pepper. Pulse several times until coarsely chopped.
  2. Scrape side with spatula and add olive oil. Pulse several times until a chunky paste forms, scraping sides as needed. Serve at room temperature.

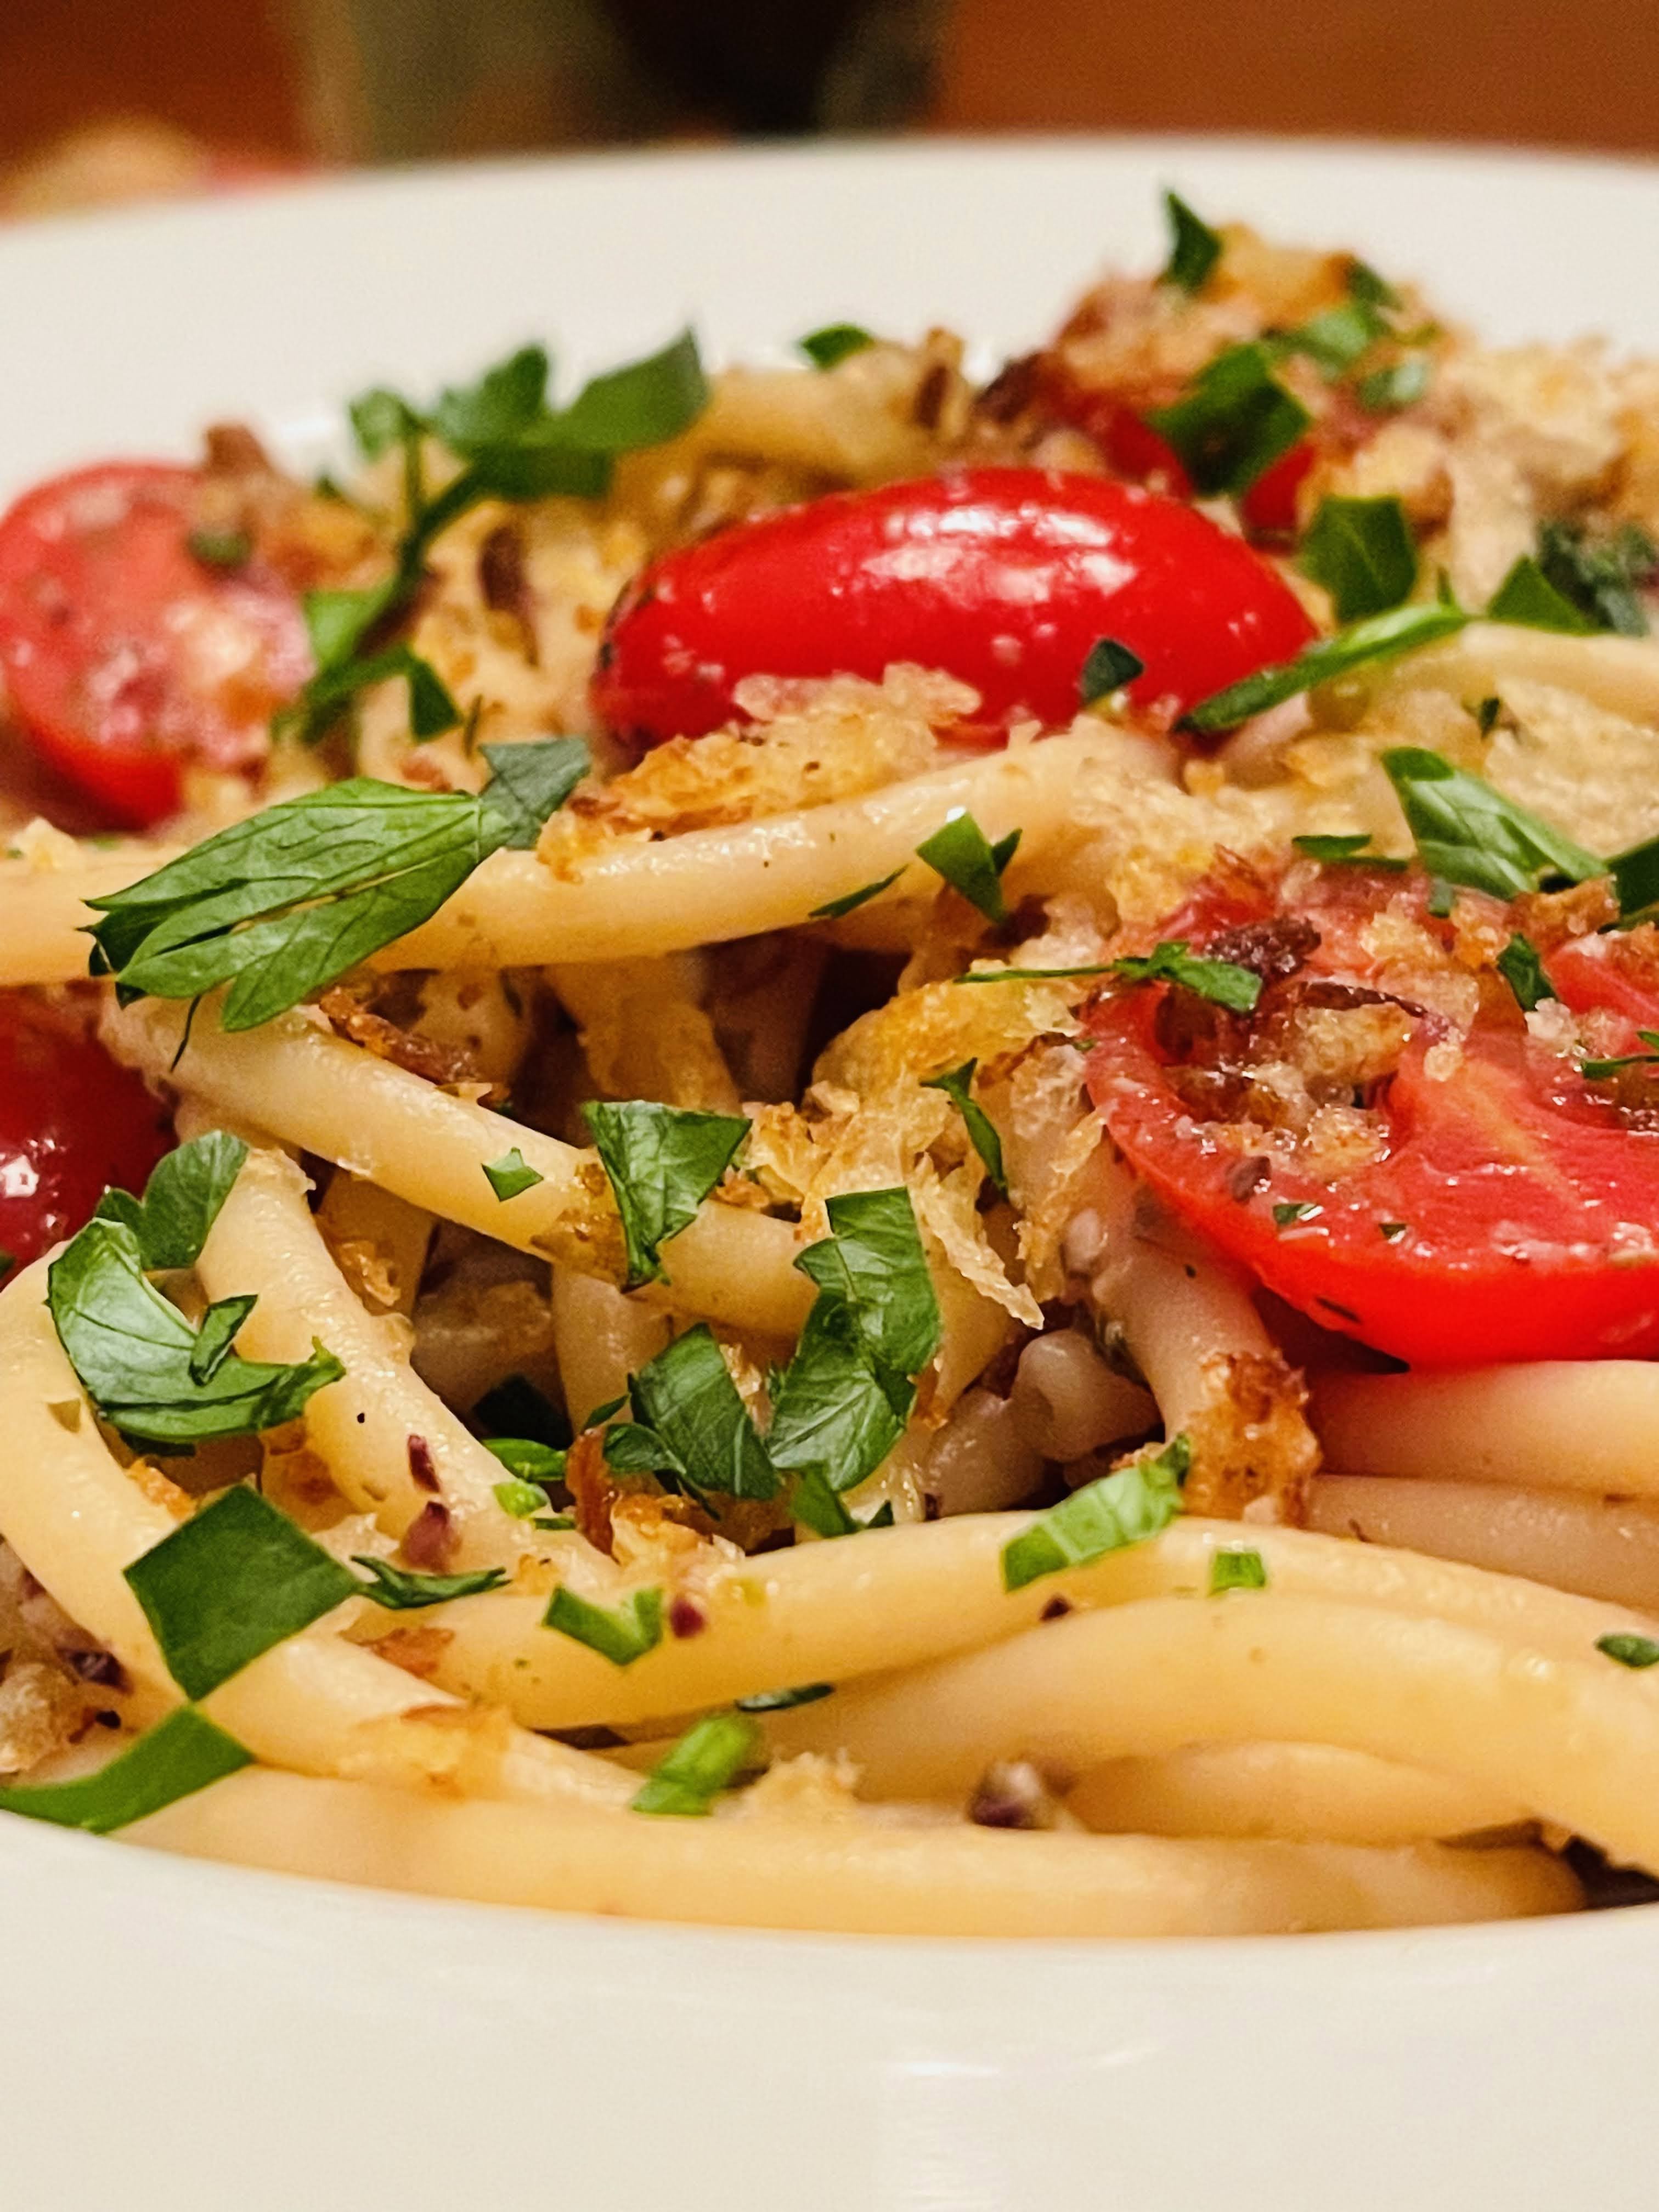
TAPENADE PASTA WITH CHERRY TOMATOES AND TOASTED BREADCRUMBS

INGREDIENTS:

  • 8 ounces bucatini pasta
  • 1/2 cup toasted fresh breadcrumbs
  • 2 cups cherry tomatoes, halved
  • 1/2 cup olive tapenade
  • 3/4 cup pecorino cheese, grated
  • 1/2 cup chopped flat-leaf parsley
  • Freshly ground black pepper

INSTRUCTIONS:

  1. Bring a large pot of water to a boil. Season the water generously with salt and then add the pasta. Cook the pasta according to package directions.. Reserve 1 cup of pasta water before draining the pasta.
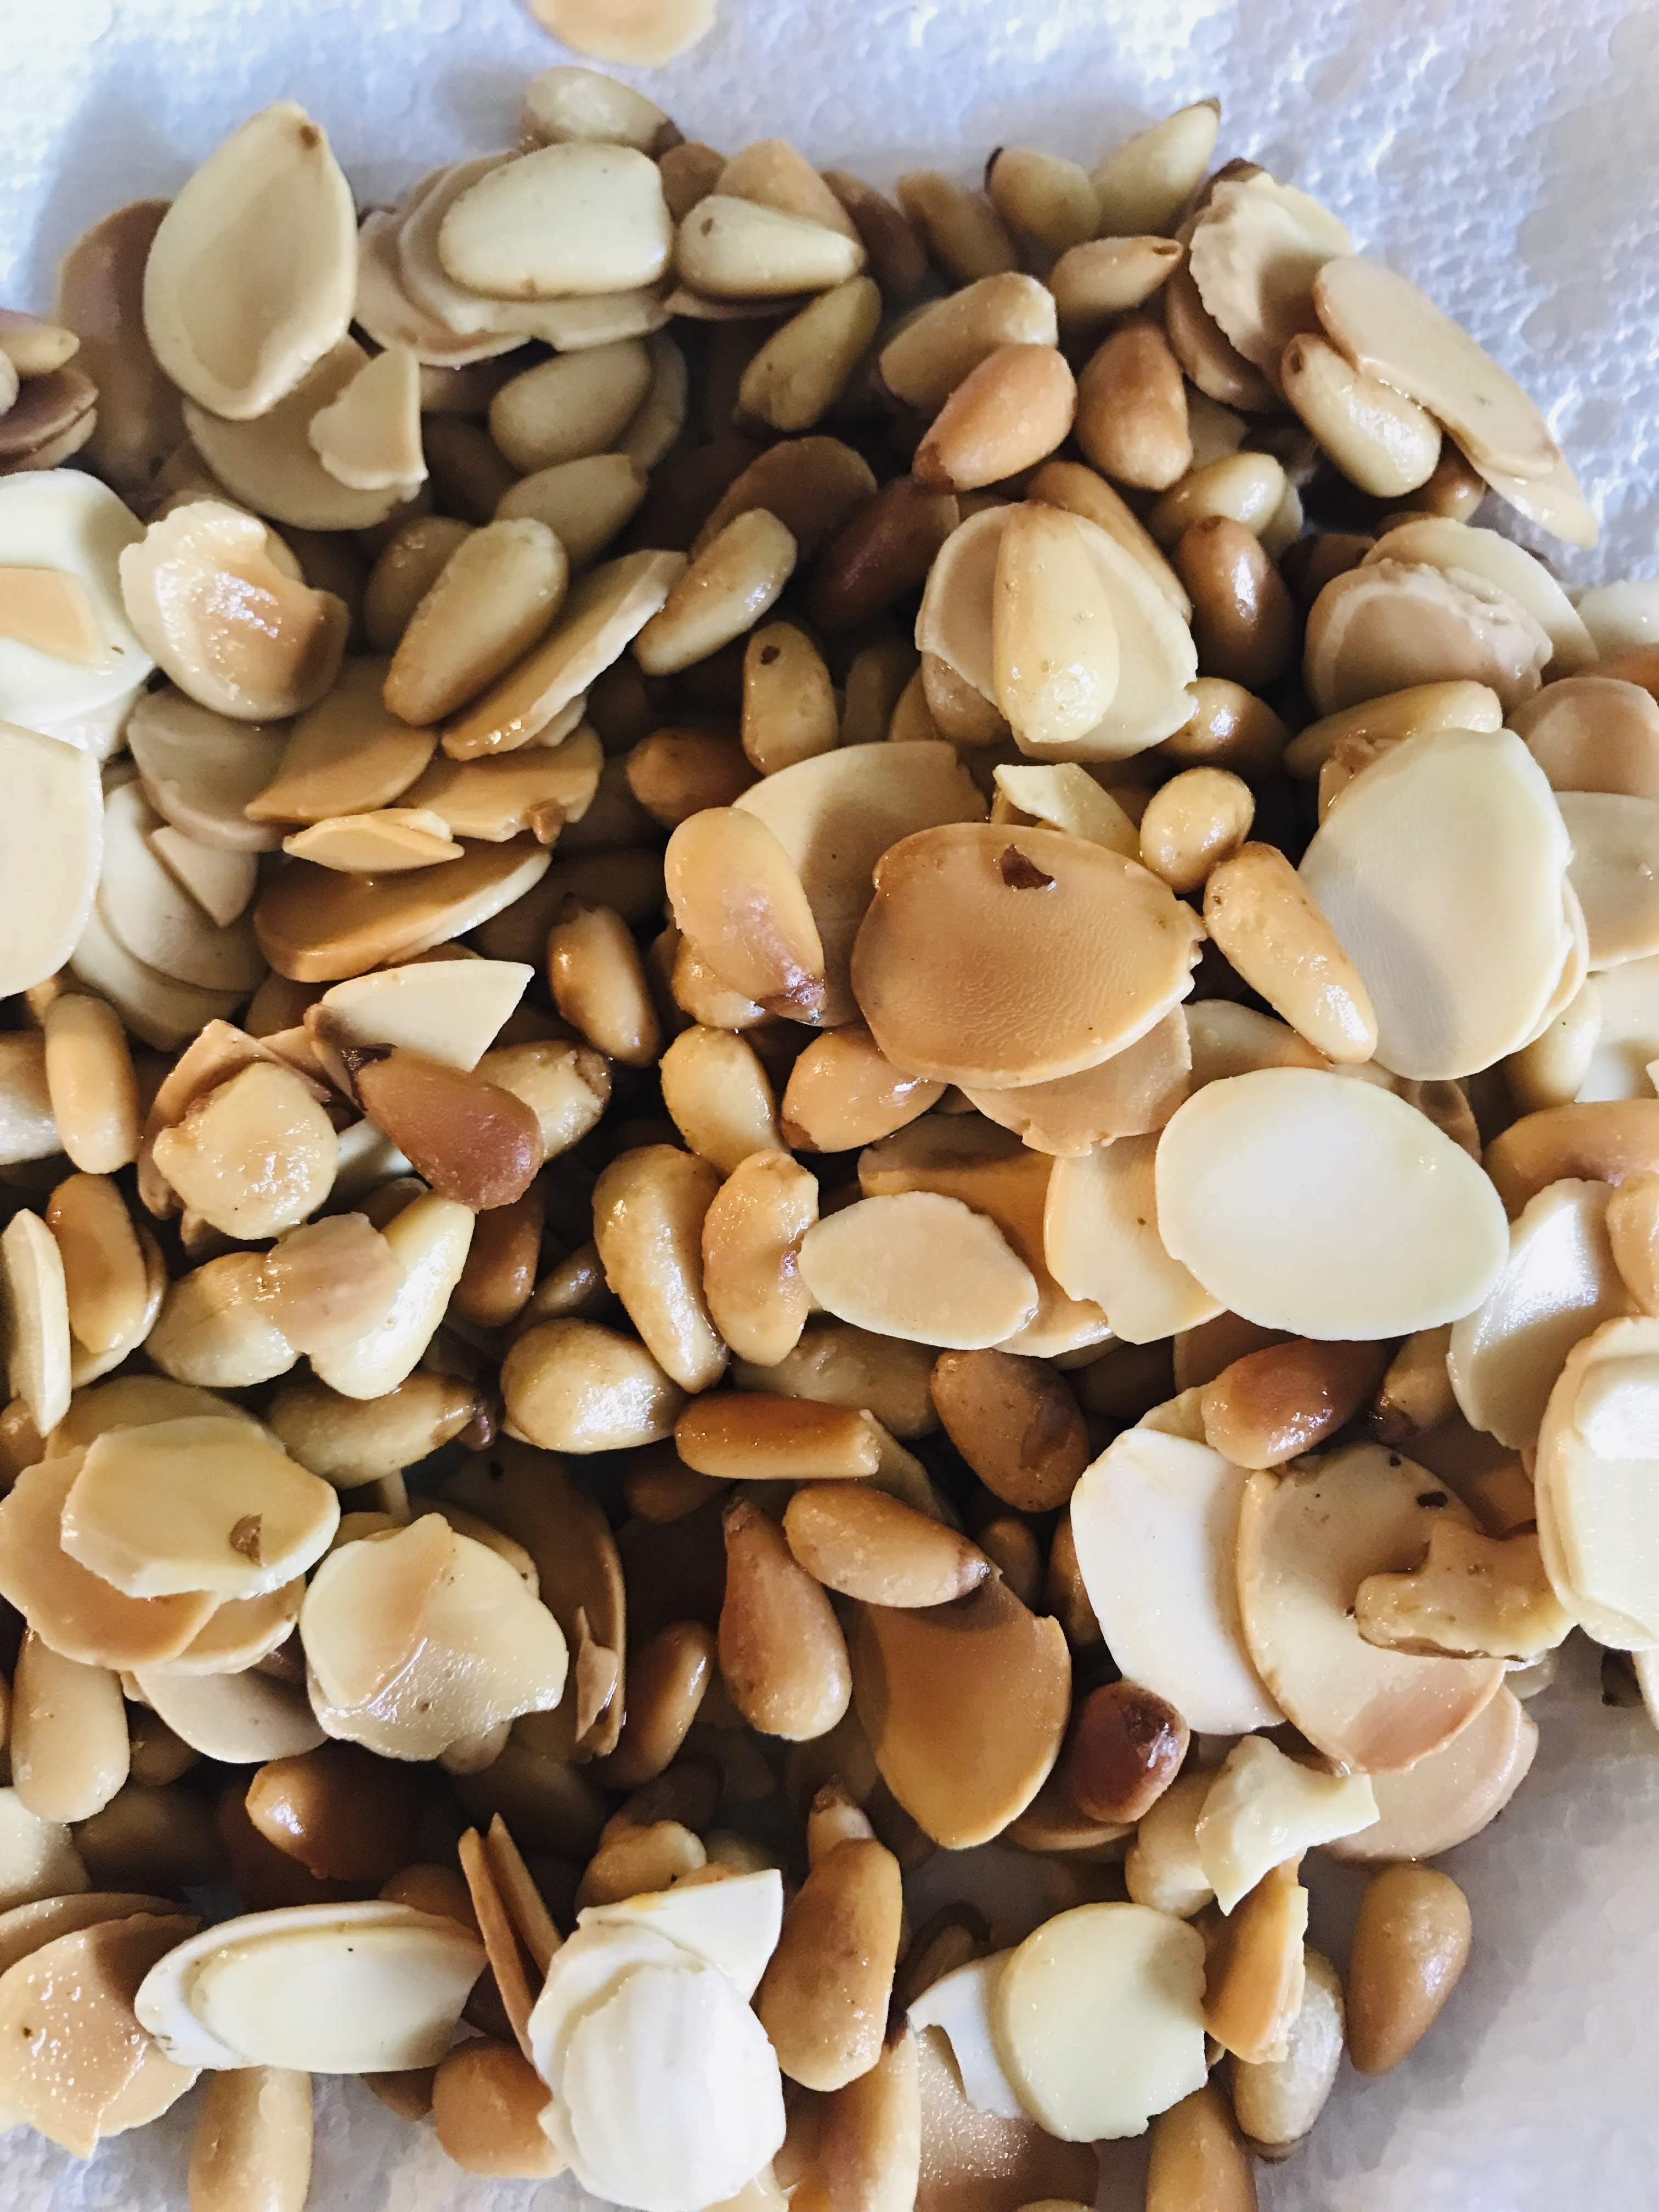
  2. While you pasta is cooking heat a few drizzles of olive oil in a small skillet over medium heat. Stir in the fresh breadcrumbs and toast them until golden brown, 3-5 minutes. Drain on paper towels.
  3. Add the drained pasta back into the pot and add the tapenade, and 1/2 cup of the pasta water. Toss well to combine, adding additional pasta water if needed. Add 1/2 the cheese, the cherry tomatoes and parsley. Season with black pepper.
  4. Pile the pasta onto plates or shallow bowls. Top with cheese, parsley and breadcrumbs. Finish with a drizzle of olive oil.

“First we eat, then we do everything else.”

The Flavorful Earth

Many years ago, when I was 10 years old, I made my first pie crust.  I had read the ingredients incorrectly and accidentally switched the salt and sugar amounts, making the pie virtually inedible.  Since then I have used refrigerator pie crusts with similar results;  they too were tough, tasteless and inedible.  I love tarts, pies and galettes and wanted to master these at home.  My reluctance to make homemade pie crusts continued until 2 months ago when my surrogate mother Mama Jan Burian offered me a solution.  I had always admired her baking skills and shared with her that pie crusts intimidated me.  She gave me her perfect pie crust recipe.  “It’s virtually foolproof!”, she told me.

Although slightly skeptical, with the encouragement of Mama Jan, I knew I had to try again.  After making the very first one, I regretted getting stuck in the refrigerator section of the grocery store.  My god, it was foolproof!  I am now delighted to report that there is no turning back!  I’m obsessed with savory galettes.  This one has become a favorite; and can be served for breakfast, lunch or dinner.  It comes together quickly and has had favorable reviews.  Thanks Mama Jan!!

SAVORY MUSHROOM GRUYERE GALETTE

MAMA JAN’S PERFECT PIE CRUST

INGREDIENTS:

  • 3 cups flour (I use Bob’s Red Mill Fine Pastry Flour)
  • 1 tablespoon sugar
  • 1 teaspoon salt
  • ¾ cup butter
  • 1/3 cup shortening
  • ½ cup ice water

DIRECTIONS:

  1. Pulse flour, sugar and salt in a processor.  Add butter and shortening; pulse until crumbly.  Add ice water and pulse until it forms a ball.  Dust silicone baking mat with flour; place ball on mat and cut in half.  Wrap each half in plastic wrap.  If using for a one crust pie or galette, place one half in refrigerator for one hour; place other half in freezer for future use.
  2. Remove wrapped dough from refrigerator and let stand for 10-15.  Unwrap and place on lightly floured silicone baking mat.  Roll out in a circle of about 16 inches in diameter.  Roll loosely around your rolling pin and place on a large baking sheet lined with parchment paper.

img_5278

img_5279


FOR FILLING:

  •  2-3 medium sized shallots, minced
  • 2 12 ounce packages white button or crimini mushrooms, or a mixture of both, sliced 1/4 inch thick
  • 3 tablespoons unsalted butter
  • 1/3 cup white vermouth
  • Kosher salt and freshly grated black pepper to taste
  • 1 tablespoon fresh thyme leaves
  • 8 ounces finely shredded Gruyere or Comte cheese
  • 1 egg lightly beaten
  • 2 tablespoons fresh parsley, chopped

DIRECTIONS:

  1. Preheat oven to 400 degrees F.  In a large non-stick skillet, melt butter over medium heat.  Add shallots and saute until soft, about 6-8 minutes.  Add mushrooms, then thyme leaves and continue to saute as the mushrooms start to sweat out their moisture.  After about 10 minutes add your white vermouth, salt and pepper.  Continue sauteing until most of the moisture is evaporated from pan.  Remove from heat and set aside.
  2. Place your finely shredded Gruyere cheese in a 12 inch circle in the center of rolled out crust; leaving a 2 inch border.  Place your mushroom mixture on top of Gruyere.  Gently fold over border making occasional pleats where necessary.
  3. Brush with beaten egg.  Place in over for 35-45 minutes; or until crust is golden and mushrooms are bubbly.  Let sit for 10 minutes before cutting.  Garnish with chopped parsley.

Serves 2-4

img_5290

img_5289

“I learned that a galette is sort of the offspring of a pie and a tart- halfway between homespun and fancy- but easier to make than its parents. The biggest difference is that a galette is a free-form pastry, baked without a pie pan or tart ring. It’s rustic. And it’s forgiving. You just roll it out flat and then fold it in roughly around the filling.”                       —Viola Shipman

Anyway You Slice It

I absolutely love Mediterranean food.  No matter if it’s from Italy, Morocco, Turkey, Spain or France, I love it all.  Fresh vegetables, legumes, olives, olive oil, cheese and an array of spices make for endless savory meals.  I find that if something you eat is truly satisfying and delicious, you eat less not more.  This Middle Eastern Tart can be served as an appetizer or entree, depending on whether or not you use both sheets of puff pastry, and how many you are serving.  Served with a salad, it is easily a complete meal.  It comes together pretty quickly and is showy enough for company.  The first time I made it there was left-over filling, which I stuffed into peppers and baked the next day.

MIDDLE EASTERN LAMB TART

INGREDIENTS:

  • 1 or 2 sheets puff pastry, thawed
  • 1 pound ground lamb
  • 1 tablespoon olive oil
  • 1 medium onion, choppped
  • 3 garlic cloves, minced
  • 1 (15 ounce) can fire-roasted diced tomatoes
  • 1 cup cooked chick peas (I use canned and drained)
  • 2 teaspoons ras el hanout (page    , or alternatively 1 teaspoon each ground cumin and oregano)
  • 1 teaspoon kosher salt
  • 1 teaspoon freshly ground black pepper
  • 10 kalamata olives, pitted
  • 1/2 cup feta cheese, crumbled
  • 2 tablespoons parsley, chopped

img_5348

DIRECTIONS:

  1. Preheat oven to 400 degrees F.
  2. In a saute pan over medium heat add olive oil, onion and garlic until soft, about 3-4 minutes.  Add ground lamb, breaking up the lamb with a spoon and brown, about 5-6 minutes.  Add the tomatoes, chickpeas, olives and spices.  Simmer for about 5 minutes or until heated through.  Remove from heat and allow to slightly cool.
  3. Line a baking sheet with parchment paper (two baking sheets if using both puff pastry sheets).  Roll out slightly, then make a one-inch rimmed line on the inside edges with a knife, taking care not to cut all the way through.  Prick the dough with fork all over in center area.  Place in oven and bake for 10 minutes, remove from oven and spoon mixture evenly in the center of each pastry sheet.  Top with feta cheese, brush pastry edges with beaten egg (optional) and bake for another 8-10 minutes or until puffed and edges are golden brown.
  4. Top with chopped parsley and cut into desired portions; 4, 6 or multiple if serving as appetizer.  Serve.

Serves 2-4 as entree

img_5350-1

“Cooking is like love.  It should be entered into with abandon, or not at all.” –Harriet von Horne.


I’ve Gone Nuts

Seasonal.  We are entering the threshold of fall.  Tomatoes are waning, sweet corn is done; but there are wonderful options that are showing up at the farmers market stalls.  Peppers, for example are prolific right now.  I love them roasted, and rely on them in jars during winter; but what if you change something traditionally done with roasted and made it with fresh peppers?  Muhammara, a Syrian spread is traditionally made with roasted Aleppo peppers (although jarred roasted peppers work just fine).  It also has bread and walnuts in combination with the roasted peppers.   I wondered what would happen if I used fresh peppers and additional varieties of nuts?  Game on.

FRESH RED PEPPER AND NUT SPREAD

img_5005

INGREDIENTS:

  • 1/4 cup vegetable oil (I use avocado oil)
  • 1/4 cup pine nuts
  • 1/4 cup sliced almonds
  • 1/2 cup walnut pieces
  • 1/4 cup unsalted roasted pistachios
  • 3 medium red bell peppers, about 1 pound, seeded and cut into 2″ chunks
  • 1 medium sweet onion (I used Wall Walla), cut into chunks
  • 1/3 cup toasted bread crumbs
  • 1/2 cup extra-virgin olive oil
  • Kosher salt and freshly ground black pepper to taste
  • 1/2 teaspoon ground cayenne pepper

img_5006

img_5007

DIRECTIONS:

  1. Heat oil in a 10 inch skillet over medium heat.  Add walnuts and saute for about 3-5 minutes until lightly toasted.  Remove with slotted spoon and place in bowl of food processor.
  2. Add pine nuts and almonds to same skillet.  Saute for 2 minutes, until lightly golden.  Remove with slotted spoon to plate lined with paper towels.
  3. Add pistachios to food processor bowl and pulse until finely chopped.  Place in medium bowl.
  4. Add red pepper and onion to food processor bowl.  Pulse until fine.  Transfer to mesh strainer to remove liquid.  Let stand for 5 minutes.
  5. Add strained peppers and onions to bowl.  Stir in pine nuts, almonds, breadcrumbs and olive oil.  Season with salt, pepper and ground cayenne.
  6. Serve with crackers of choice. (I use crostini)

Yield: 3 cups

“A recipe has no soul.  You. As a cook bring soul to the recipe.”  — Thomas Keller


Romancing The Garlic

Hard-neck garlic drying

Hard-neck garlic drying

July is garlic time here at our farm,. We’re busy harvesting, cleaning, hanging and selling heady, beautiful hard-neck garlic. It’s an intense time for a small farm such as ours.  Each step of the process is by hand so although time consuming, it’s definitely a labor of love.  There’s nothing quite like fresh garlic and many of our customers buy large quantities. When stored properly garlic can last well into the following year, while adding that welcome punch to so many recipes.  One way to preserve garlic is to make a “confit”.  The French verb confit means “to preserve.” The term confit in our country has come to mean to poach something in fat at a low temperature for a long time.

Peeled garlic ready to poach

Peeled garlic ready to poach

During the growing season I am always looking for ways to preserve and extend each crop.  Many times while harvesting garlic we have ‘dingers’; heads that we accidentally sink a shovel into or rip the roots off by pulling a little too hard.  We collect these and rather than resign them to the compost pile, we turn them into a delicious garlic confit. These make wonderful hostess or Christmas gifts and can be used in a variety of ways. Try them as a dipping oil for crusty artisan bread, add them to bean soups, to pasta, mashed potatoes or even roasted red peppers for a great bruchetta.  The possibilities are endless, limited only by your imagination.  Who wouldn’t love a jar of this liquid gold?

Garlic Confit:

  • 4 cups whole garlic cloves, separated and peeled
  • Small handful of fresh woody herbs (approximately 8-10) such as thyme or rosemary
  • 1 bay leaf, 8 peppercorns, or 1/2 teaspoon red pepper flakes (try different combinations, as these are entirely optional)
  • 3 cups extra virgin olive oil

Place garlic, herbs, oil and any additional ingredients you have chosen in a medium heavy saucepan.  Cover a cook over very low heat for about 30 minutes.  Don’t allow the oil to rise above 200 degrees F.  You may see small bubbles rise to the top.  To check for doneness, take a paring knife and test a clove.  It should be very soft; if not, poach for an additional 10 more minutes.

Remove pan from heat, keep covered and allow to cool to room temperature.  Using a clean spoon, divide garlic, herbs and oil among resealable jars. (I use 1/2 pint jelly jars)  Can be kept in the refrigerator for up to 4 months.

Garlic ready to slowly poach

Garlic ready to slowly poach

Liquid Gold

Liquid Gold

“The combination of olive oil, garlic and lemon juice can lift the spirits in winter.”

—Yotam Ottolenghi

Many Shades of Green

After working in the heat and humidity today, we decided it was high time to remove the storm windows in our screened-in porch.  It’s really our “family room” during the summer.  Our dining room table is temporarily retired and we open the french doors.  It is here that we have our morning coffee, our evening cocktail, eat our meals and play endless games of domino’s. Overlooking the lake, surrounded by trees and our flower gardens, it is our sanctuary at the end of a hectic farm day.

After a shower and Bloody Mary, I wanted to make something in contrast to the heavy humidity of the past several days.  Remembering I had purchased beautiful English cucumbers from Real Food at the farmer’s market on Saturday; it was time to turn them into a refreshing chilled soup.  This is super easy and just right for those night’s when your tired but want something quick and healthy.  The olive oil gives this soup a creamy texture.

Tangy Cucumber Soup:

  • 3 Persian or English cucumbers, ends trimmed and coarsely chopped
  • 1/2 cup Greek yogurt
  • 1/4 cup buttermilk
  • 3 cloves garlic, pressed
  • 3 Tbsp. fresh lemon juice
  • 2 Tbsp. fresh chives, chopped
  • 3 Tbsp. fresh dill or cilantro, chopped
  • 1/2 cup extra-virgin olive oil (omit if you choose to drink this as a smoothie)
  • Kosher salt and freshly ground black pepper to taste

Place all ingredients except the olive oil in a blender.  Puree until smooth.  With the blender still running, gradually add the olive oil until incorporated.  Transfer to a bowl and chill for at least an hour.  Ladle into bowls and garnish with additional dill or cilantro.

Serves 4

Chilled soup or smoothie, you be the judge

Chilled soup or smoothie, you be the judge


“Live within your harvest.”  —Persian Proverb

Cream Of The Crop

Spring seems to be dragging its feet around here.  One day it’s warm, the next day it’s cool, while the night’s plunge into the low 40’s and occasionally the 30’s.  It looks like our tomato planting is put off another week. Those 2600 little darlings will just have to wait it out in the hoop house until the night temperatures warm up.

The good news is that the rain and warm daytime temperatures are wonderful for glorious spring asparagus!  Do I see a pattern here?  Wasn’t I just making a pronouncement last week that it’s one of the few vegetables I will only use fresh?  Well, that was last week.  We bought 10 pounds to put up, taking full advantage of fresh Michigan asparagus while it’s plentiful now; and boy is it ever!  Nearly every stall at the farmer’s market is overflowing with the stuff.  I know that we will be reminded of our favorite veggie in this wonderful cream soup long after the season is over.

There are many approaches to asparagus soup, but typically the essentials involve asparagus, onions or leeks and chicken stock.  With spring leeks available, that choice was a no-brainer.  However the addition of garlic, fresh spring tarragon and vermouth kick it up a notch.  And of course there’s the cream.  Honestly, it’s decadence is worth the calories!

Cream of Asparagus Soup:

  • 2 lbs. fresh asparagus
  • 4 Tbsp. unsalted butter
  • 4 small leeks, using white and light green parts only, thinly sliced
  • 3 garlic cloves, minced
  • 1/4 cup dry vermouth
  • 4 cups chicken stock
  • 1 Tbsp. fresh tarragon, minced
  • 1 Tbsp. fresh lemon juice
  • 3/4 cup heavy cream

Directions:

Snap off the tough stem ends from the asparagus spears.  Cut the tips off a dozen or so and set aside for garnish. Chop the remaining asparagus into 1 inch pieces.

In a small saucepan, blanch the asparagus tips for 2 minutes, then plunge into ice water.  Let drain on paper towels.  Reserve for later.

In a heavy soup pot over medium heat, melt the butter.  Add the leeks and garlic and saute until tender and translucent, about 3-4 minutes.

Fragrant leeks and garlic

Fragrant leeks and garlic

Getting better all the time

Getting better all the time

Add the asparagus and 4 cups of chicken stock.  Season with salt and freshly ground black pepper.  Bring to a simmer, then reduce the heat to medium-low.  Add the chopped tarragon.  Cover and cook for about 20 minutes.

Using an immersion blender, puree the soup until smooth, about 2 minutes. Alternately, you can puree the soup in batches in a blender, then return to the pot.  Add lemon juice and heavy cream.  Reheat the soup to serving temperature.  Ladle in shallow bowls and garnish with reserved asparagus tips.

Tip:  This soup is also great cold, so pack it for your next lunch if you’re luck enough to have leftovers.

Serves: 4

Spring never tasted so decadent.

Spring never tasted so decadent.

“Worries go down better with soup.”

Liquid Gold

It’s March 1st and winter still has us in her clutches, with no sign of letting go anytime soon.  I tell myself “no problem” and head into our basement to see what vegetables are still holding up.  I find both white and orange sweet potatoes and carrots still in good condition.  I dig around the freezer and find a quart of homemade chicken stock.  I grab some onions and garlic and head back upstairs.

Whenever I want to make soup using root vegetables, I find I like to roast them first.  It always gives the soup much more depth, not to mention those warming smells in the kitchen.  As I’ve mentioned both in my previous blog Basics With A Twist, and this one, I always lean toward the savory,  I enjoy herbs and spices and love what they do to food.  It’s really ethnic cooking at its finest.

With this soup I’ll roast the sweet potatoes and carrots to make a puree for the base.  While they’re in the oven I will toast cumin and coriander seeds.  Toasting whole seeds releases a flavor far superior to purchased ground spices; you’ll find the scents exotic and sensual.  Although you can grind them in a spice mill, I prefer to use a granite mortar and pestle. I also use shallots, rather than onion, and brown them slightly.  I like how the sweetness of the root vegetables pairs with the intensity of the spices.  Puree it altogether with a bit of apple cider vinegar and it really comes alive.  I enjoy topping it with toasted pepitas (pumpkin seeds) and chopped cilantro.

Roasted Sweet Potato and Carrot Soup:

  • 6 cups sweet potato, peeled and cubed
  • 4 cups carrot, peeled and sliced into 2 inch sections
  • 4 Tbsp olive oil
  • 1/2 tsp salt
  • 4 cups homemade chicken stock
  • 3/4 tsp cumin seed, toasted and ground
  • 1/2 tsp coriander seed, toasted and ground
  • 1 1/2  cups shallots, thinly sliced
  • 2 garlic cloves, pressed
  • 2 Tbsp ghee
  • 2 Tbsp olive oil
  • 1 tsp freshly grated ginger
  • 1 tsp salt
  • 1/2 tsp ground cinnamon
  • 1/2  tsp ground cayenne
  • 1 14oz can full-fate coconut milk
  • 1 Tbsp apple cider vinegar
  • 1/4 cup fresh cilantro, chopped
  • 1/4 cup roasted pepitas (pumpkin seeds)

Perfectly roasted veggies

Perfectly roasted veggies

Toasted cumin and coriander seeds

Toasted cumin and coriander seeds

  1. Preheat oven to 400 degrees.  Peel and cut sweet potatoes and carrots; place in a large bowl.  Drizzle with olive oil and sprinkle salt.  Toss until well coated; place on large sheet pan lined with parchment paper.  Place in oven for 40 minutes or until soft; turning vegetables halfway through. Cool.
  2. While vegetables are roasting, place cumin and coriander seeds in small dry skillet over medium heat and toast until lightly brown.  Grind in mortar and pestle or in spice grinder.  Set aside.
  3. After vegetables are cool, place half of them in a blender with some of the chicken stock and puree until smooth;  pour into large bowl and set aside; repeat with remaining vegetables and stock.
  4. Melt ghee and olive oil in large pot.  Add sliced shallots and pressed garlic.  Saute on medium until soft.  Add ground cumin, coriander, salt and ginger.  Stir for 1 minute.  Add cinnamon and cayenne.
  5. Pour half of vegetable puree into pot with shallots and blend with stick blender until smooth.  Add remaining puree and coconut milk.  Heat on low until warmed through.  Add apple cider vinegar and mix well.
  6. Ladle into bowls, topping with a few pepitas and chopped cilantro.

Serves: 6-8

Liquid Gold

Liquid Gold

“Soup is a lot like a family.  Each ingredient enhances the others; each batch has its own characteristics; and it needs time to simmer to reach full flavor.”  —-Marge Kennedy


Little Things Mean A Lot

Initially, when we went grain-free, we thought it might be a difficult transition.  Being foodies, we were anxious to understand the perimeters of this life-style approach and how we might use our creativity to still make food that excited us.  When looking for inspiration, I often go to my collection of ethnic cookbooks.  I was not disappointed; we love Middle Eastern, Indian and Mediterranean food.  I was soon mixing up a concoction of ground turkey, shredded zucchini, herbs and garlic into small meatballs that were first browned in a pan, then finished in the oven.  Topped with a soothing sauce of homemade yogurt, sour cream, lemon juice and sumac, they are perfect as an appetizer or served on top of a salad of tomatoes, cucumber, feta and sunflower sprouts.

Moral of the story:  change doesn’t have to be difficult, and little things mean a lot.

Zucchini and herbs at the ready

Zucchini and herbs at the ready

Turkey-Zucchini Meatballs With Lemon Sumac Sauce:

  • 1 lb ground turkey
  • 2 cups shredded zucchini
  • 3 green onions, thinly sliced
  • 1 large organic egg
  • 2 Tbsp fresh mint, chopped
  • 2 Tbsp fresh cilantro, chopped
  • 3 cloves garlic, pressed
  • 1 tsp cumin seed, toasted and ground
  • 1 tsp salt
  • 1/2 tsp freshly ground black pepper
  • 1/2 tsp cayenne pepper
  • 2 Tbsp ghee

Lemon Sumac Sauce:

  • 1/2 cup sour cream
  • 2/3 cup homemade or Greek yogurt
  • 1 tsp grated lemon zest
  • 2 Tbsp fresh lemon juice
  • 1 clove garlic, pressed
  • 2 Tbsp extra-virgin olive oil
  • 1 Tbsp sumac (found in Middle-Eastern grocery stores)
  • 1/2 tsp salt
  • 1/2 tsp freshly ground black pepper

Browning in ghee

Browning in ghee

  1. First make the lemon-sumac sauce by placing all the ingredients in a small bowl.  Stir well and chill until needed.
  2. Preheat oven to 425 degrees.  In a large bowl, combine all the ingredients except the ghee.  Mix with your hands (you will really get a better result) then shape into small meatballs about the size of golf ball.
  3. Melt the ghee in a 12 inch skillet on medium-high heat.  Add meatballs, making sure to leave room between them.  Saute on each side until browned, about 4 minutes per side.
  4. Place browned meatballs on a cookie-sheet lined with parchment paper.  Place in oven and bake for 7-10 minutes.
  5. Place on platter and pass sauce; or place on top of salad.

Delicious and savory

Delicious and savory

“THE SECRET OF
CHANGE lS TO FOCUS
ALL OF YOUR ENERGY
NOT ON FIGHTING THE
OLD BUT ON BUILDING
THE NEW.”

Toxic Thoughts

Can we talk?  I mean really talk?  I love liver…always have.  Maybe it’s my German heritage.  I know, I know, some of you have to get past the yuck factor; but when you get past all those toxic thoughts, you’ll learn it is one of the most nutritionally dense foods you can eat.  Yet how do I convince all you skeptics out there?  After all, its been appreciated for thousands of years, and recently advocated by Paleo enthusiasts.  Why, its developed a bit of a cult following.

So let’s start by stating some nutritional information.  Liver actually contains, gram-for-gram, more nutrients  than any other food!

  • Nature’s most-concentrated source of vitamin A and vitamin B12, and rich in all other B vitamins
  • Great source of folate (folic acid is the synthetic stuff found in vitamin pills)
  • Rich in copper and chromium
  • Co-Q10 for heart heath and antioxident benefits
  • High quality protein
  • Contains an “anti-fatigue” factor (making it great for individuals fighting anemia, like me!)

Another misconception is that liver stores the toxins and therefore is not safe to eat.  It is true that liver is a detox organ.  But it is not true that liver is where the toxins are stored.  What it does store is a motherlode of critical vitamins, nutrients, and antioxidents.  These are what help the liver get rid of the toxins in the body–not trap them inside.  One caveat I do strongly suggest is insisting on grass-fed liver from pasture-raised chicken or cows.  The term “you are what you eat” does not only apply to humans.

So there it is…I suspect that if you were inclined to eat liver before, you will continue.  If you have never tried liver, I urge you to give this recipe a shot.  It’s savory, rich and delicious.  Who knows…you might just like it.

Sauteing with fresh rosemary and vermouth

Sauteing with fresh rosemary and vermouth


CHICKEN LIVER PATE:

  • 3 Tbsp ghee
  • 1 lb grass-fed chicken livers
  • 1 bunch green onions, chopped
  • 1/2 lb mushrooms, cleaned, and coarsely chopped
  • 2 cloves garlic, chopped
  • 2/3 cup white vermouth
  • 1/2 tsp dry mustard
  • 1 Tbsp fresh lemon juice
  • 2 Tbsp fresh rosemary, minced
  • 1/4 cup ghee, (plus a little additional for melting on top)
  • Sea salt
  1. Melt first 3 Tbsp of ghee in a large skillet, over medium-high heat.  Add the livers, onions, and mushrooms and cook, stirring occasionally, for about 10 minutes, until the livers are browned.
  2. Add the garlic, vermouth, mustard, lemon juice and rosemary.  Bring to a boil and cook, uncovered, until the liquid is gone.  Allow to cool.
  3. Process in a food processor with 1/4 cup of ghee.  Season  with salt to taste.  Place in individual ramekins or mold, pour melted ghee over top to preserve.  Cover with plastic wrap and chill at least 2 hours.  Freeze additional ramekins for future use.  Serve with crackers, coarse mustard and pickled red onions.

Serves 8-10 total

And so GOOD for you!

And so GOOD for you!


“Laughter is an instant vacation.”  –Milton Berle