As many of you know, food is my love language. When I researched my last cookbook, I discovered 70 percent of American’s don’t cook. This absolutely amazed me! I want to help adjust that statistic! What if I told you that many meals can be made in 40 minutes or less, with healthy and unprocessed foods? We should all be concerned about the amount of processed food we eat. Studies have repeatedly shown the more processed food we consume, the less healthy we become. In less time that it takes to order takeout pizza and wait for delivery, we could have a much healthier and satisfying meal on the table for ourselves and loved ones.
To accomplish this, I will do my part by blogging two recipes per month to give you examples of how easy this can be accomplished. Stay tuned for these as we explore how easy it can be to cook healthy meals with very little prep.
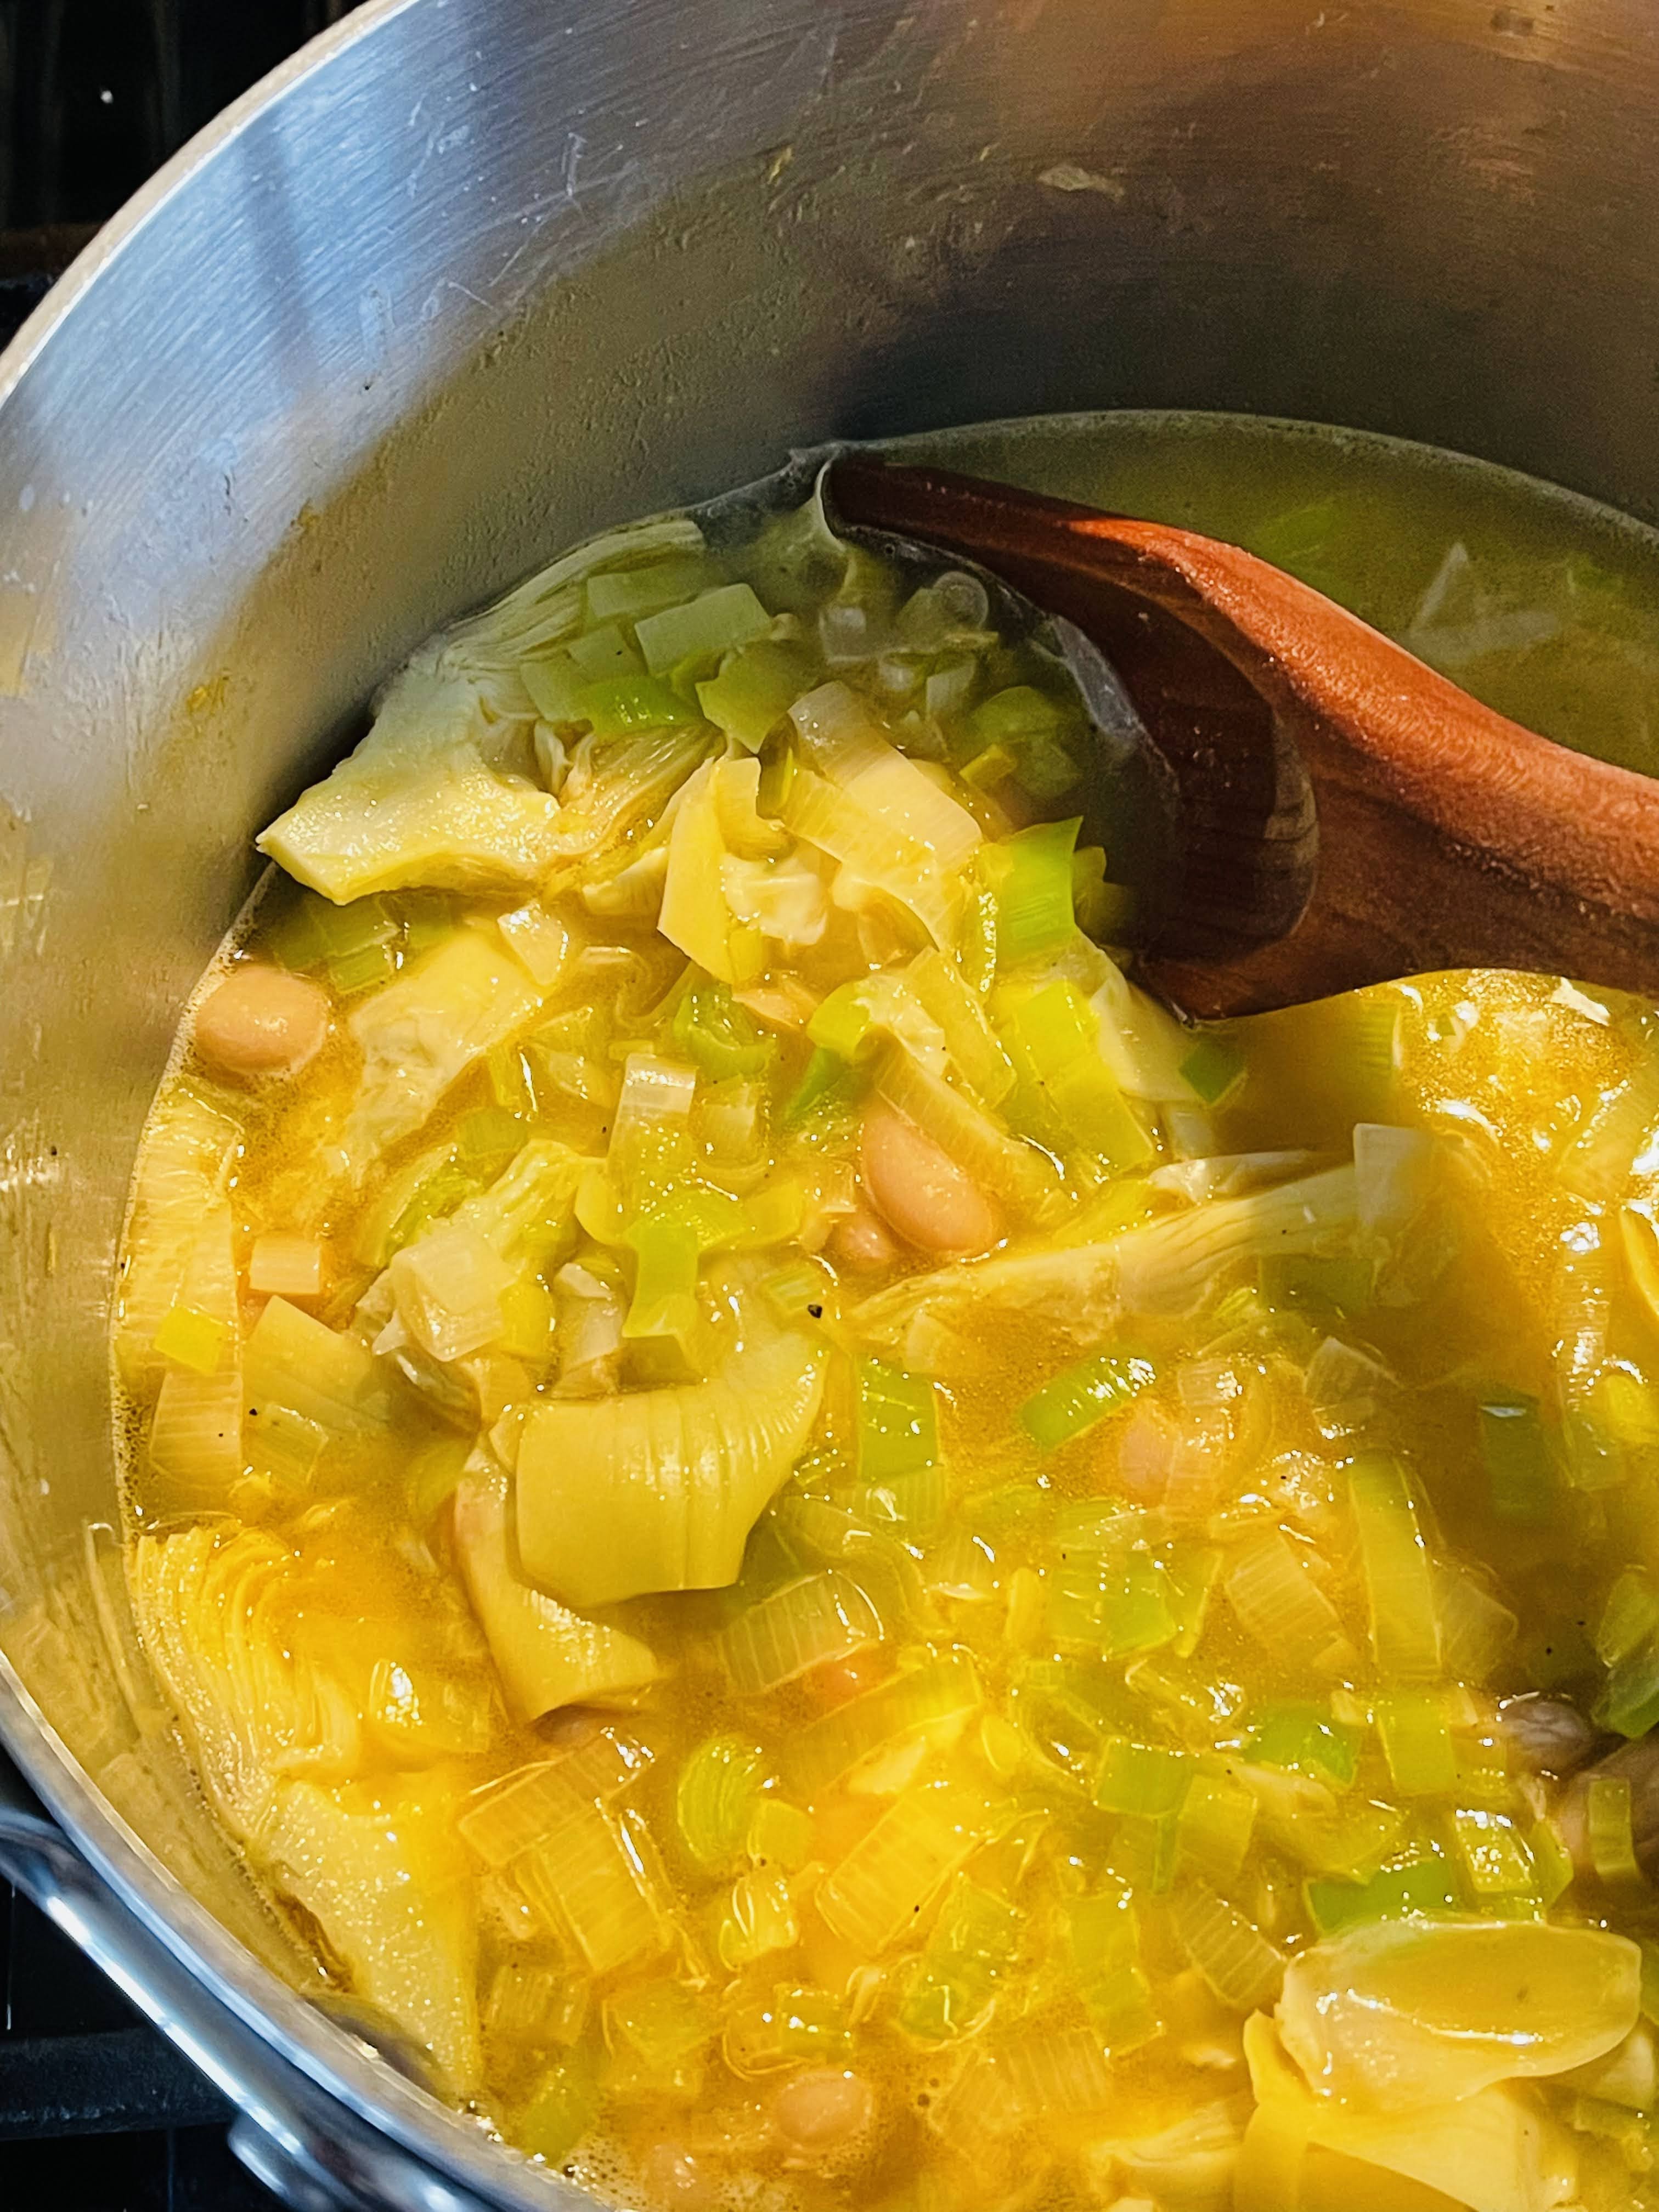
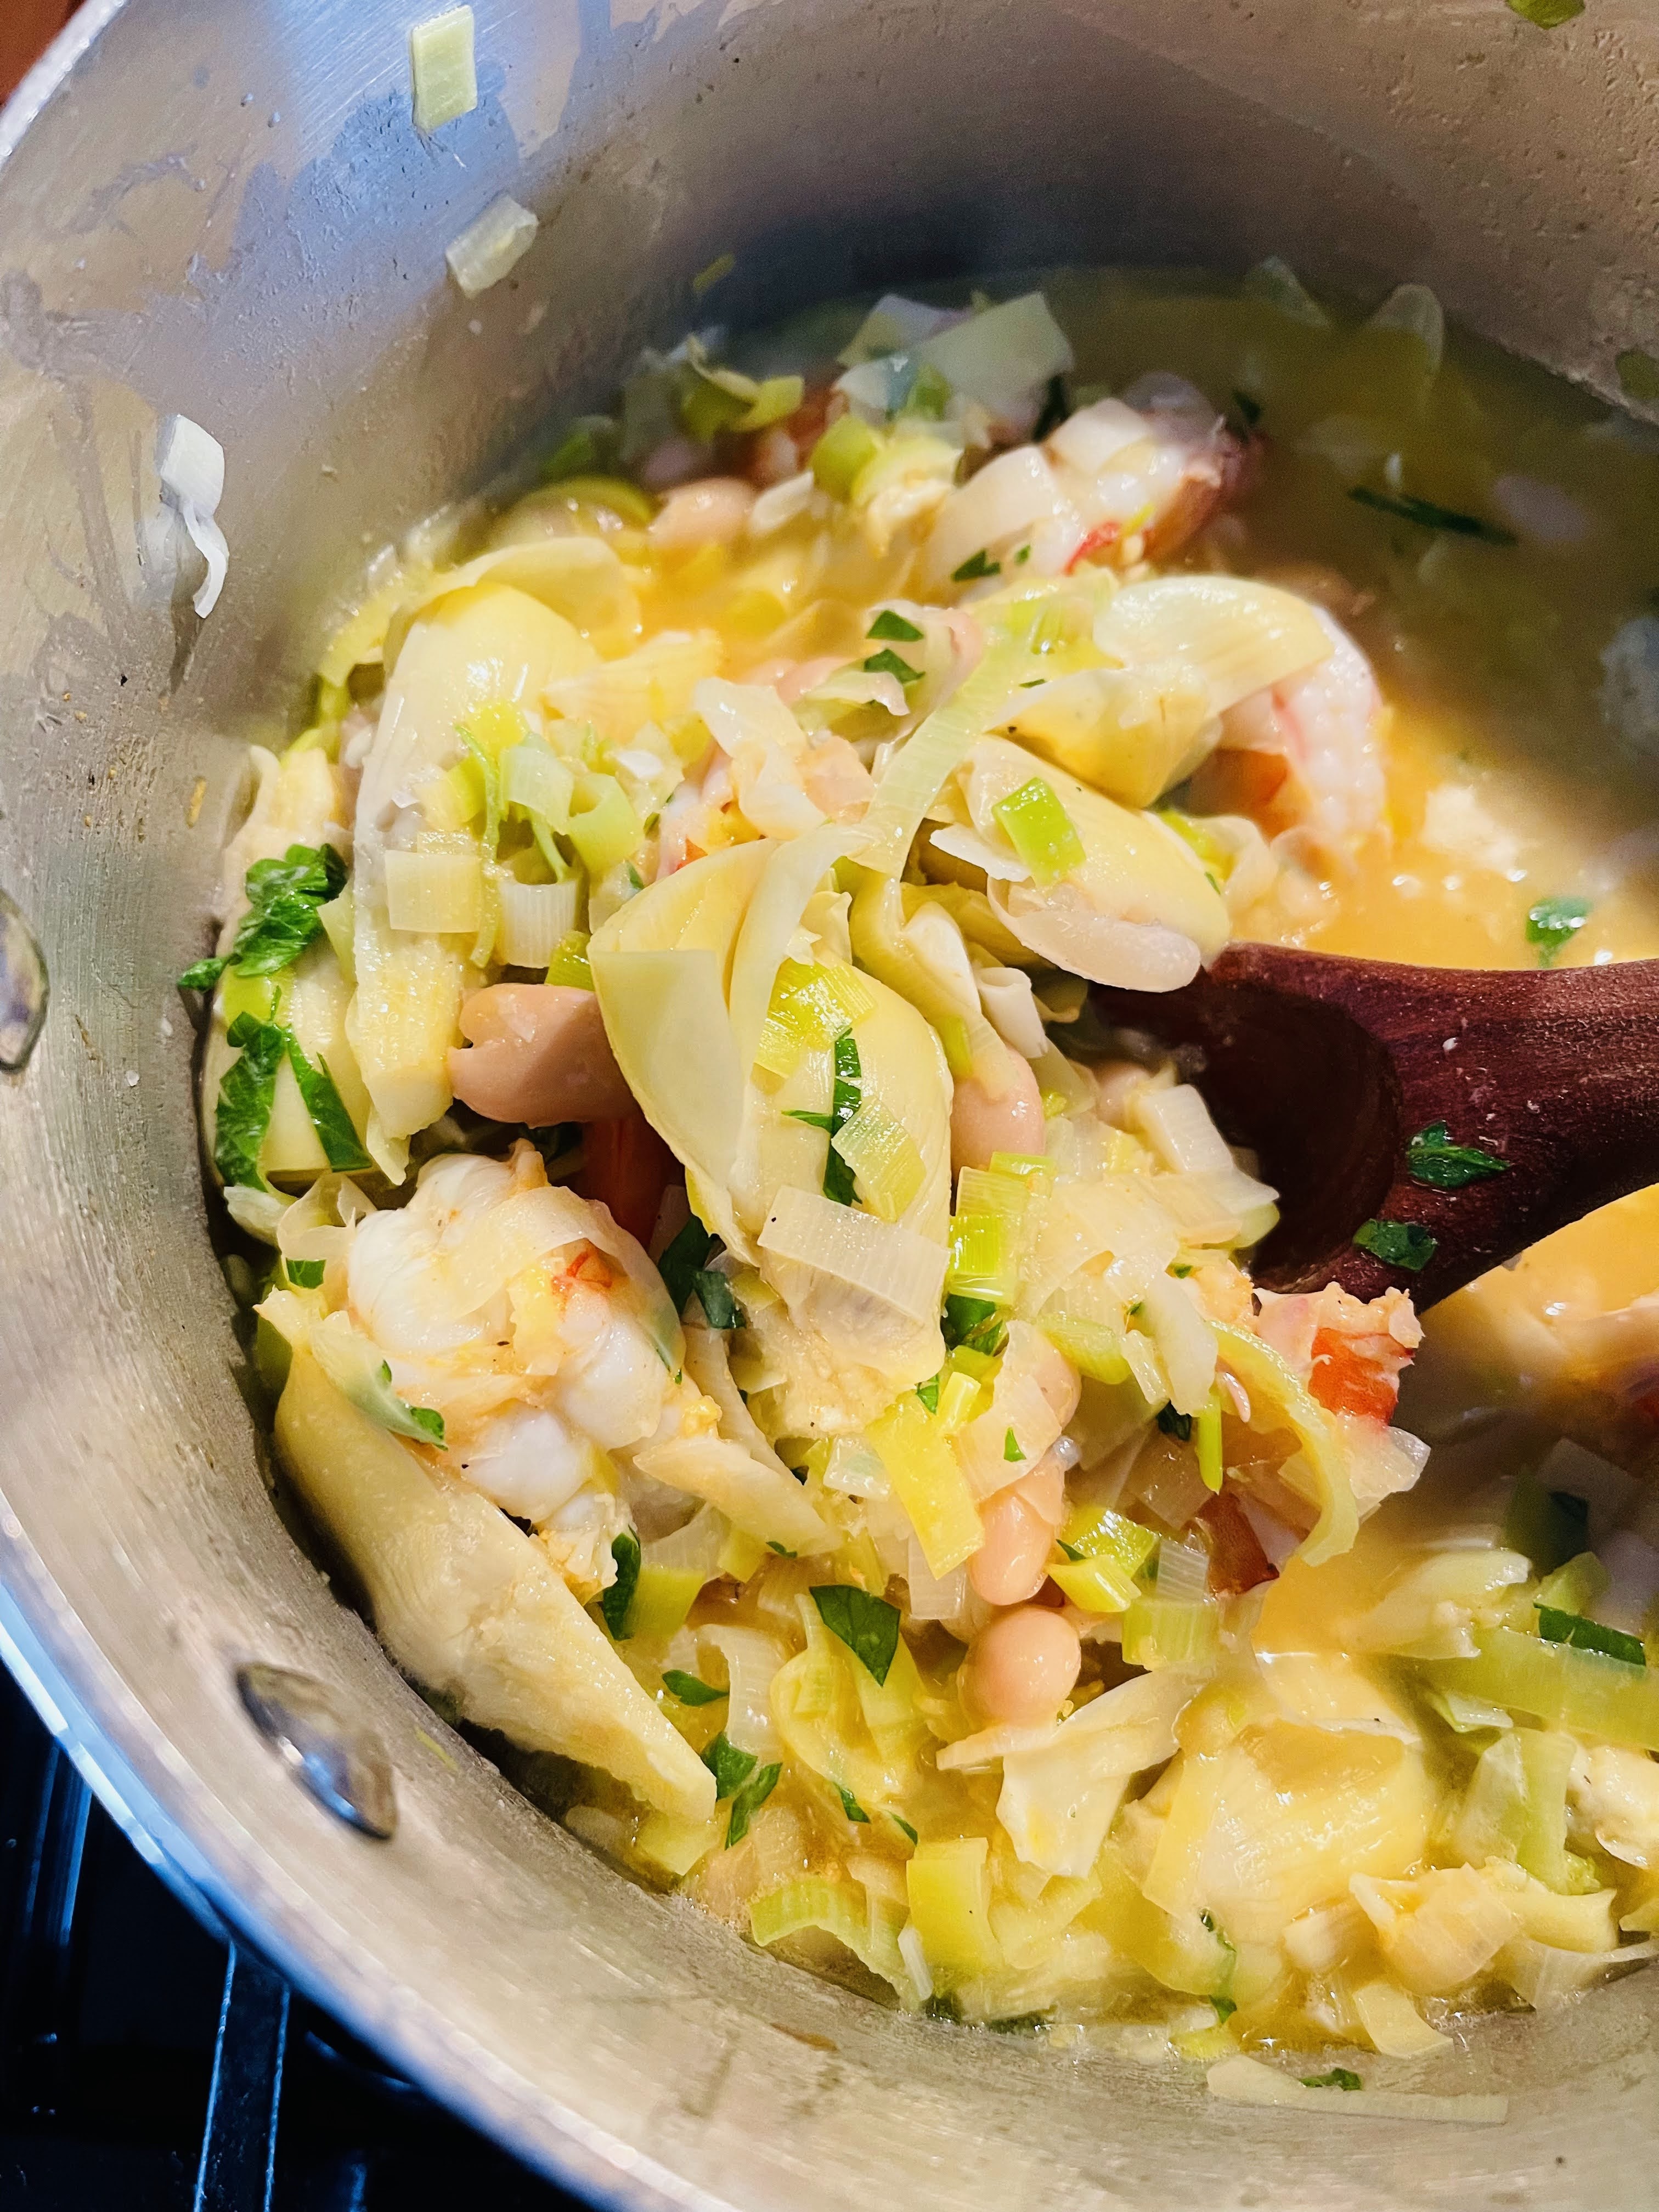
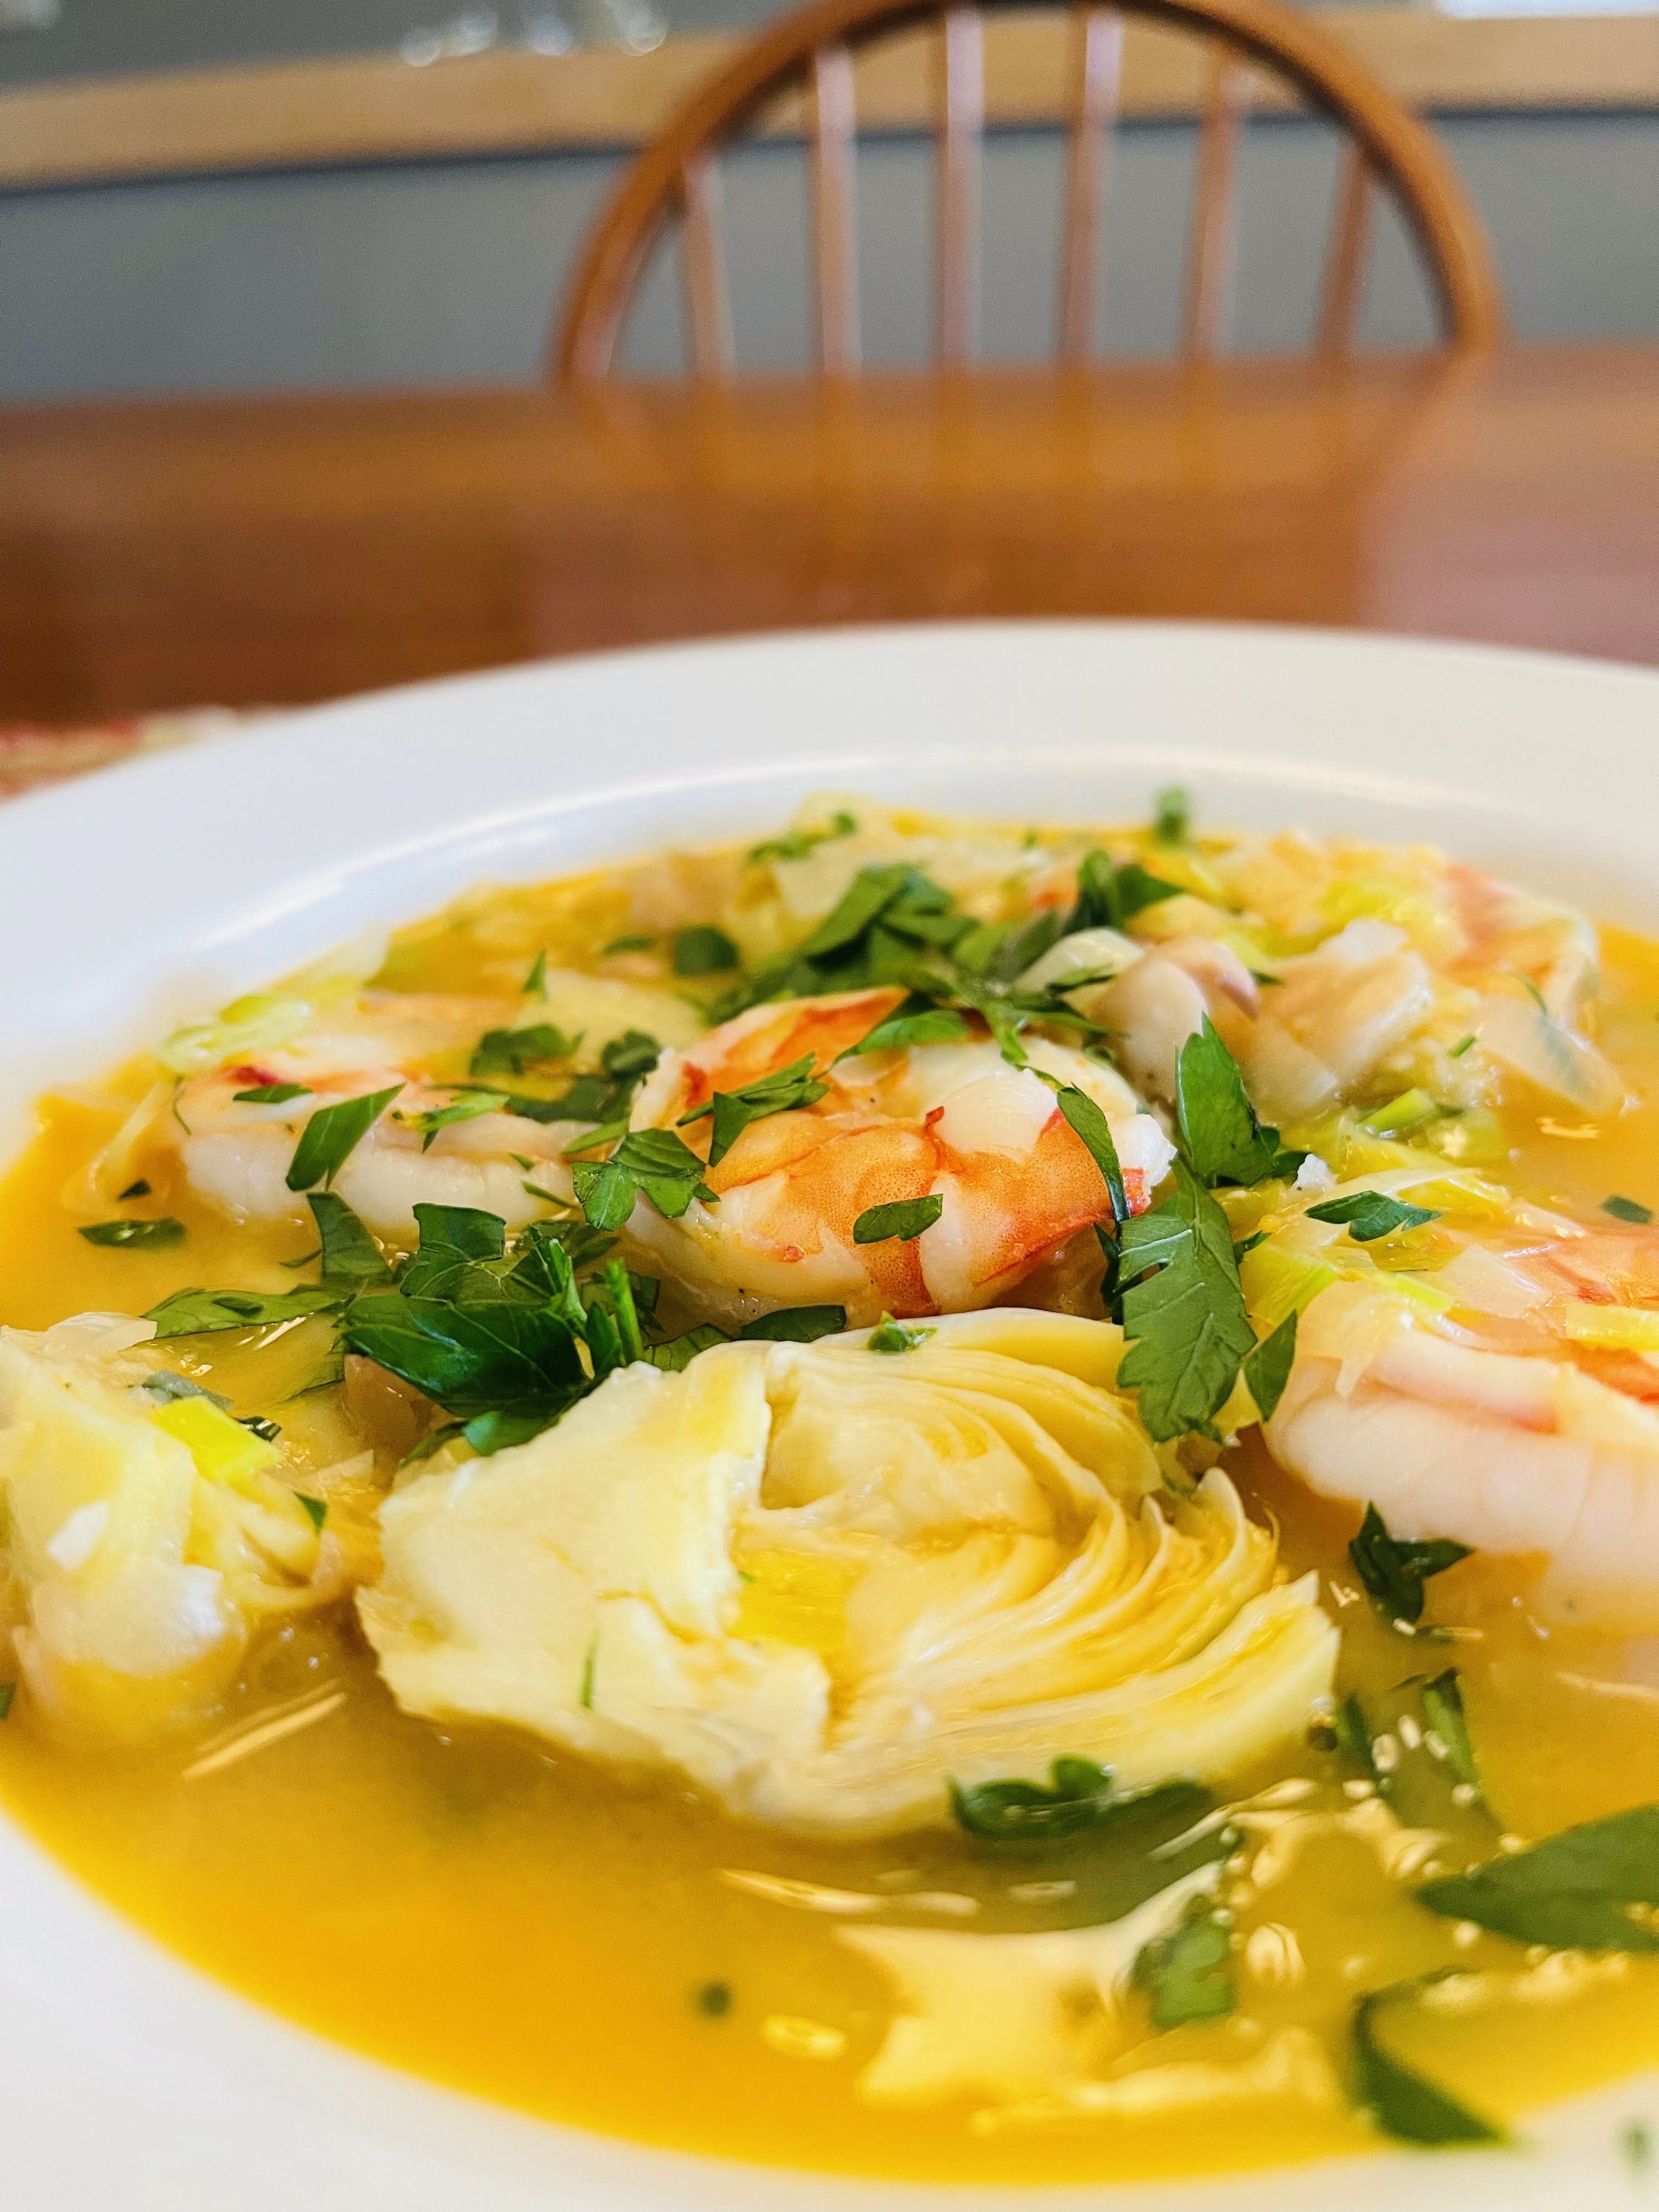
SHRIMP, BEAN AND ARTICHOKE STEW
INGREDIENTS:
Zest from one lemon, plus juice from half a lemon
1 teaspoon of sweet paprika
2 garlic cloves, grated
1 pound peeled, deveined large shrimp, tail removed
2 large leeks, trimmed, halved lengthwise, white and light green parts sliced crosswise 1/2 inch thick
4 tablespoons unsalted butter, (1/2 stick)
2 15-ounce cans cannellini beans, rinsed
2 cups chicken or vegetable stock (homemade if possible)
1 can whole artichokes, drained and cut in half vertically
3 tablespoons finely chopped parsley
INSTRUCTIONS:
Combine lemon zest, paprika, garlic, 3/4 teaspoon each of salt and freshly cracked black pepper in a medium bowl. Add shrimp and toss to coat.
In a large pot, melt butter over medium-high heat. When butter is foaming, add shrimp and cook, stirring occasionally, until slightly pink, 2-3 minutes. Using a slotted spoon, transfer shrimp to a plate; set aside.
Add leeks, season with salt & pepper, and cook over medium heat until leeks are soft and starting to brown on the edges, 4-5 minutes, stirring occasionally. Add beans, artichokes and stock. Bring to a boil over high heat. Lower heat and simmer 6-8 minutes. Remove from heat and stir in reserved shrimp and any juices from the plate, parsley and lemon juice. Garnish with additional chopped parsley.
Serve in bowls with toasted bread. SO SIMPLE!!!
Serves 4
“Good food is often, even most often, simple food.” –Anthony Bourdain
When I was a child, you could tell the day of the week by what we ate for dinner. My mother who worked full time relied on me to get things started in the kitchen. To this day I can’t look at meatloaf with any enthusiasm, although I will make it for my wife in a way that differs greatly from my mother’s recipe. The things we do for love! The other thing that will illicit a yuck from me is cream of mushroom soup from a can. Any can. I hate the stuff (and I love mushrooms)! All I can picture is it congealing around baked chicken breasts, and tasting, well, bland.
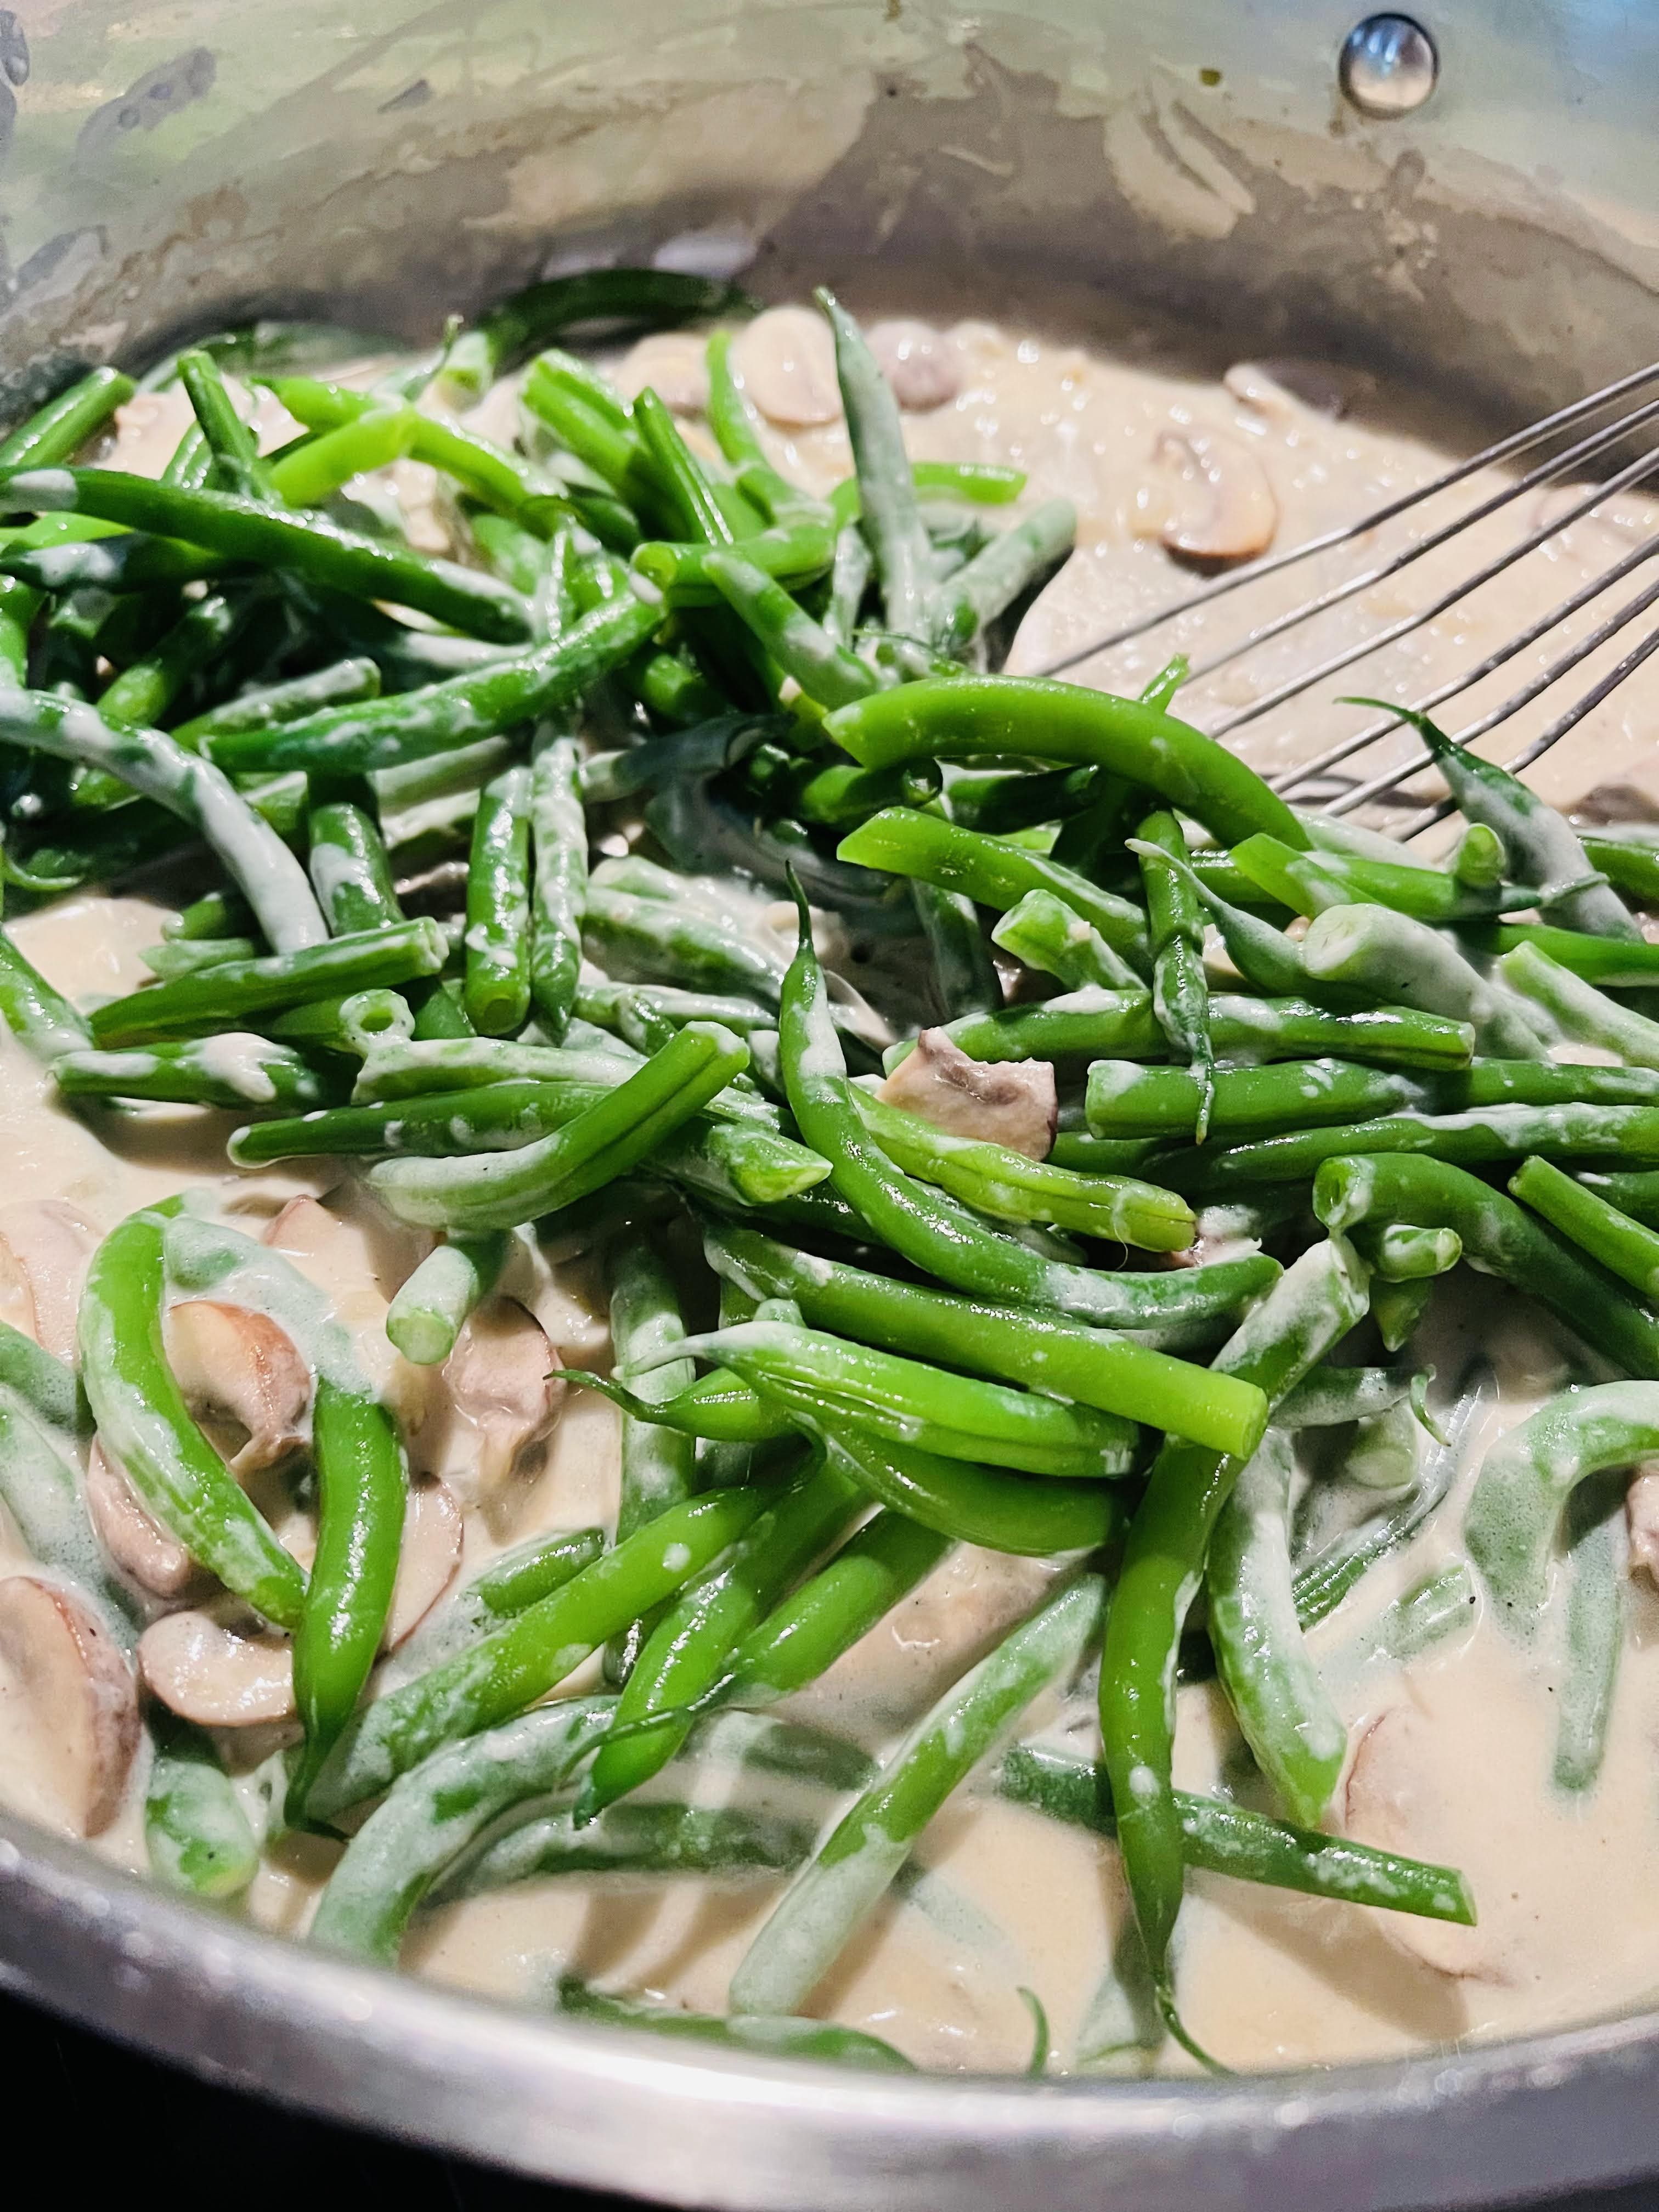
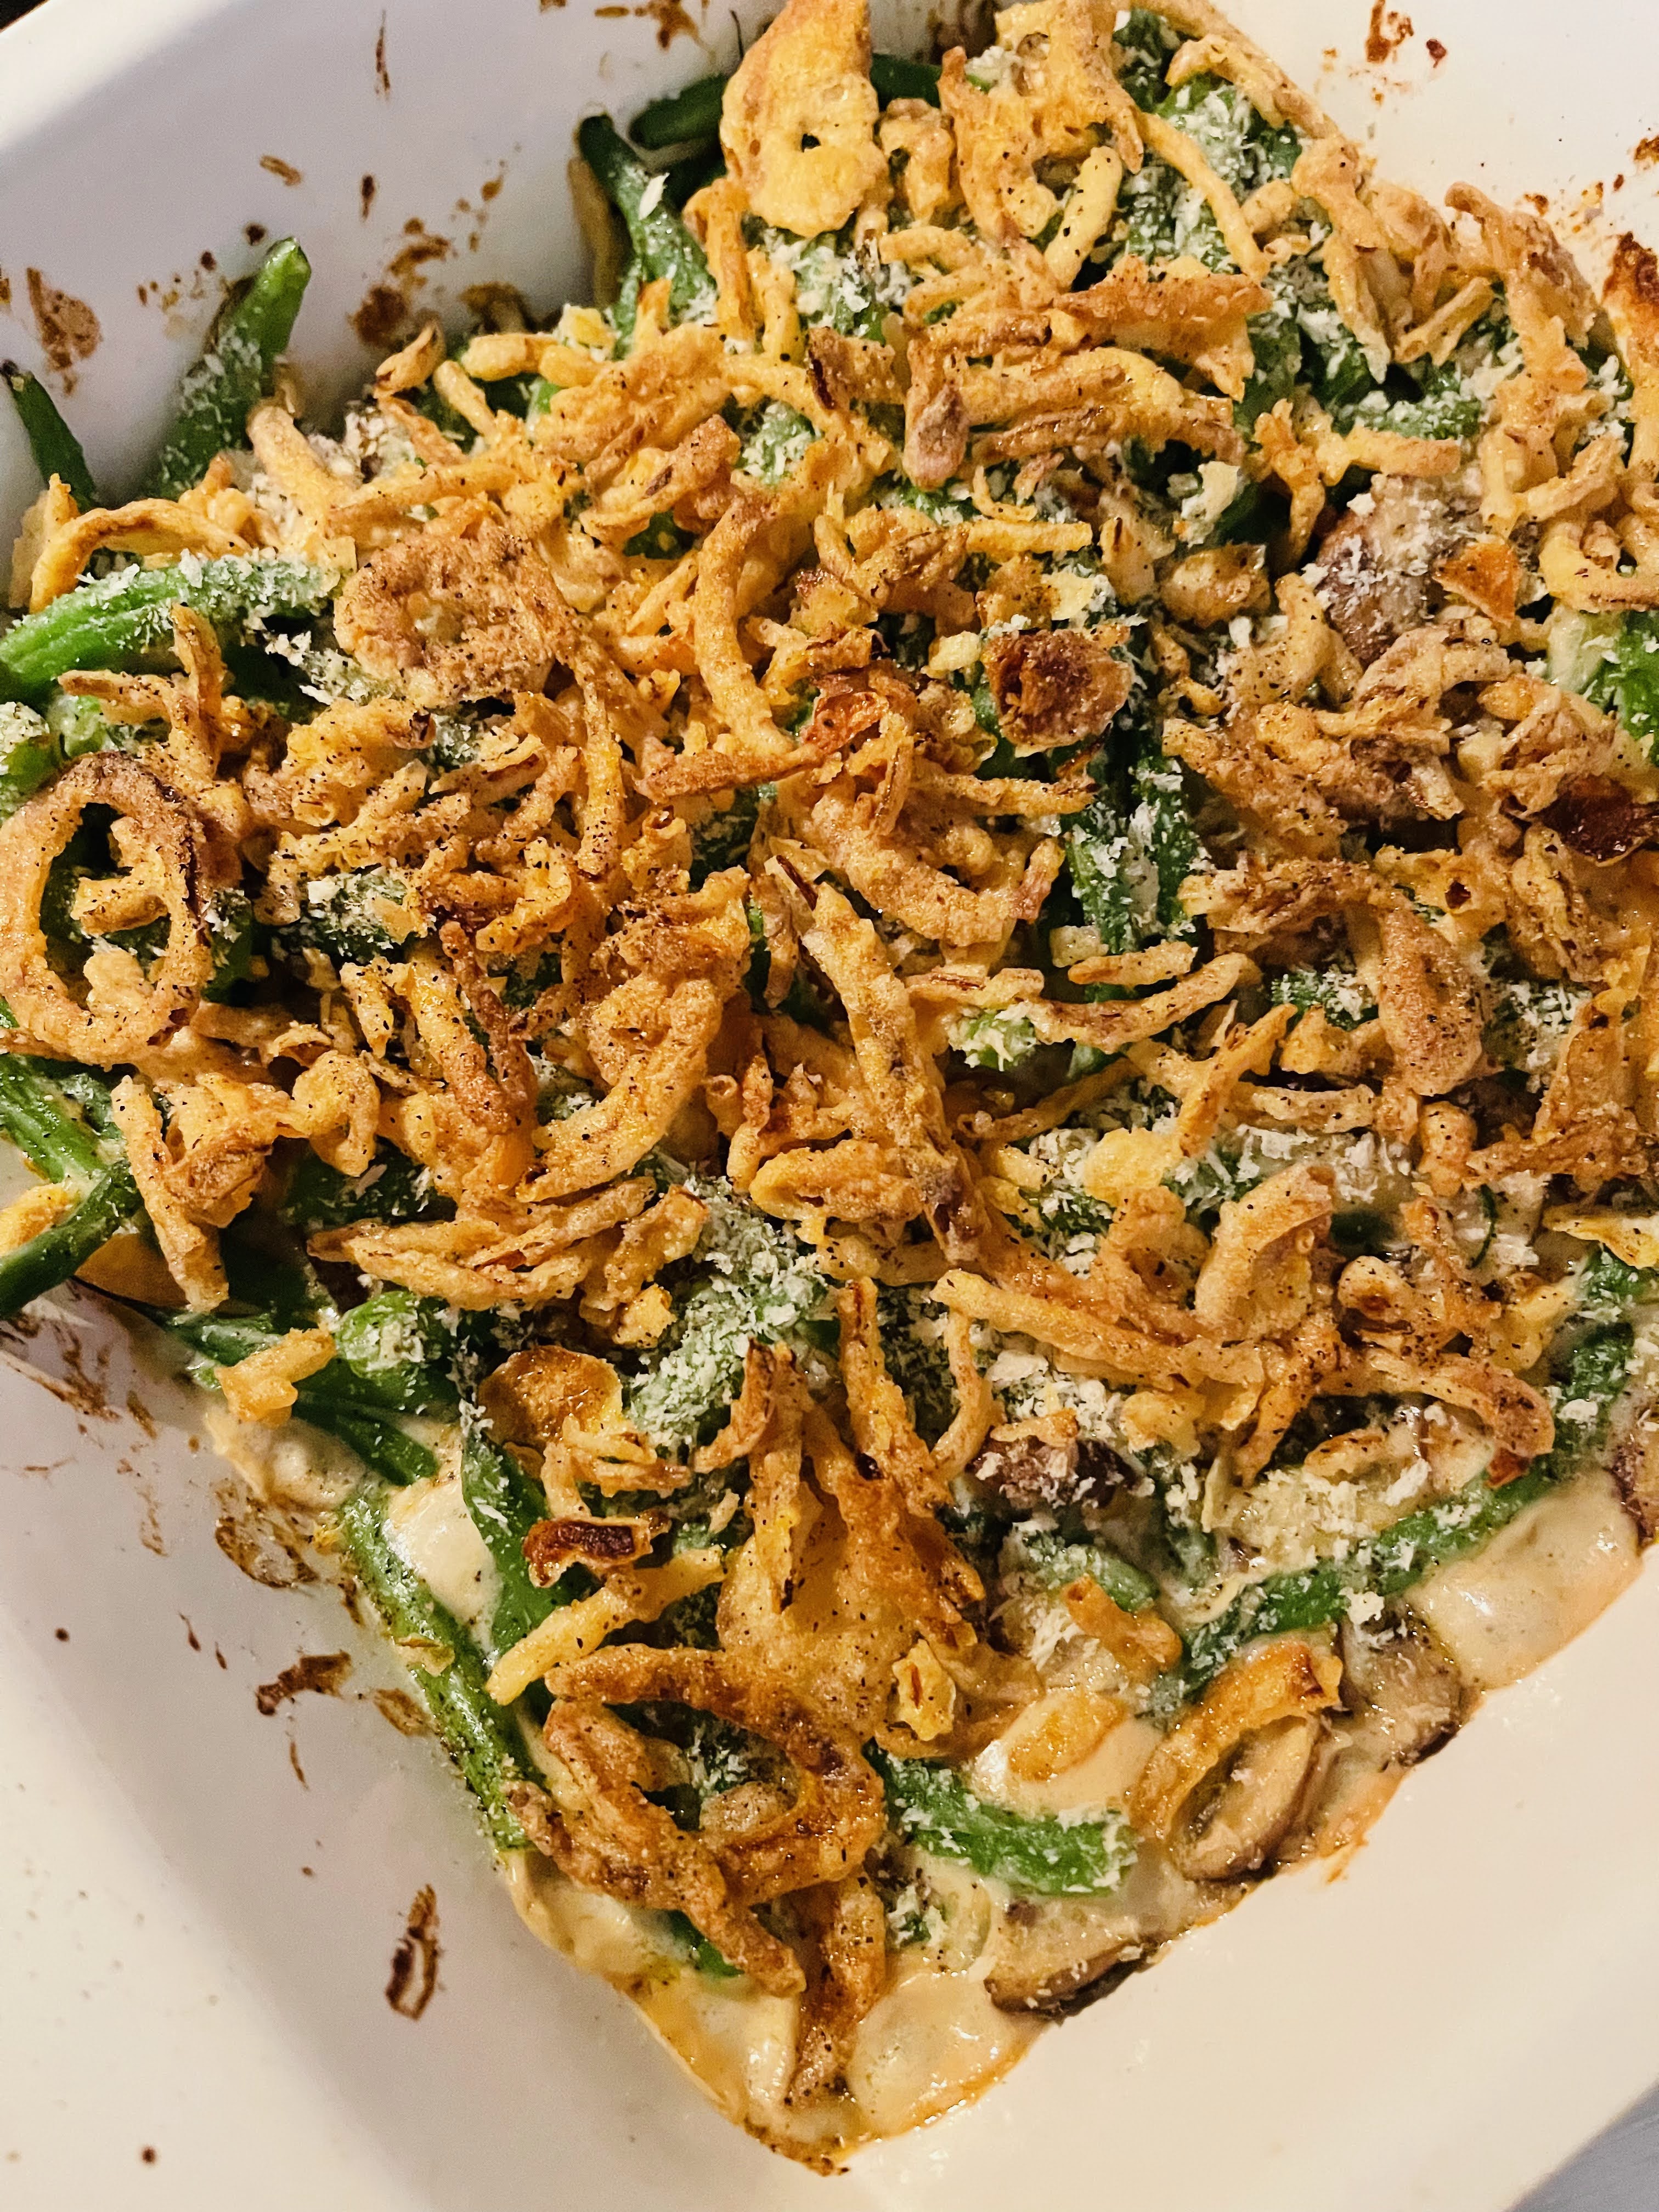
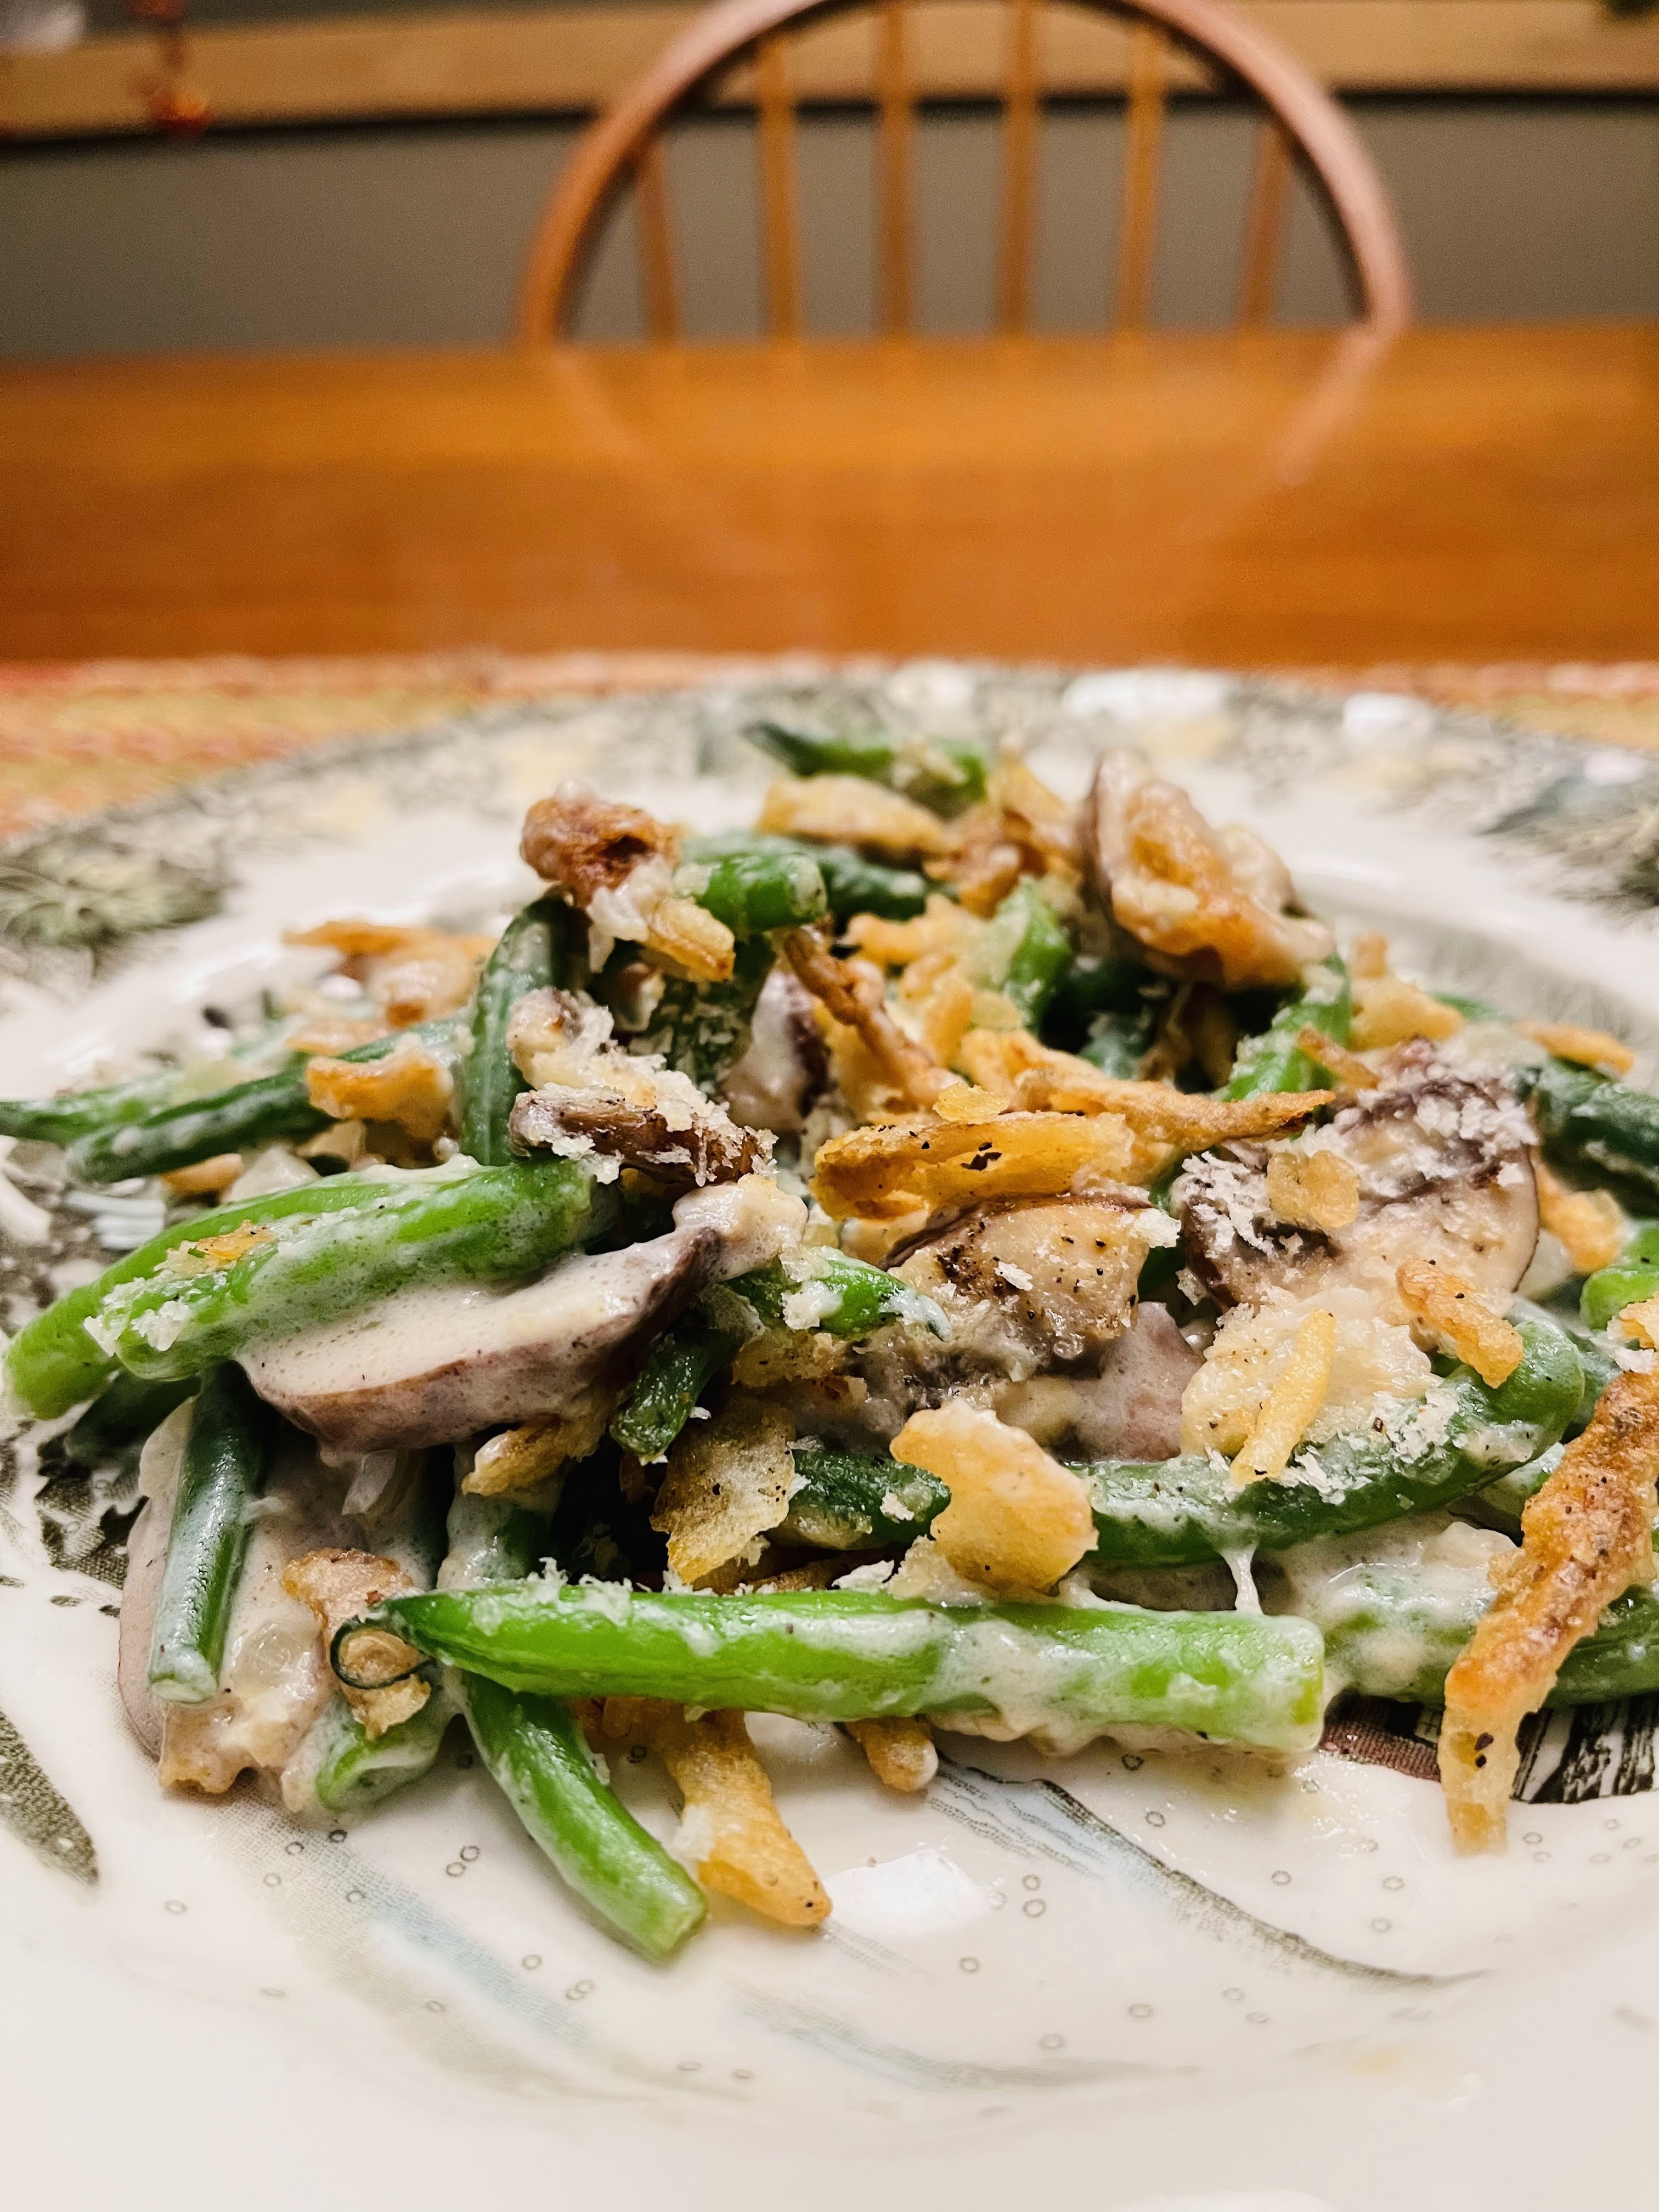
As we approach Thanksgiving, there are memories and traditions that families enjoy. A favorite side dish for many is green bean casserole. I love green beans and was on a mission to create a slightly different version of this beloved dish, minus that awful cream of mushroom soup. Fresh beans were a priority, along with fresh mushrooms. Onions, garlic, a flavorful roux of butter, flour, homemade chicken stock, and half & half, became something both old and new. Don’t forget the crispy french fried onions (my nod to tradition)! Afterall, we can’t completely through the baby out with the bath water!
INGREDIENTS:
2 pounds fresh green beans, rinsed, stemmed and cut in half
2 tablespoons unsalted butter
1 medium onion, finely chopped
3 large garlic cloves, minced
8 ounces cremini or white button mushrooms, stemmed and sliced
1 teaspoon Kosher salt
Freshly ground black pepper
2 tablespoons all-purpose flour
1 cup chicken stock (homemade really makes a difference here)
1 cup half and half
1/2 cup Panko bread crumbs
6 ounces french fried onions (I used French’s)
INSTRUCTIONS:
Preheat the oven to 375 degrees F. Heat a large pot of salted water to boil. Generously season with Kosher salt. Prepare a large bowl with ice water to stall the cooking of the blanched beans.
Blanch beans by adding them to the salted, boiling water a cook for 5 minutes. Drain beans in a colander and place in the ice bath. Once cooled, drain and set aside.
Melt the butter in a large skillet over medium-high heat. Add the onion and garlic, sauteing them for 4-5 minutes, or until the onion is translucent. Add the sliced mushrooms, salt and pepper to taste and cook for another 2-3 minutes.
Sprinkle the flour over the onions and mushrooms, stirring to combine. Cook for about 2 minutes, then slowly whisk in the chicken stock, making sure there are no lumps. Slowly add half and half and continue to whisk. Cook until thickened about 6 minutes, stirring occasionally.
Add your blanched green beans and stir to combine, then transfer to a 9×13 casserole dish and sprinkle with breadcrumbs and french fried onions. Bake for 20 minutes until hot and bubbly.
Serves 6-8
“Tradition is a guide, not a jailer.” —W. Somerset Maugham
During these cooler autumn days, we often lean into our personal versions of comfort food. For many it’s soups, stews or casseroles. I enjoy casseroles and they can be delicious; but they often look like a blob of melted cheese. I’m someone who requires food to be good tasting, and visually appealing. As the saying goes, “you eat with your eyes.”
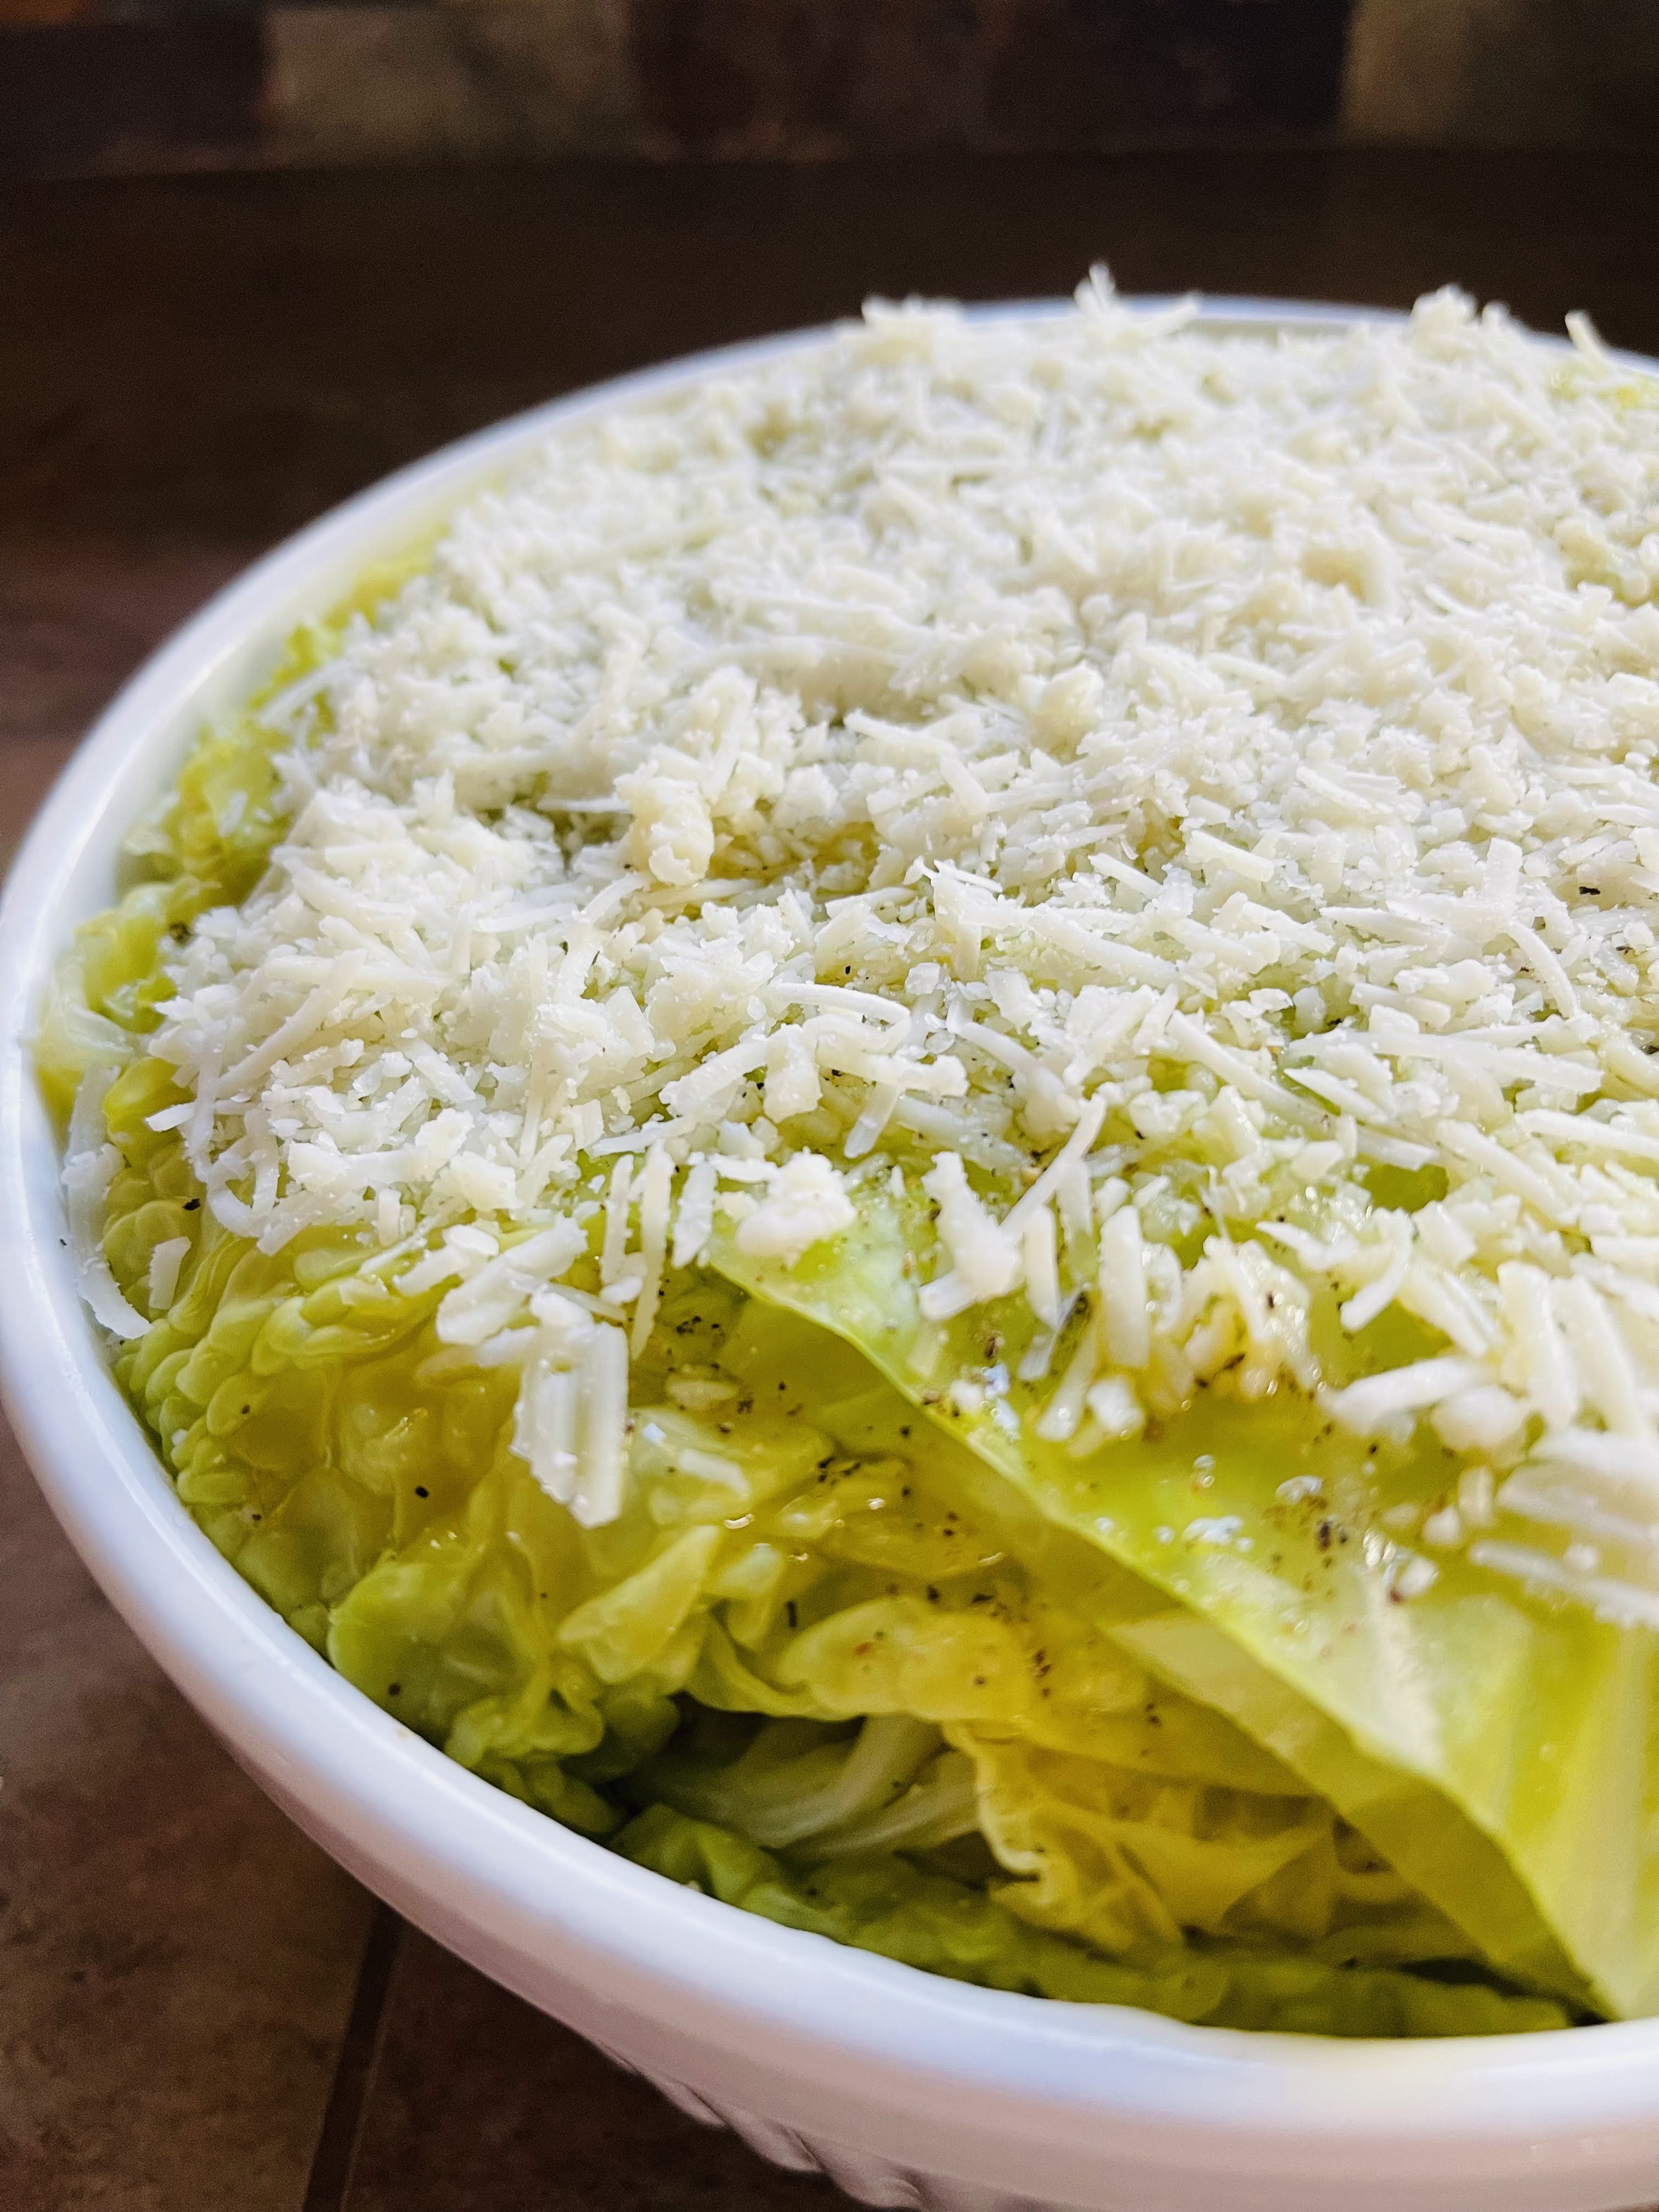
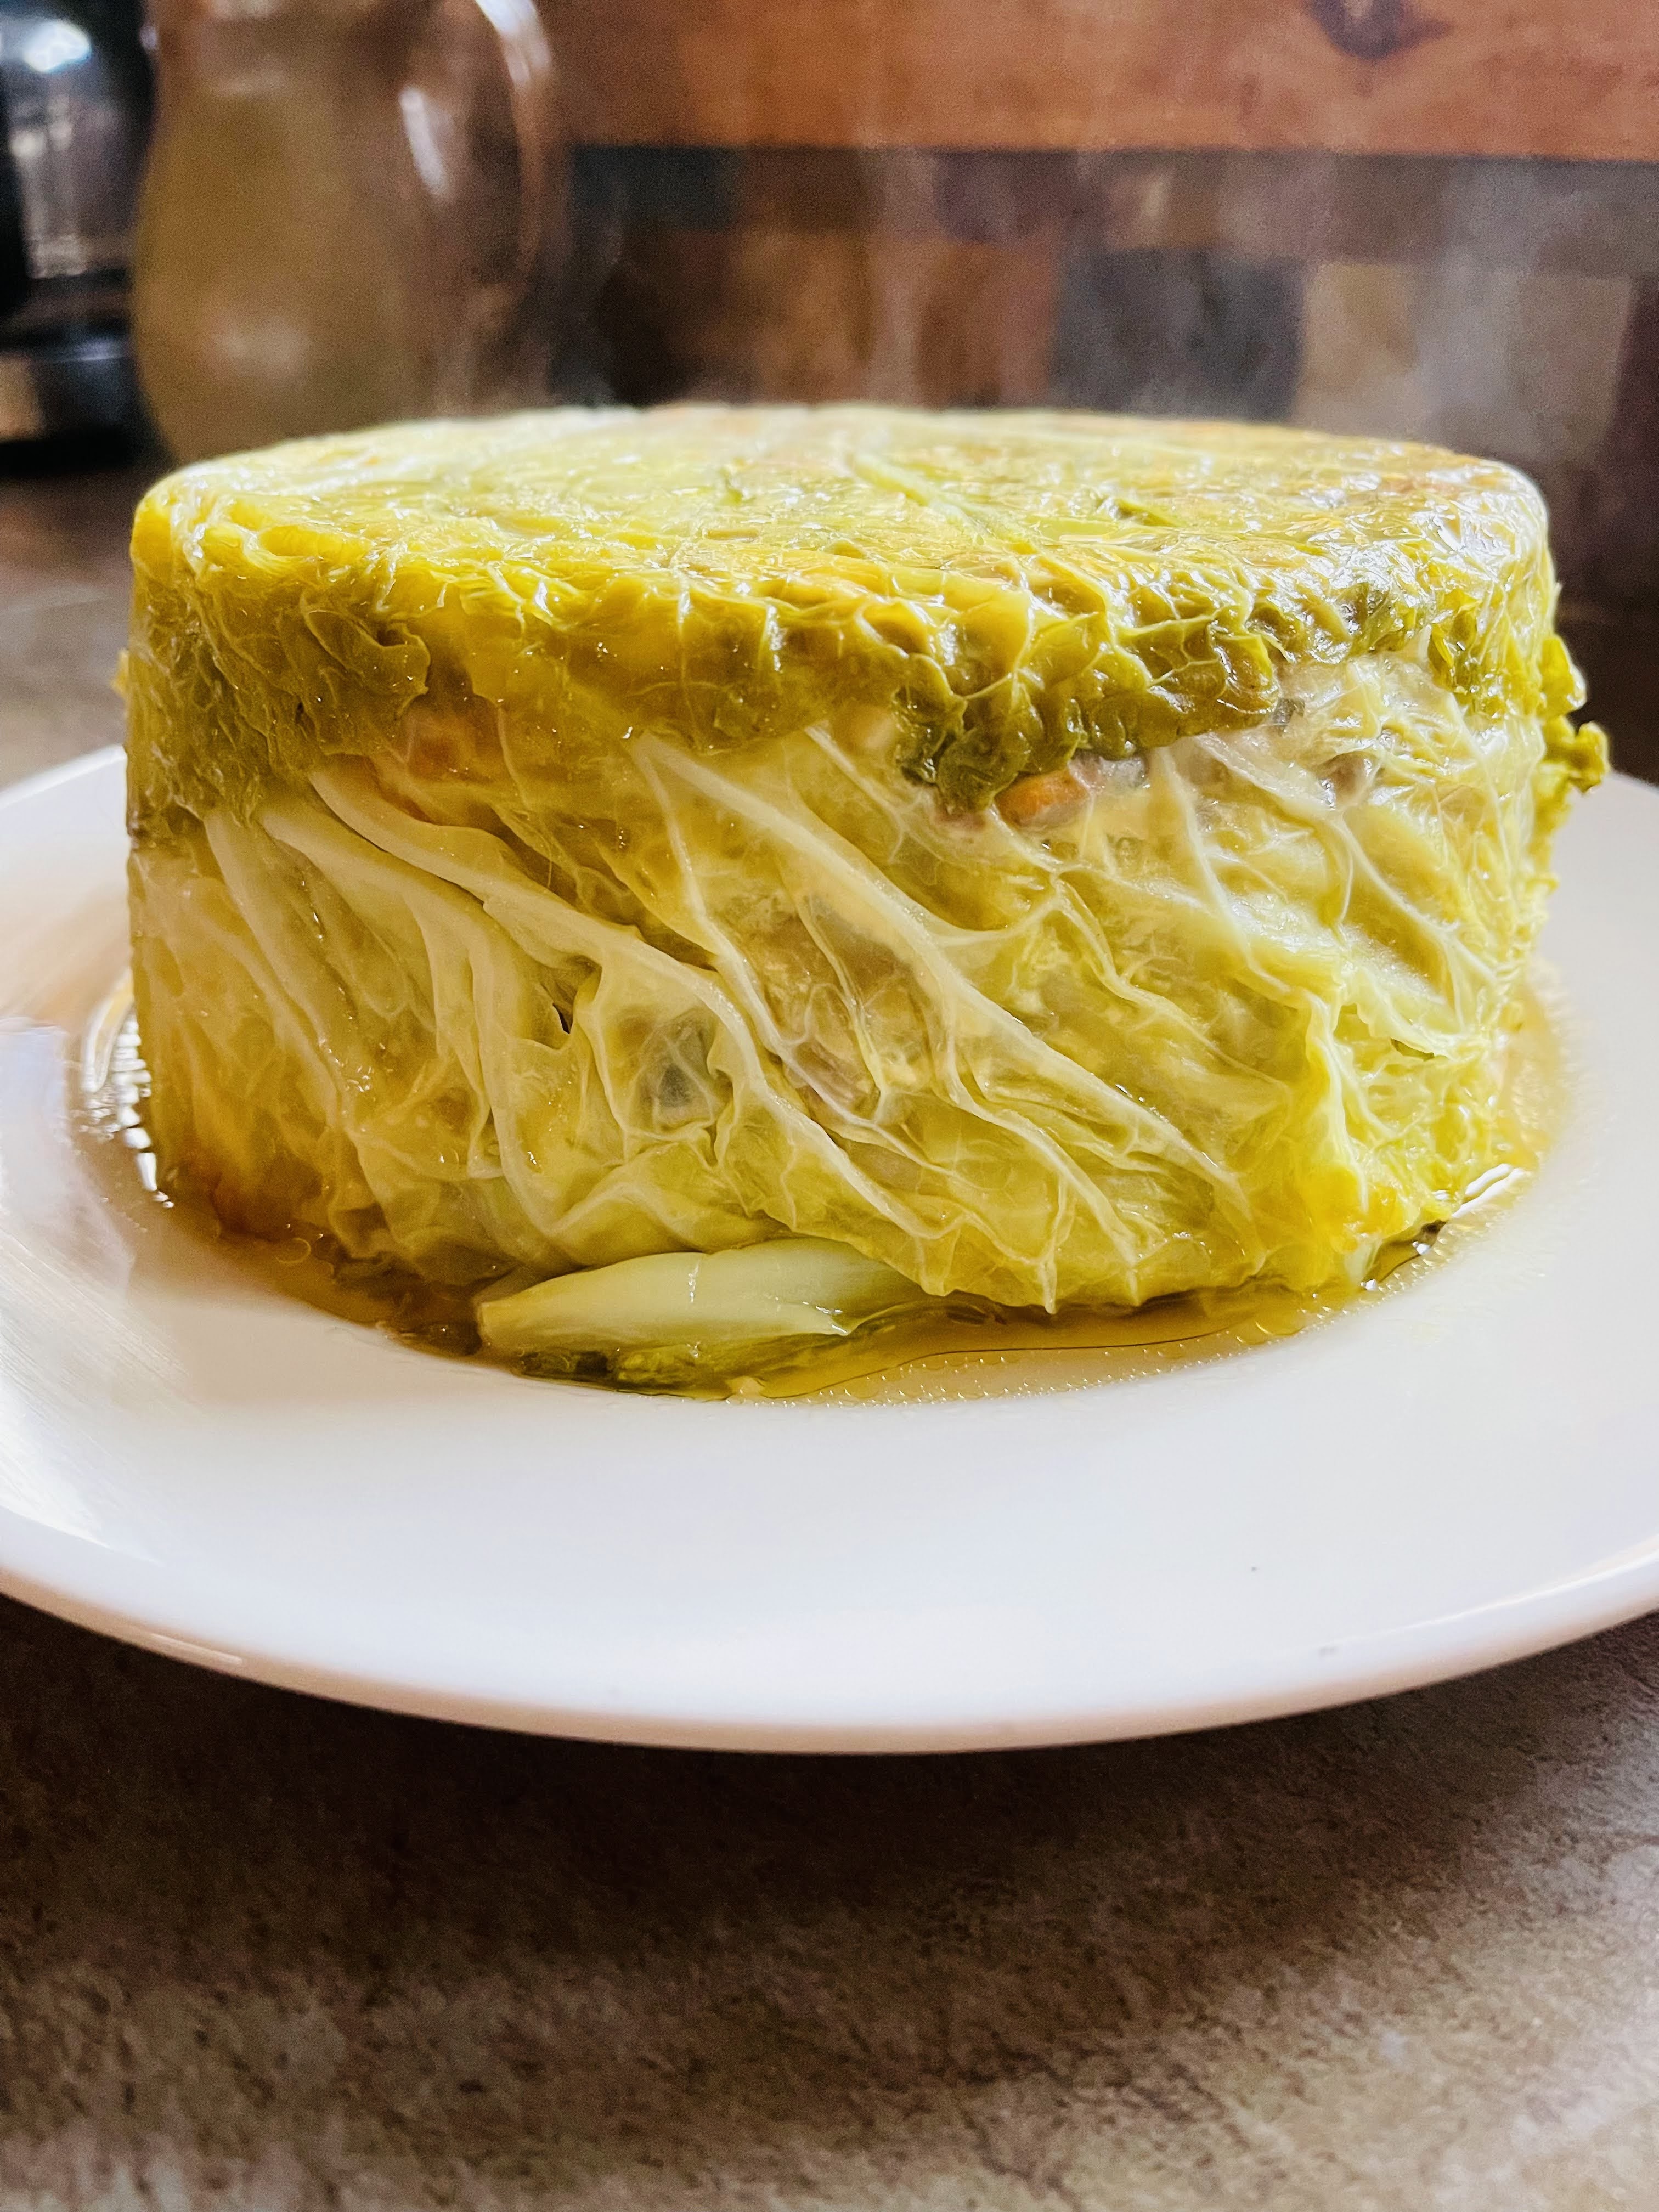
I’m a huge fan of Yotam Ottolenghi’s cauliflower cake and have made it several times. What a great way to present and eat vegetables. It covers all the bases. It’s creative, delicious and showy. So the other day when I picked up a beautiful head of savoy cabbage from the farmers market, I wanted to create something that showed off the deep veins in the leaves. Then it occured to me why not riff from the idea of cake, and make a cabbage roll on steroids? Well, it not only worked but will be on a regular rotation as the temperatures drop. Try it and see if you don’t agree!
STUFFED CABBAGE CAKE
INGREDIENTS:
1 large head of savoy cabbage
2 lbs of grass-fed ground lamb
1 medium yellow onion, diced
2 carrots, peeled and diced
1 cup red bell pepper, seeded and diced
4 large cloves of garlic, minced
1 cup pecorino cheese, grated
1 cup marinara sauce, or pasada
1 cup cooked jasmine rice
1 large egg
Olive oil
1/2 cup fresh flat-leaf parsley, chopped
Kosher salt and freshly ground black pepper to taste
INSTRUCTIONS:
Core and separate the leaves from the savoy cabbage, by gently lifting them from the bottom of the cabbage, one leaf at a time. Continue until all large leaves have been removed. This should yield approximately 10-14 leaves. Cook the leaves in a large pot of salted, boiling water for 5 minutes. Drain, and place them in an ice bath to cool them down. Drain once again and place on a kitchen towel, pat them dry and set aside.
Grease the bottom and sides of a deep souffle dish. Place a large attractive leaf on the bottom of dish, allowing it to partially curl up the sides of the dish. Then take 4 additional leaves, and place them from the center and up the sides of the souffle dish covering all the sides.
In a large skillet, cook the ground lamb until it’s no longer pink. Drain if necessary and place in large bowl.
Add 2 tablespoons of olive oil to the skillet and saute the onion, garlic, carrots and red pepper until soft, then toss it all together with the meat in the bowl and add the cooked rice. Add the chopped parsley, 1/2 the cheese, tomato sauce, egg and salt and pepper. Stir to thoroughly combine.
Place 1/4 of mixture on top of cabbage in souffle dish. pushing it to the sides of the dish, then cover with 1 or 2 cabbage leaves depending on their size. Repeat, using 1/4 of filling at a time, then covering with 1 or 2 cabbage leaves. You should have 4 individual layers. Top this with 1 or two cabbage leaves, and fold in any additional leaves that are hanging over the sides of the dish.
Cover the cabbage with remaining half of pecorino. Place in a 375 degree oven for 1 hour. Let it rest for 15 minutes, then invert a serving plate over the souffle dish and flip it over. Cut in 6 slices and serve with additional marinara sauce or passata and additional cheese.
“Cabbage: a familiar kitchen-garden vegetable about as large and wise as a man’s head.” —Ambrose Bierce
Have you ever tried something new and realized that you were a goner? I was introduced to this amazing concoction from my dear friend Vitali, who is my foodie soul-mate. When he gave me some to try he said, “You will love this!” He was 100% correct. I love it and put it on everything from toast to chicken, lamb, fish and the closest spoon.
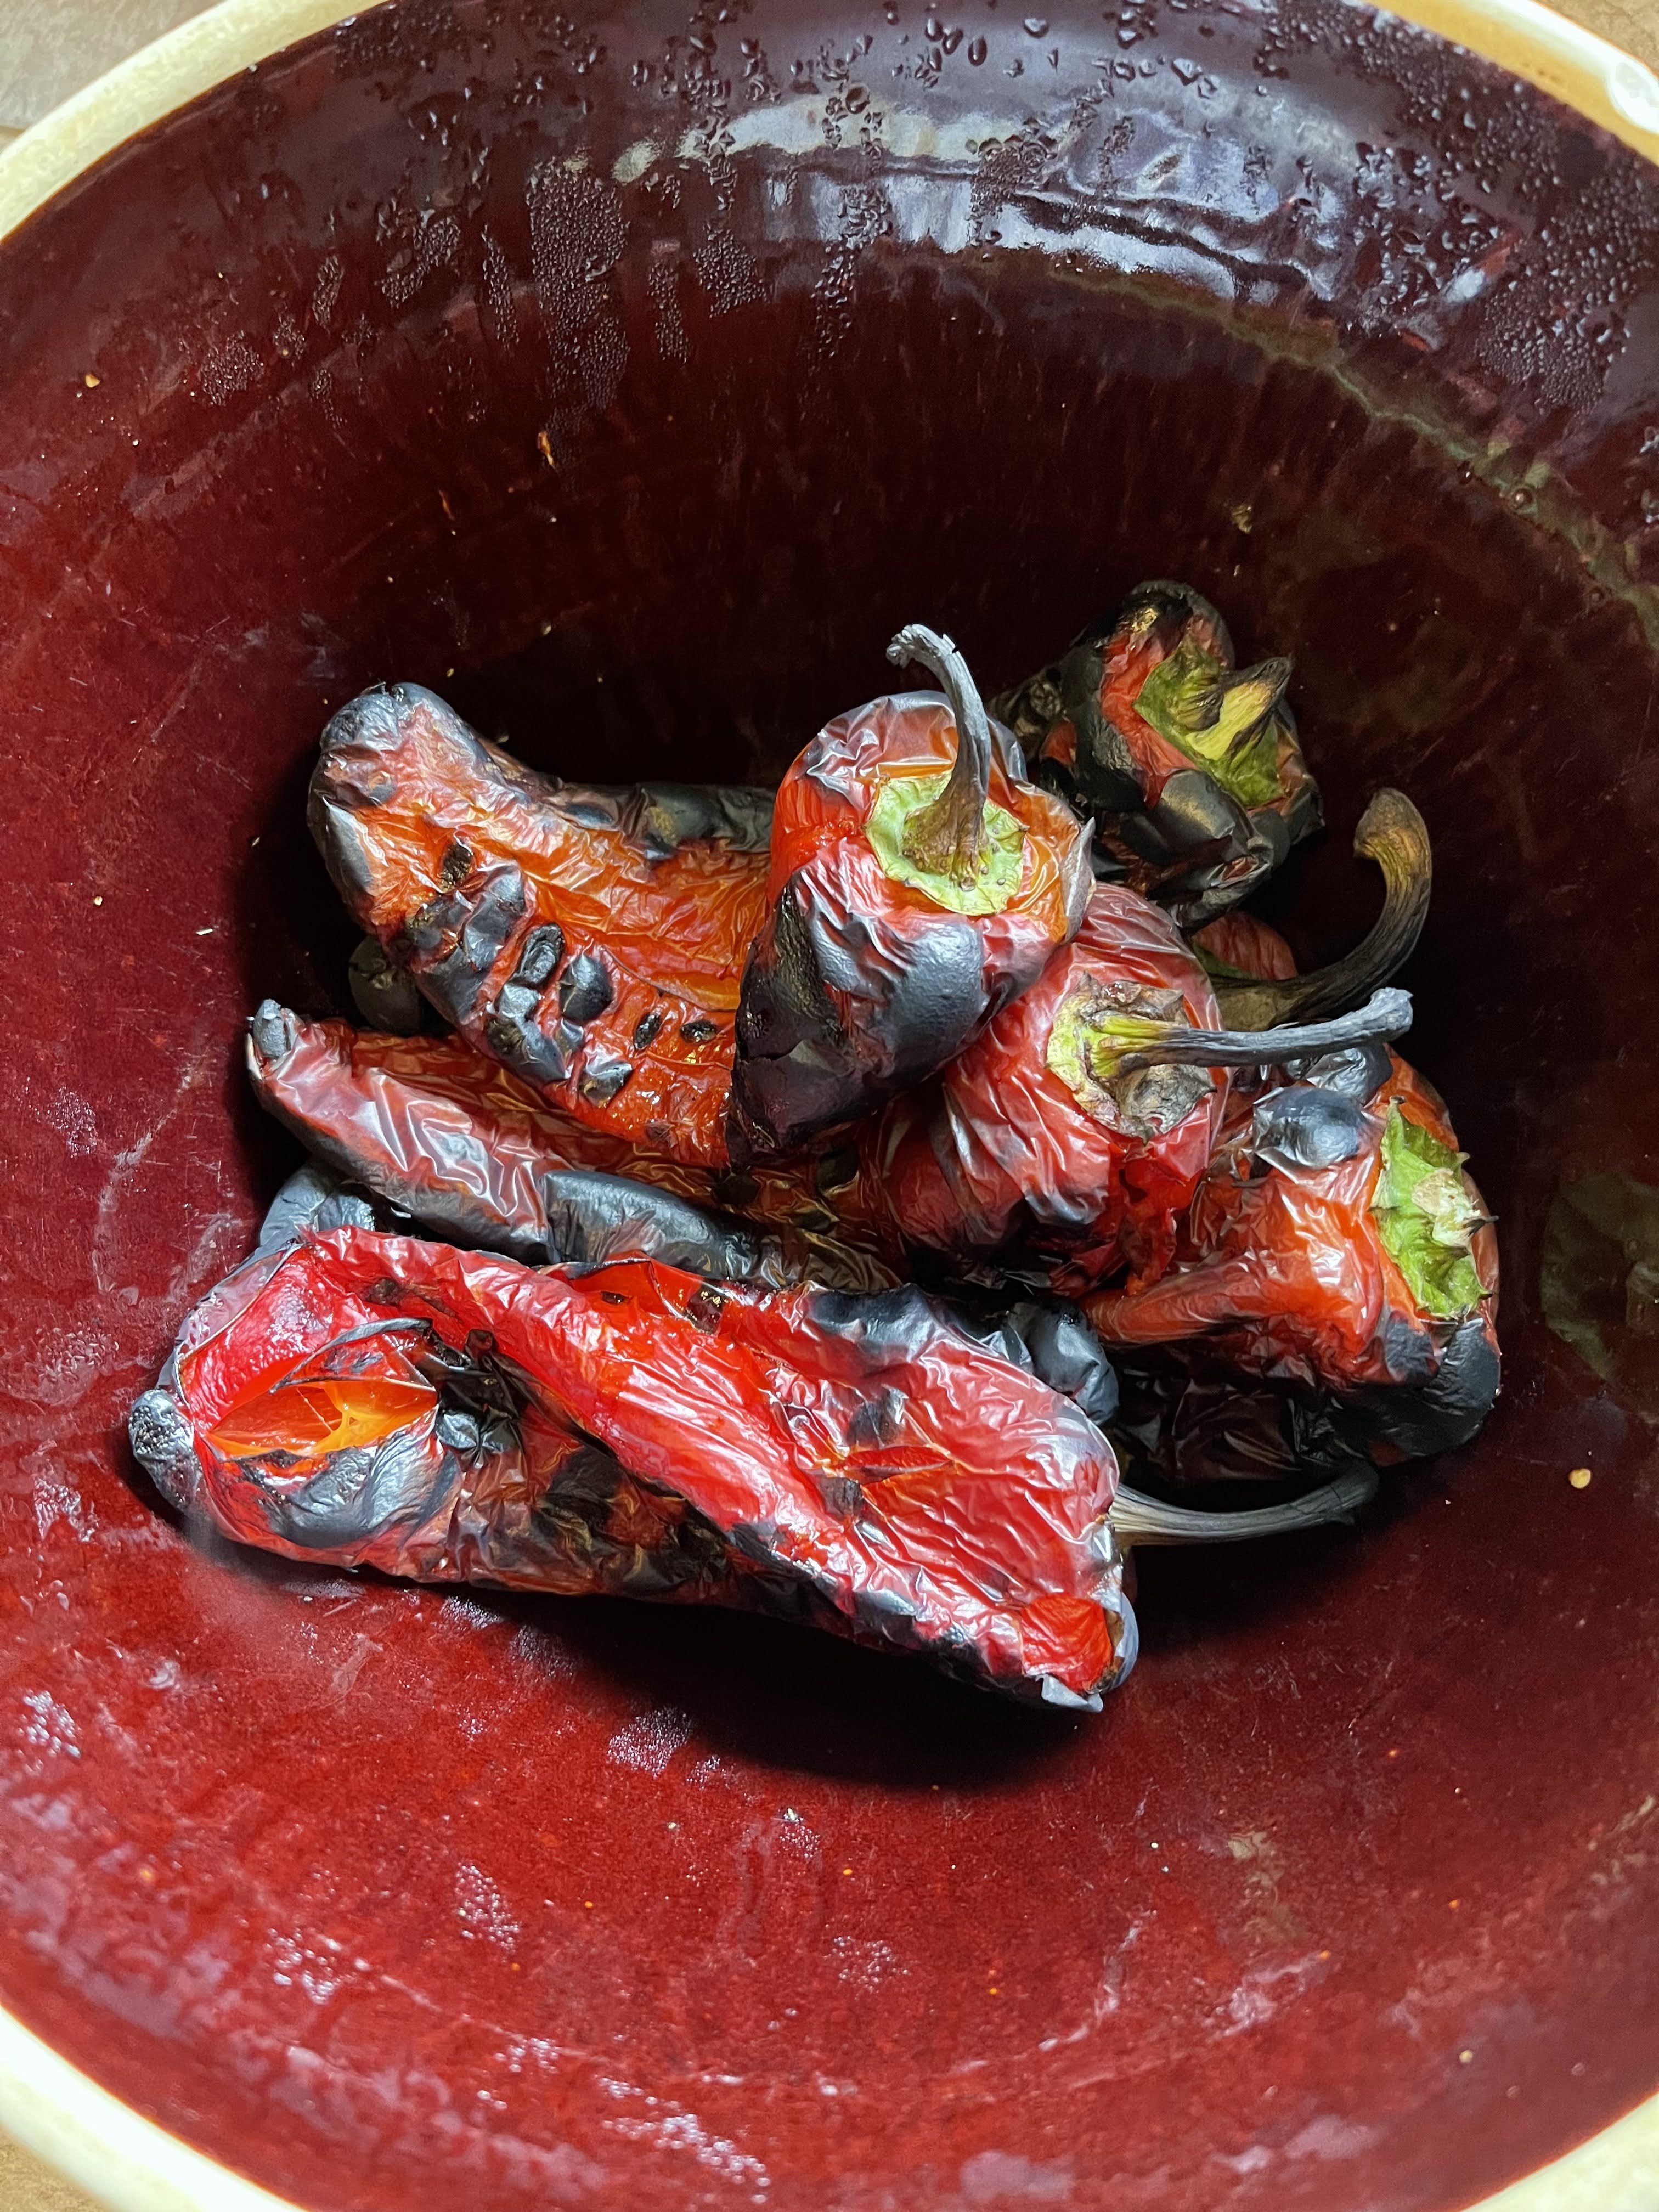
What is this concoction you ask? It’s a Serbian spread called Ajvar. Ajvar is a condiment made principally from sweet bell peppers and eggplants. The relish became a popular side dish throughout Yugoslavia after World War II and is popular in Southeast Europe. Homemade ajvar is traditionally made with just four ingredients: roasted peppers, sunflower oil, garlic and vinegar. Many countries that call it their own may add: eggplant and/or chilies. It can be mild or hot depending on your personal preference. Although there are many good commercial brands, I absolutely love making it from scratch. In late summer and early fall when Carmen sweet peppers and eggplant are in their peak, is the time to make jars of it to use throughout the winter months (if it lasts that long!!).
AJVAR (SERBIAN ROASTED RED PEPPER SAUCE
INGREDIENTS:
2 pounds red bell peppers (about 5 medium peppers)
1 medium eggplant (about 1 pound)
5-6 medium cloves of garlic, minced
1/4 cup sunflower or extra virgin olive oil
1 tablespoon white vinegar
1 teaspoon kosher salt, plus more to taste
Freshly ground black pepper to taste
1/4-1/2 teaspoon red pepper flakes
INSTRUCTIONS:
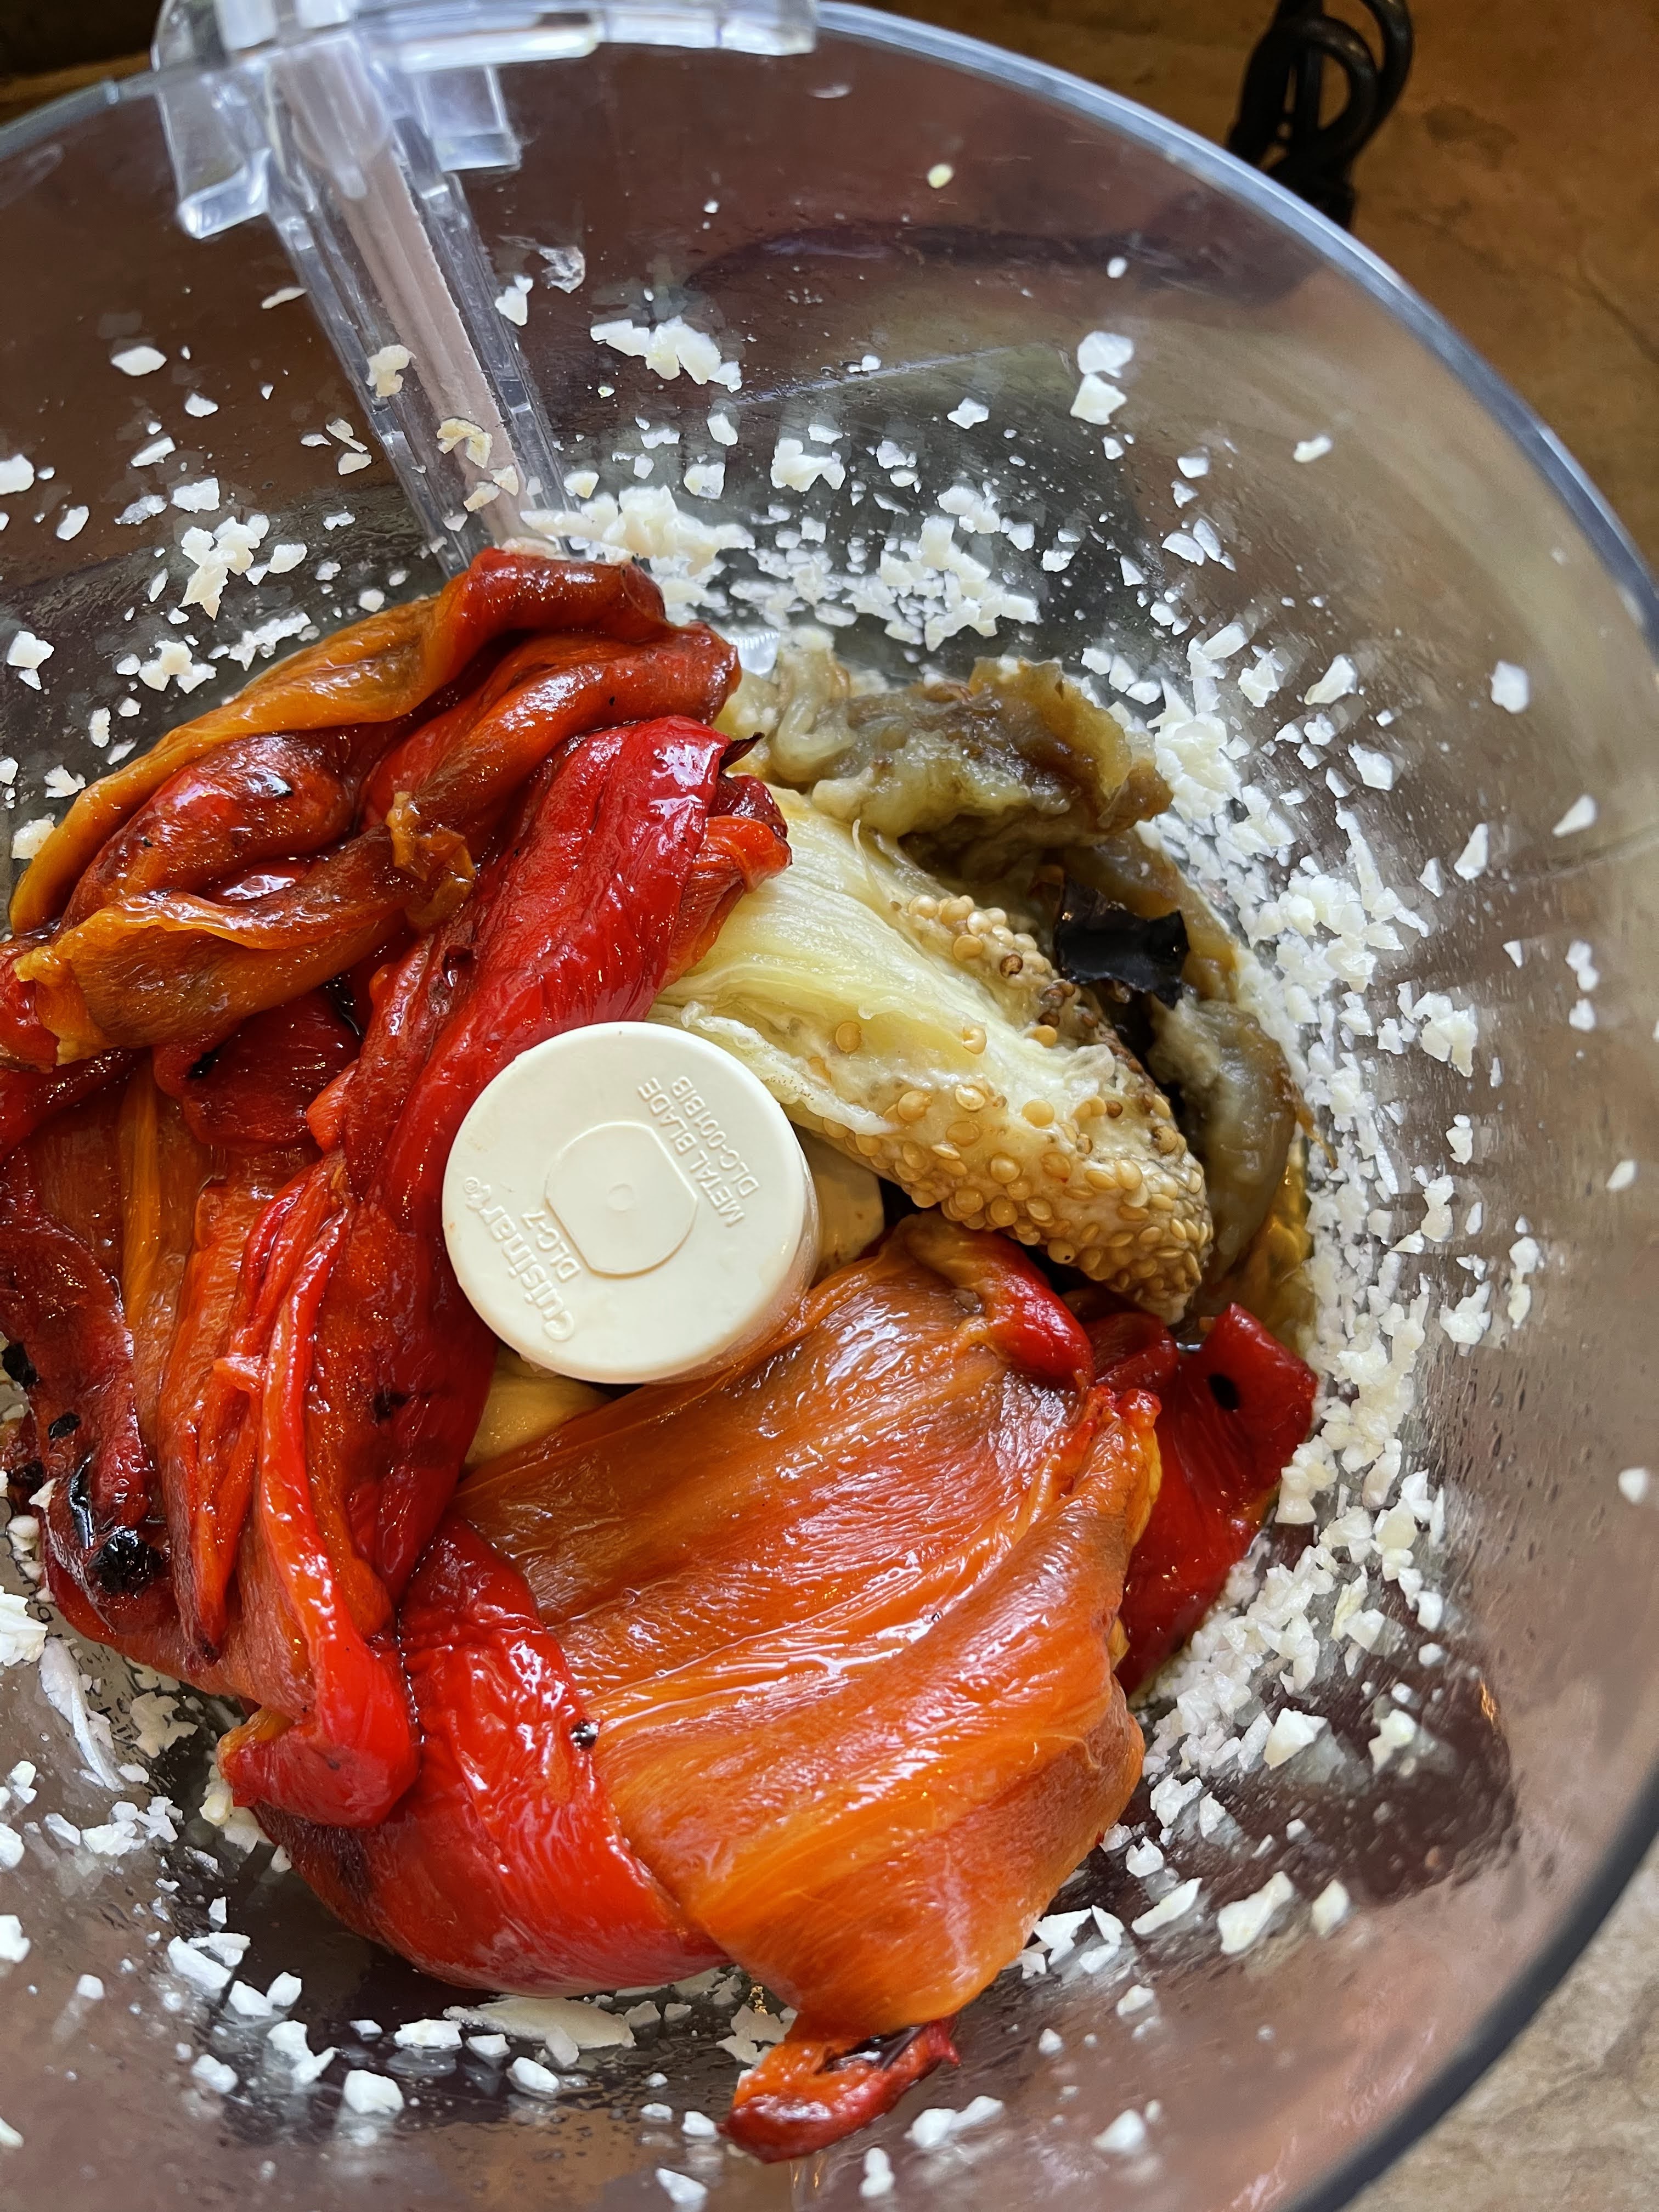
Preheat a gas grill to 500 or a charcoal grill using one side of the grill. Heat charcoal until it is covered with gray ash. Clean and oil grilling grate. Place peppers on hot side of grill and cook until blackened all over, 10-15 minutes. Transfer charred peppers to a large bowl, cover with plastic wrap, and let sit until cool enough to handle, about 10 minutes. Remove charred skin, seeds, and cores from peppers.
While the peppers are cooling pierce skin of eggplant with a sharp knife all over. Place eggplant on cool side of grill. Cover and cook until skin darkens and wrinkles and eggplant is uniformly soft when pressed with tongs, about 30 minutes, turning halfway though for even cooking. Remove eggplant from grill and let sit until cool enough to handle, about 10 minutes. Trim top of eggplant and split in half lengthwise. Using a spoon, scoop out flesh of eggplant and discard skin.
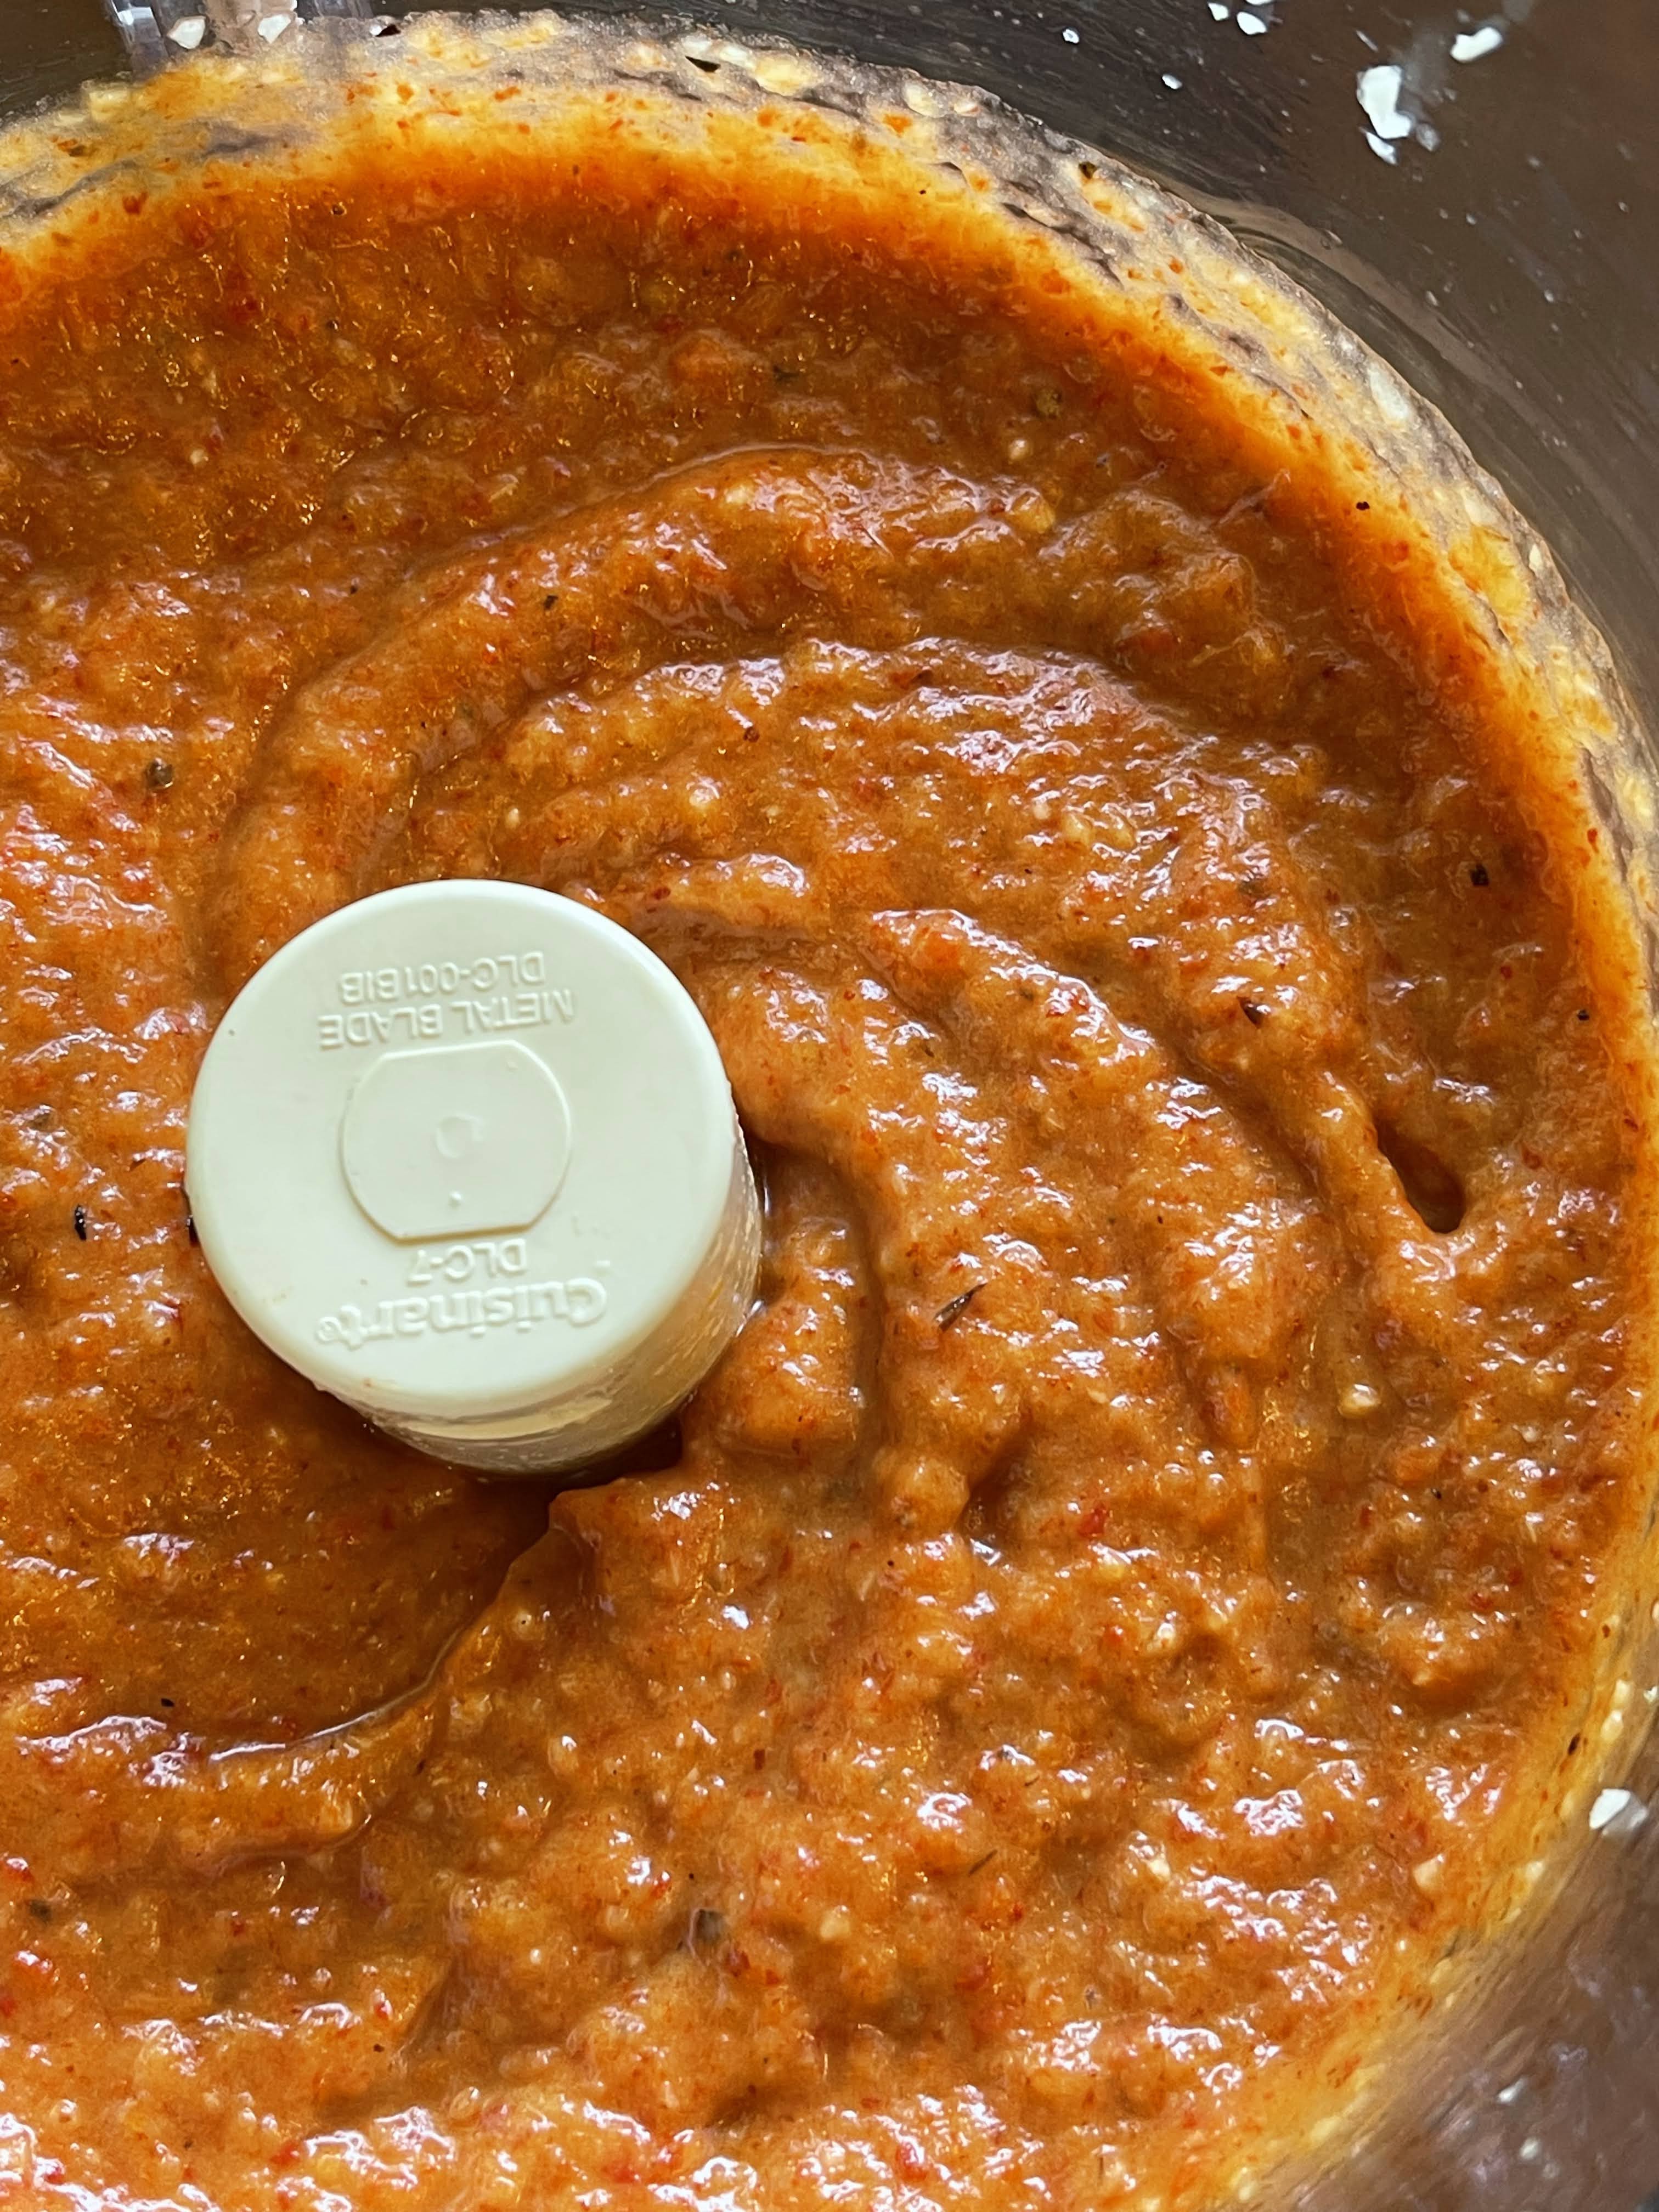
Place roasted red peppers, eggplant pulp, garlic and red pepper flakes in food processor fitted with a steel blade. Pulse until roughly chopped. Add in oil, vinegar, salt and pepper and pulse until incorporated and peppers are finely chopped.
Transfer sauce to a medium saucepan. Bring to a simmer over medium-high heat, then reduce to medium-low and simmer for 30 minutes, stirring occasionally. Remove from heat and add more salt, pepper or vinegar to taste. Fill 1/2 pint jars, leaving 1/2 inch of headspace and process in water bath canner for 30 minutes. If eating right away, let cool to room temperature. or store in airtight container in refrigerator for up to 2 weeks.
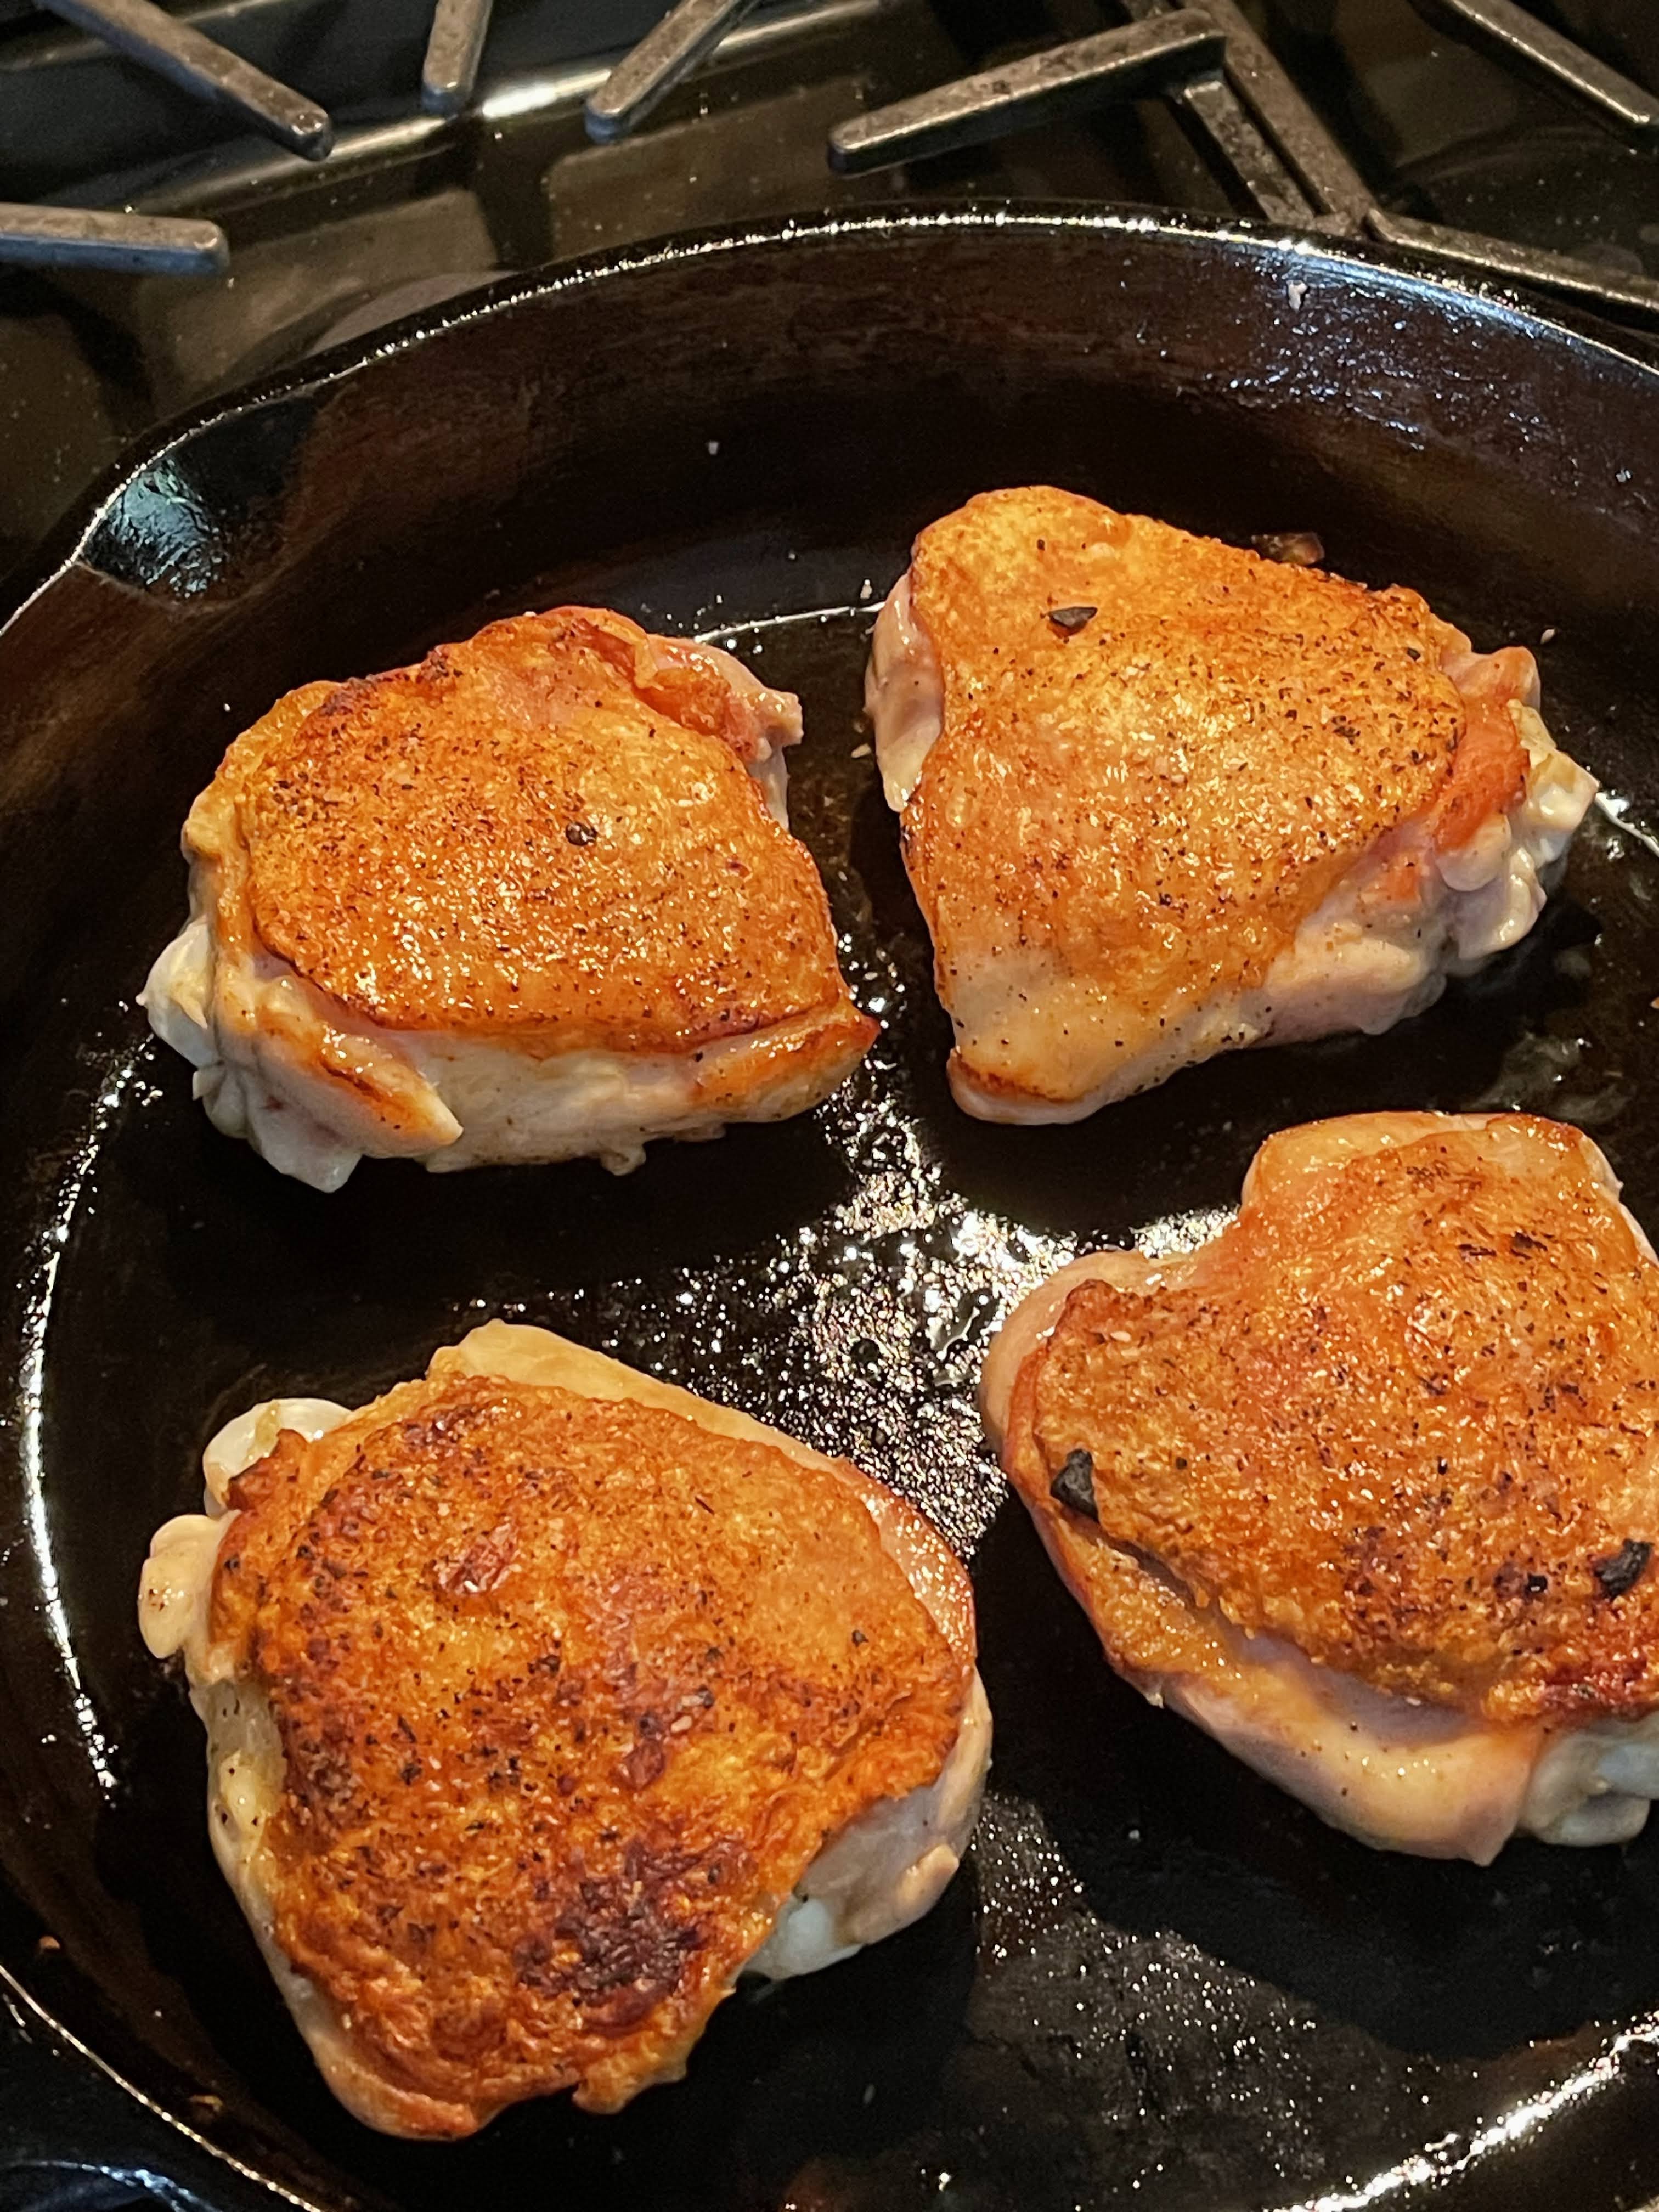
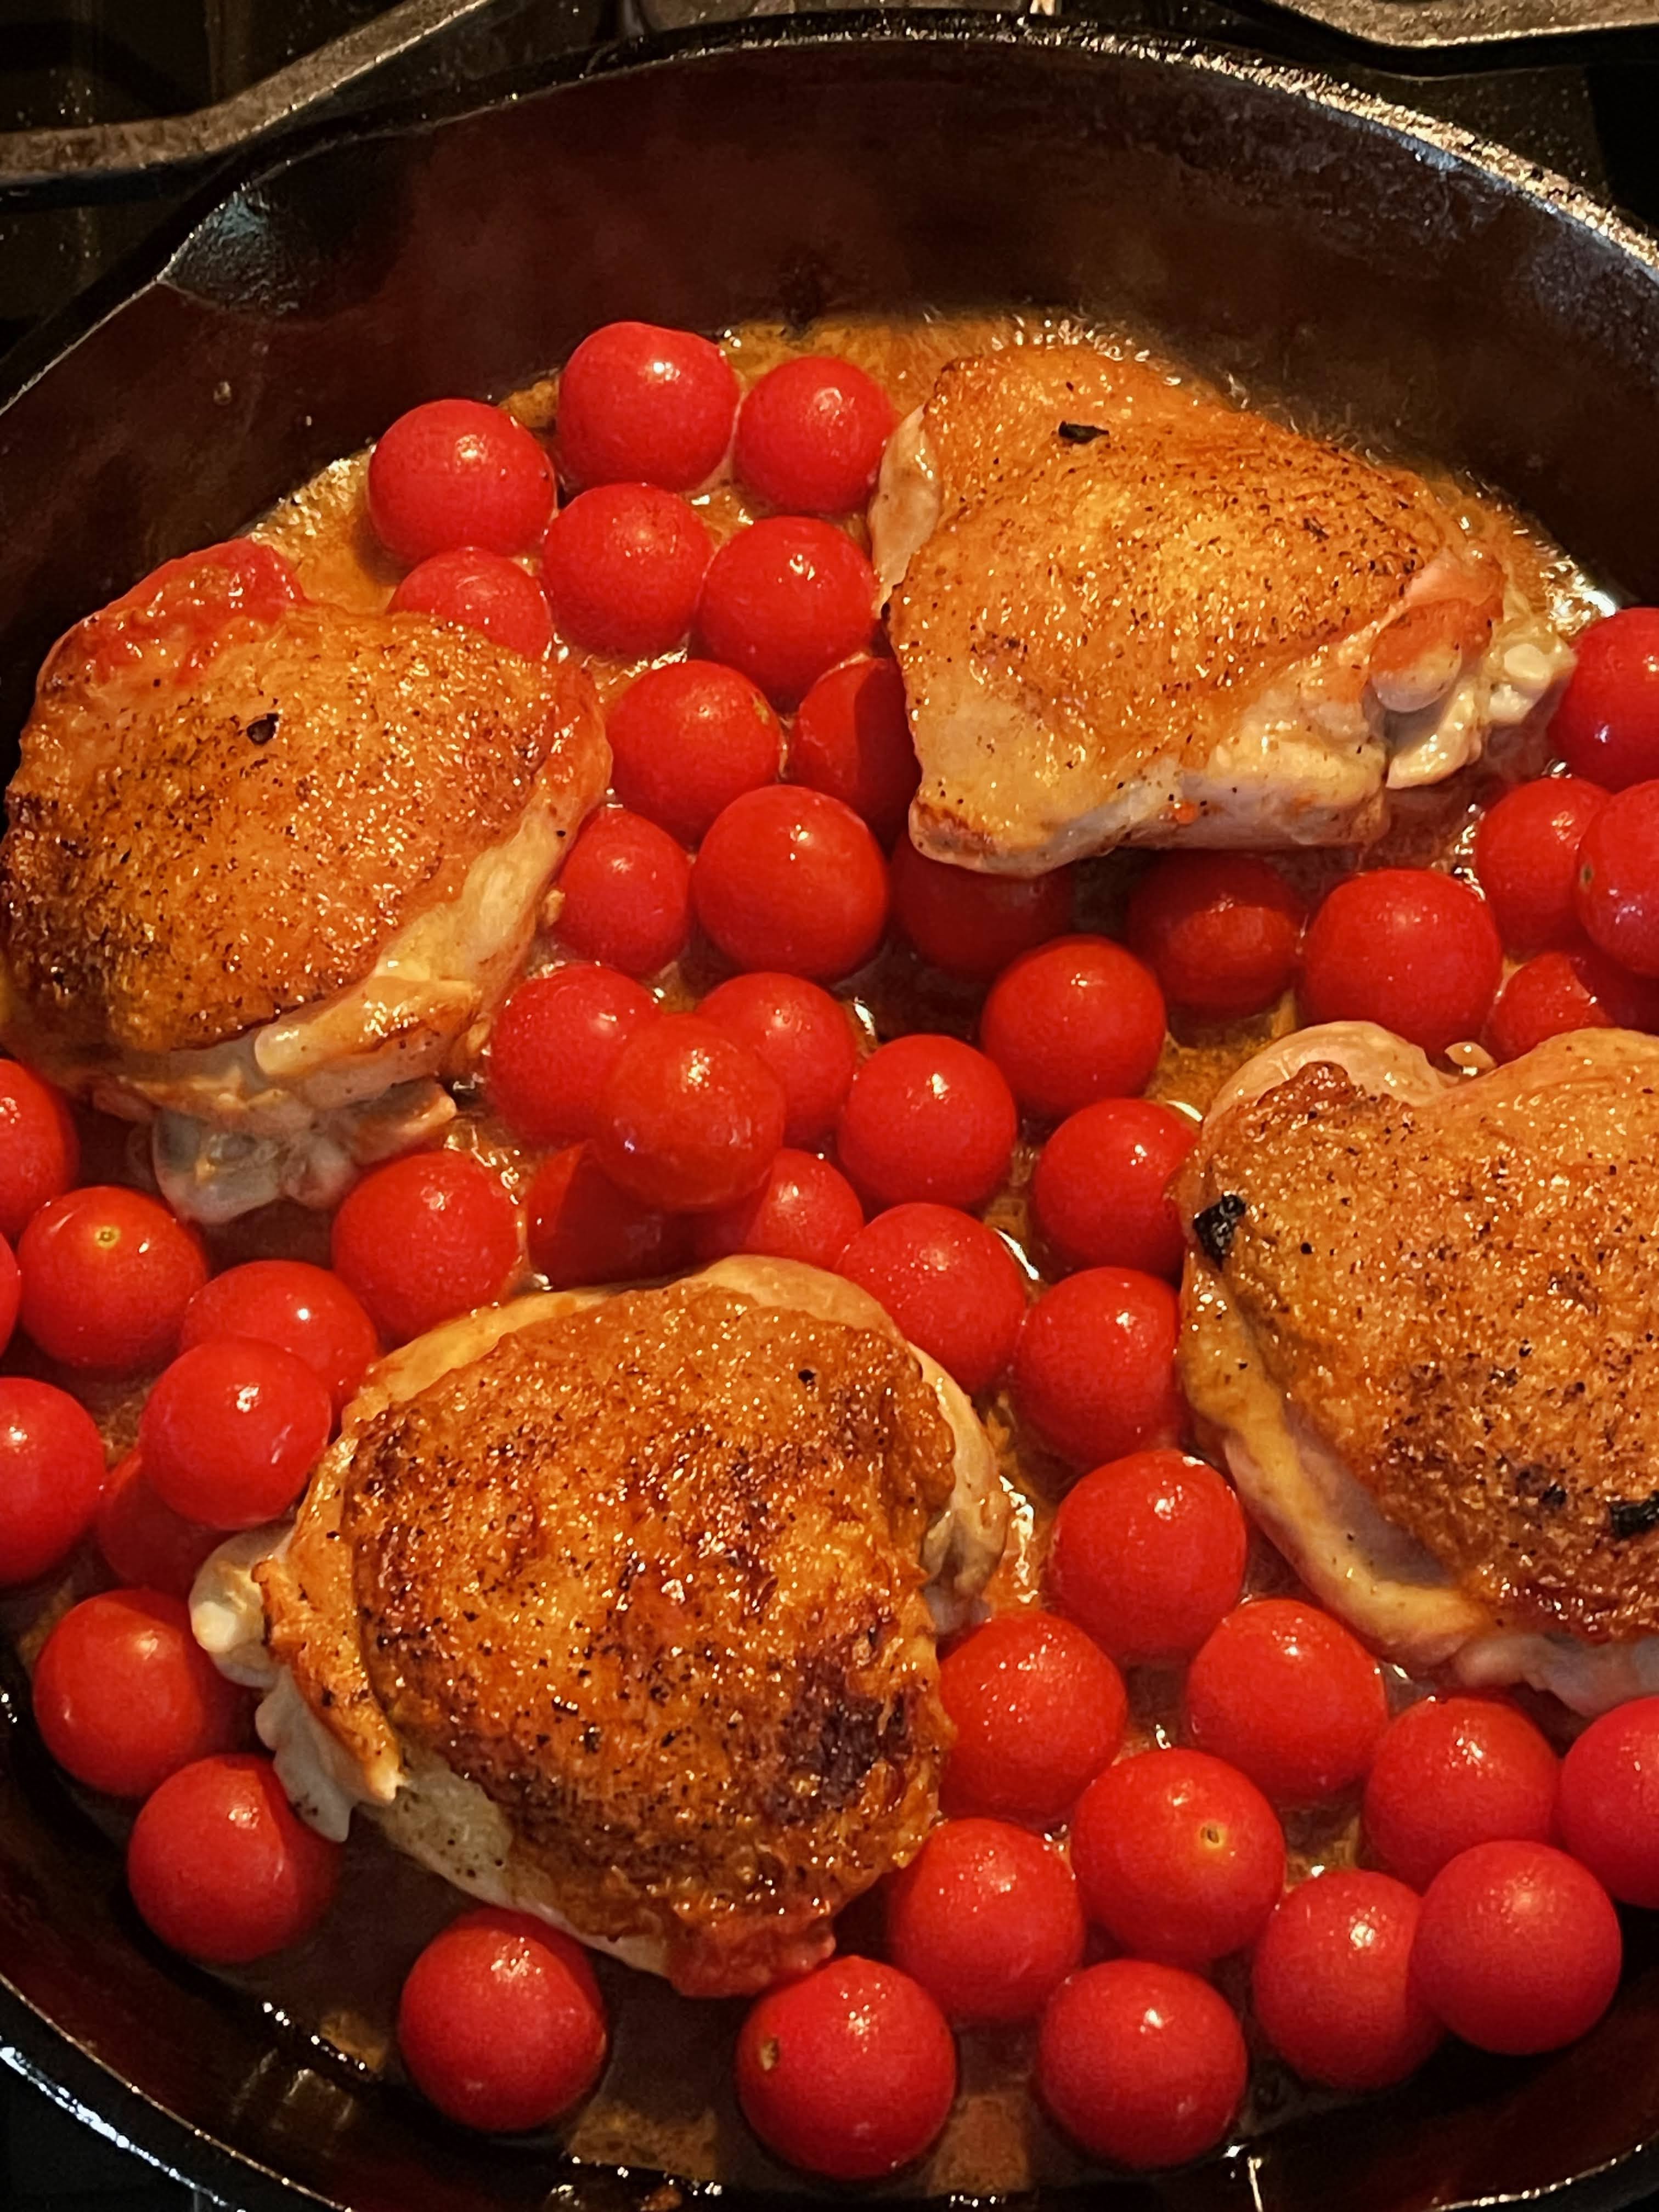
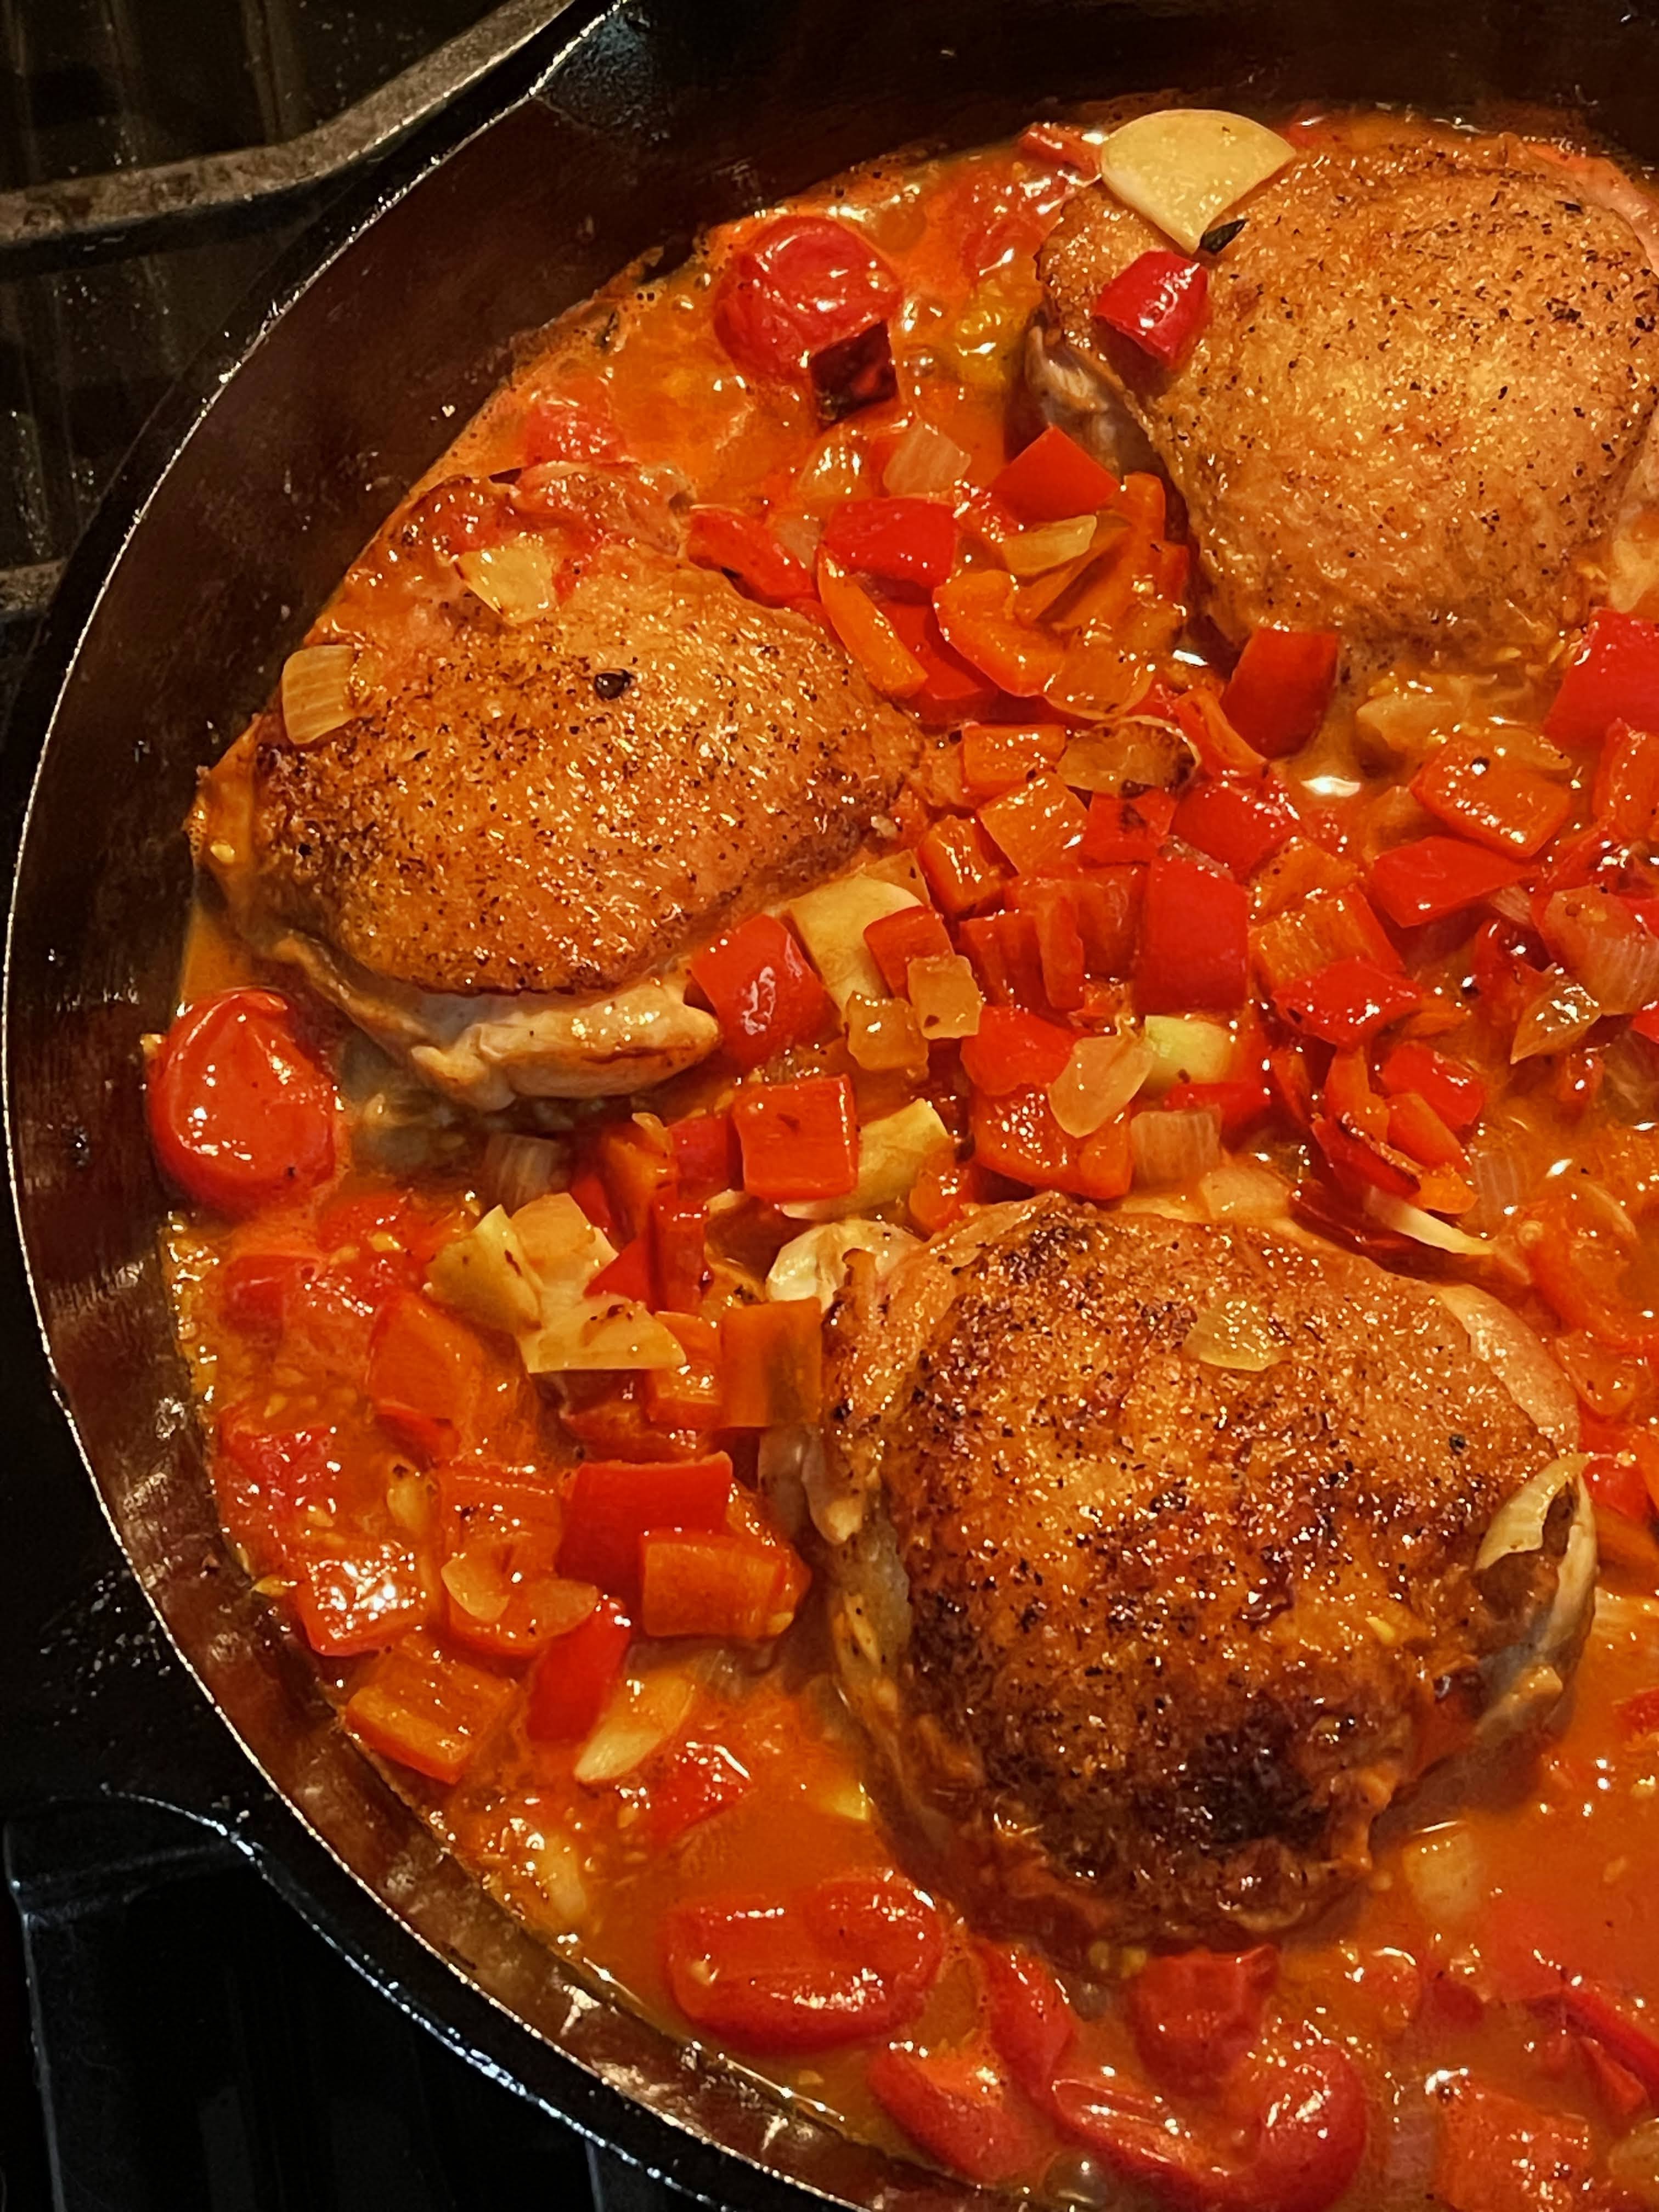
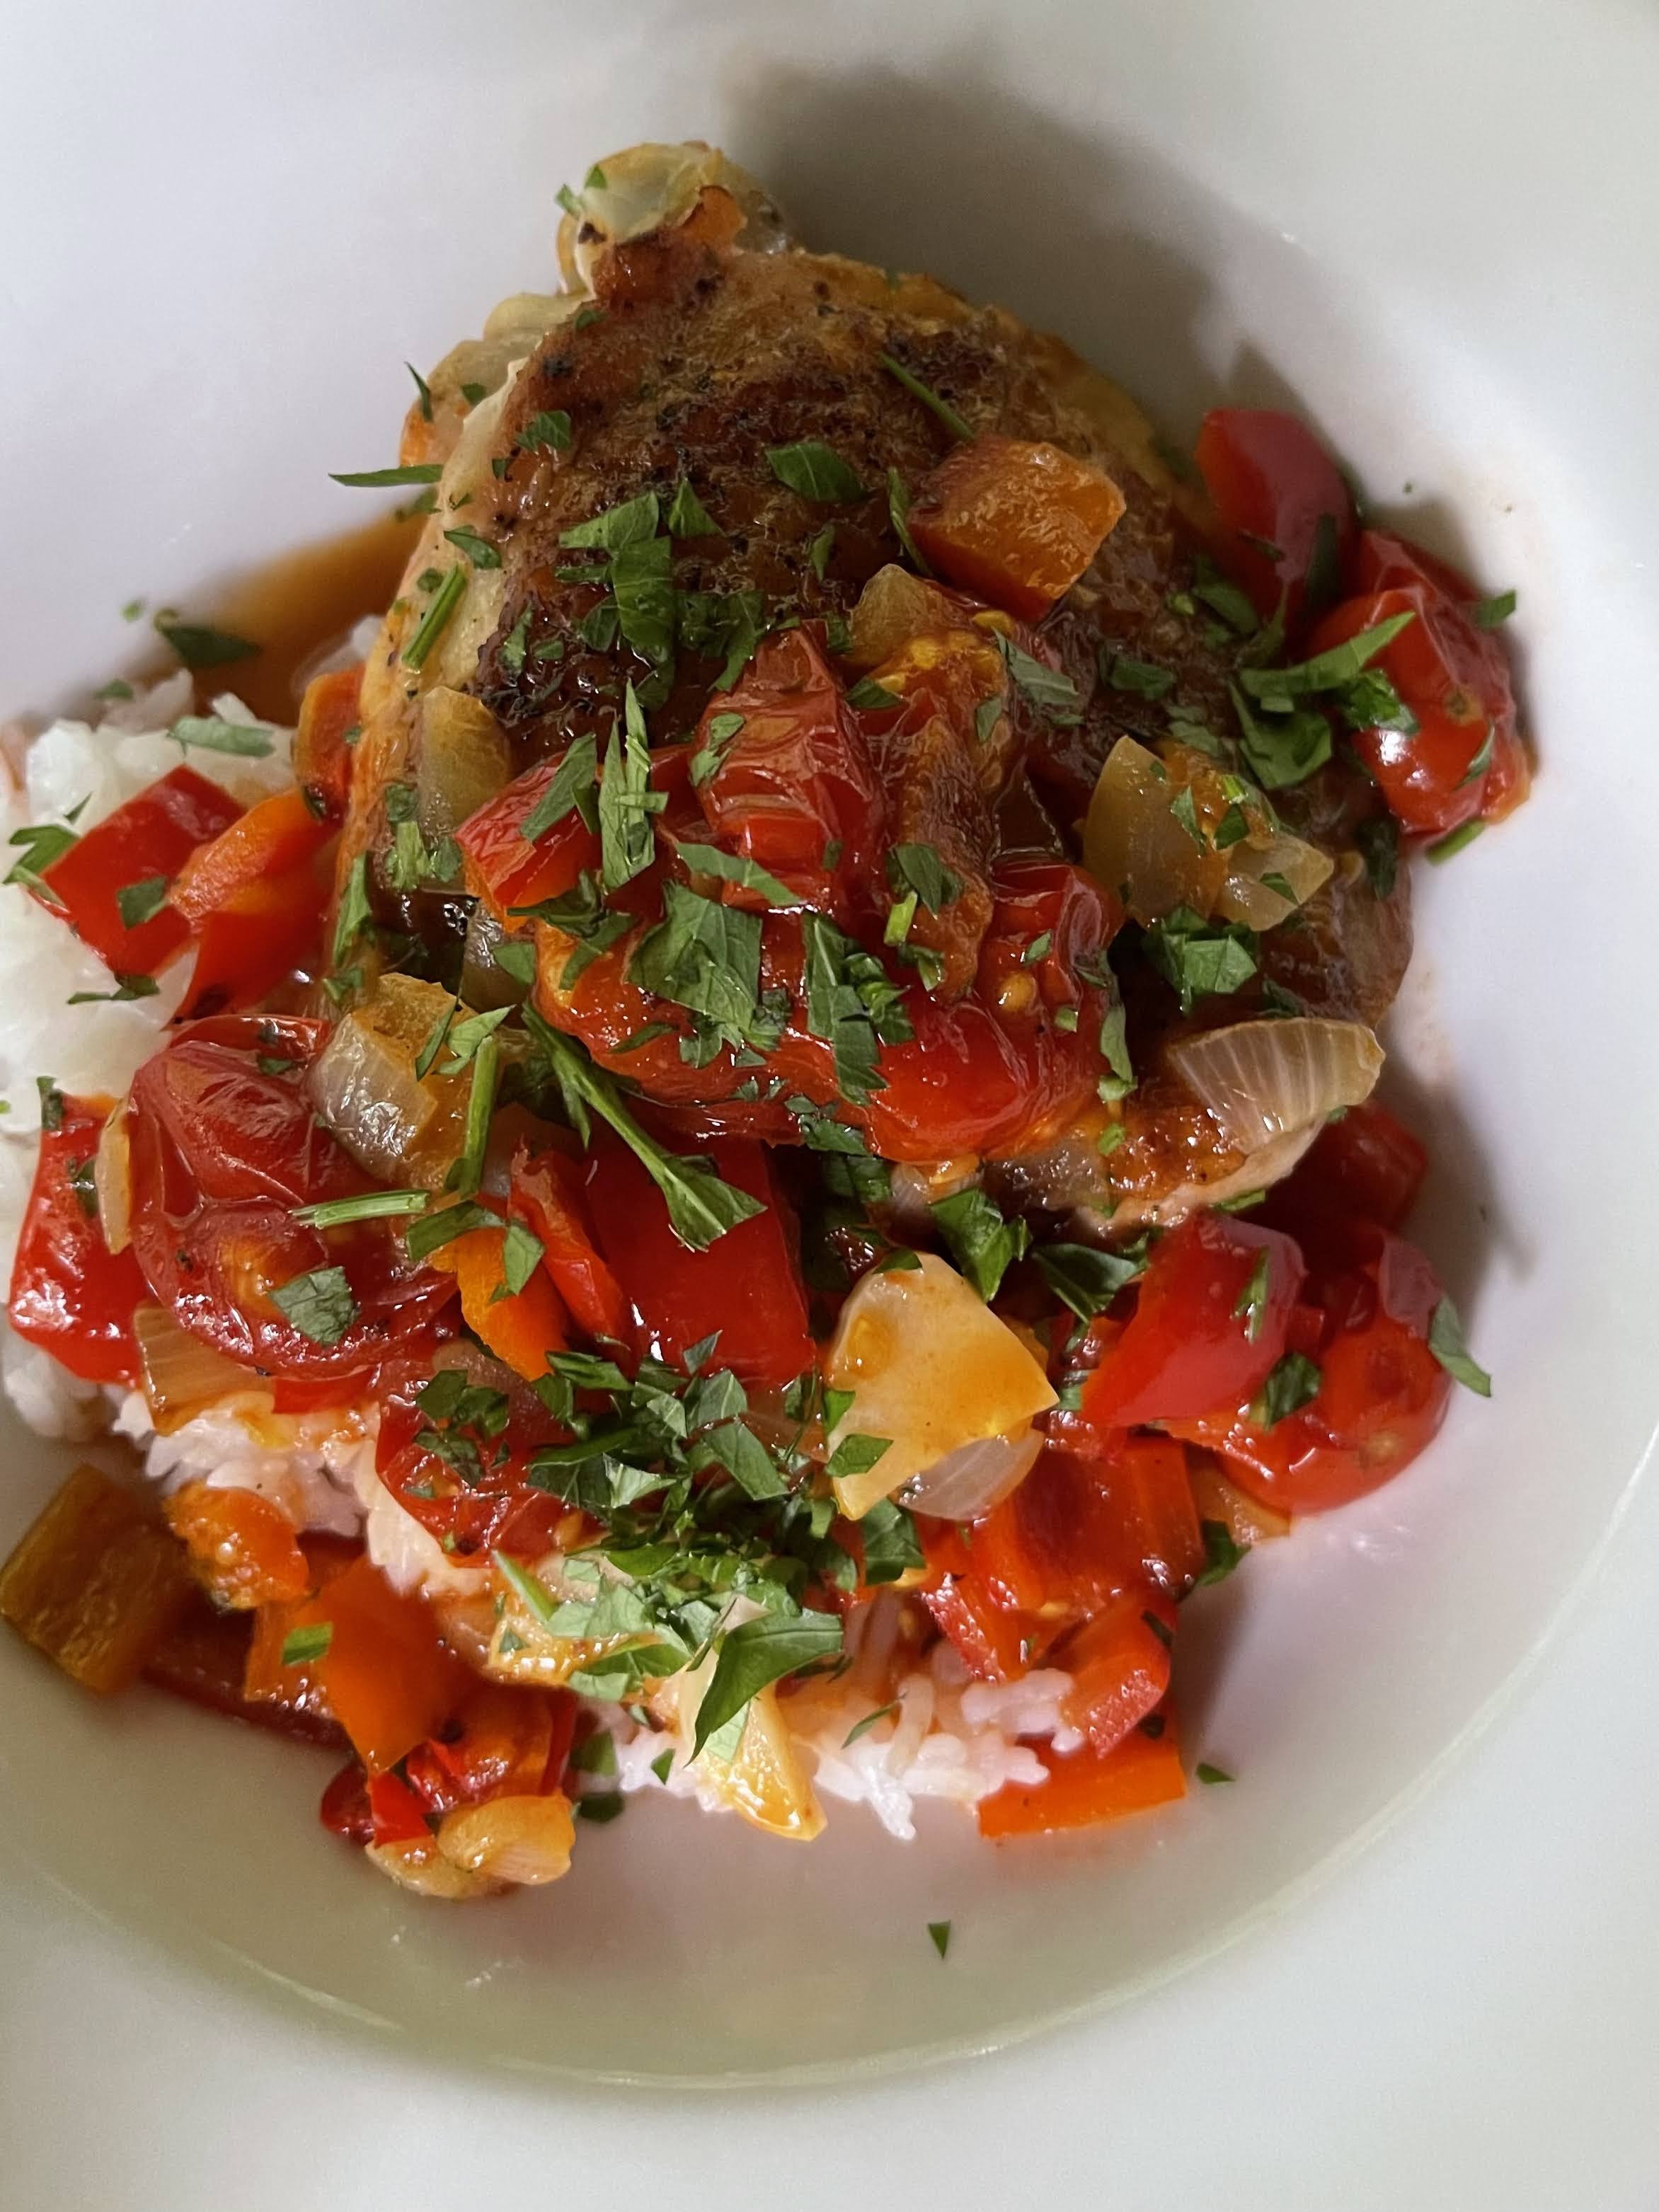
We just returned from a trip up north, and of course it was off to the races on the farm. Our fall crops are coming in, while the summer crops are slowing down. It was an incredible year for our tomatoes. I’ve been putting up tomato sauce like a crazy woman! I wanted something simple tonight, while using up the last of our cherry tomatoes and newly ripened Carmen peppers. Although this skillet chicken dinner was served and on the table in just 45 minutes, it was NOT lacking flavor. If you have a cast iron skillet, use it. Next time I’ll even sprinkle some feta on the top. Served over rice it really hits the spot and soaks up all those incredible juices. This will definitely remain on rotation.
INGREDIENTS:
4 bone-in, skin on chicken thighs
Salt
2 tablespoon extra-virgin olive oil
1 medium onion, diced
4 Carmen peppers, or 2 bell peppers, seeded and chopped
6 garlic cloves, thinly sliced
1/2 teaspoon red pepper flakes
1/4 cup sherry vinegar
1 tablespoon local honey
1 pint red cherry tomatoes
1/4 cup chopped fresh basil or Italian parsley
1/4 cup crumbled feta cheese (optional)
Cooked jasmine rice
INSTRUCTIONS:
One hour before preparing dish, pat dry your chicken thighs and dry brine by sprinkling generously with kosher salt on both sides. Set aside while you prep the rest of your meal.
Heat 1 tablespoon oil in a large skillet (cast iron if you have one) over medium. Add the onions and peppers and saute until onions are just soft. Add garlic slices and cook, stirring frequently until garlic is fragrant, about 3 minutes. Move cooked vegetables to plate and set aside.
Pat dry chicken thighs, add additional oil to skillet and place chicken thighs skin-side down and sear without moving until the skin is golden brown, 6-8 minutes. Turn and cook the other side until lightly browned, about 3 minutes. Pour out all but 1 tablespoon fat from the pan.
Add 1/2 water to the skillet stir and scrape to loosen any stuck bits. Stir in the sherry vinegar and honey. Cover with a lid or a piece of foil and simmer until chicken is cooked through, about 8 minutes. Uncover, raise heat to medium-high and add the cherry tomatoes. Cook until they begin to split and soften, about 4 minutes. Take a potato masher and crush them to help create a sauce. Return the onion, pepper, garlic mixture to pan and stir to incorporate. Heat until the vegetables are warmed through.
Remove from heat and add feta if using and chopped herbs. Serve in bowls over rice.
Serves: 4
“A world without tomatoes is like a string quartet without violins.” –Laurie Colwin
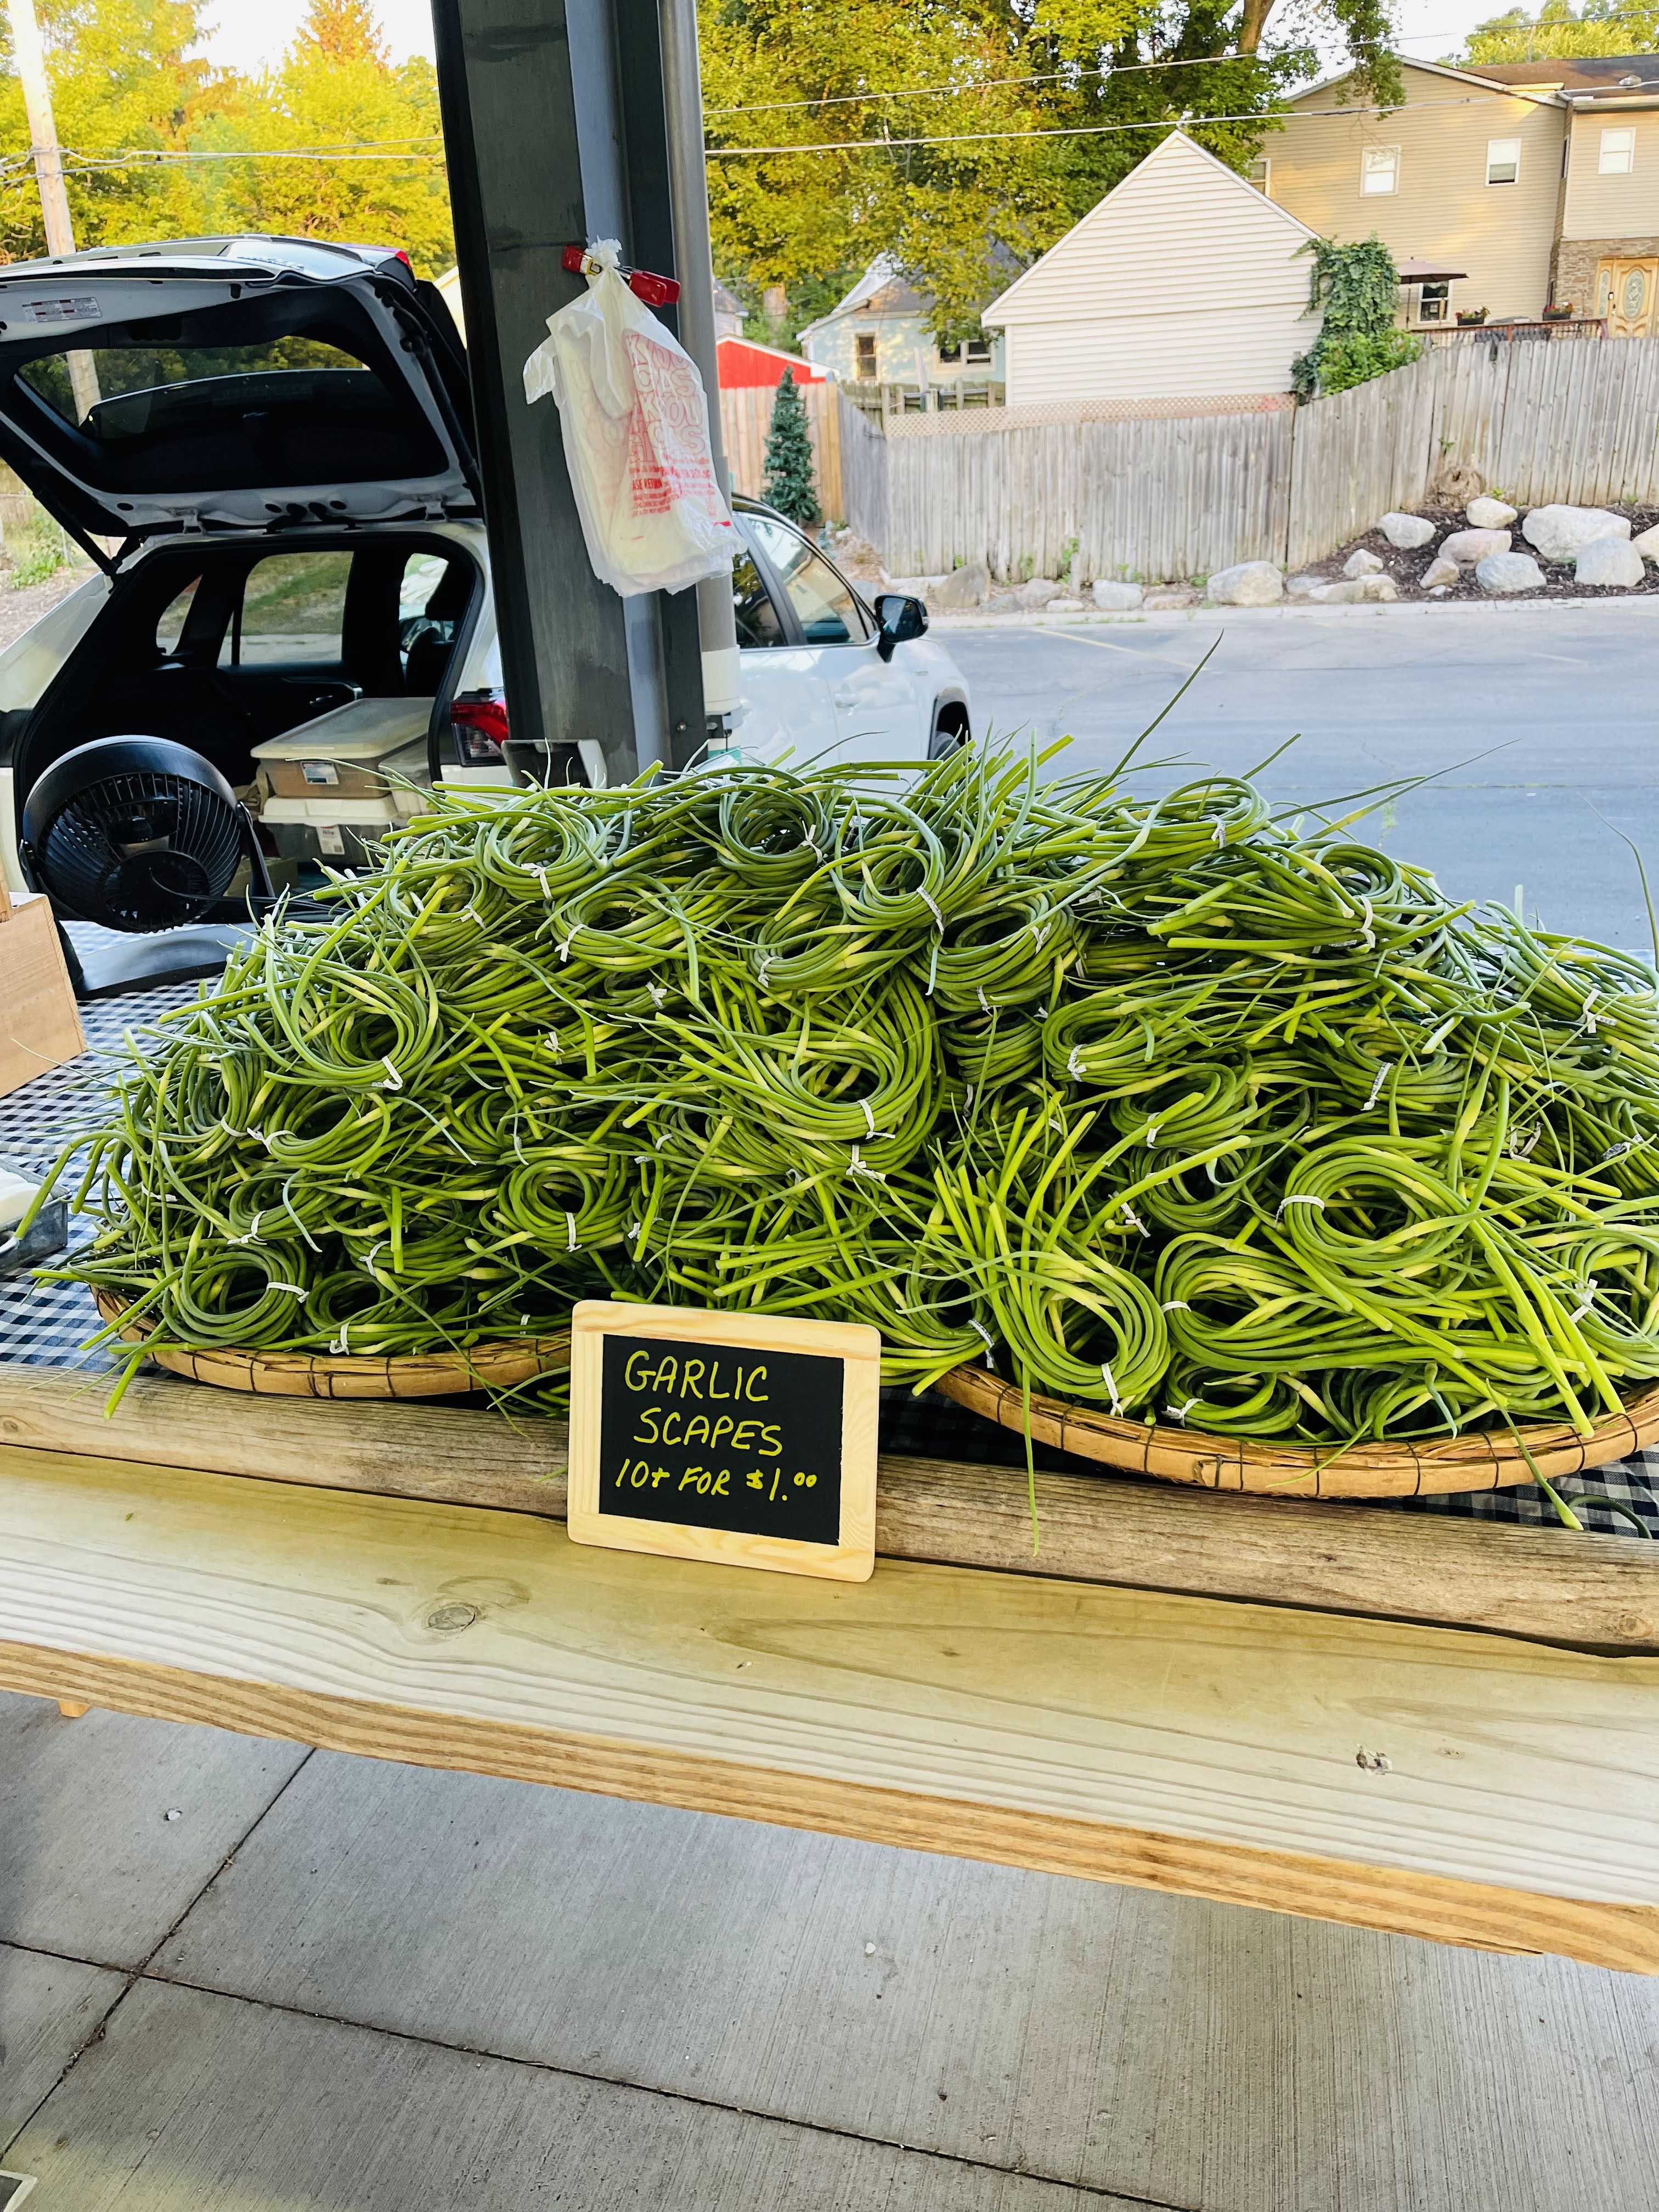
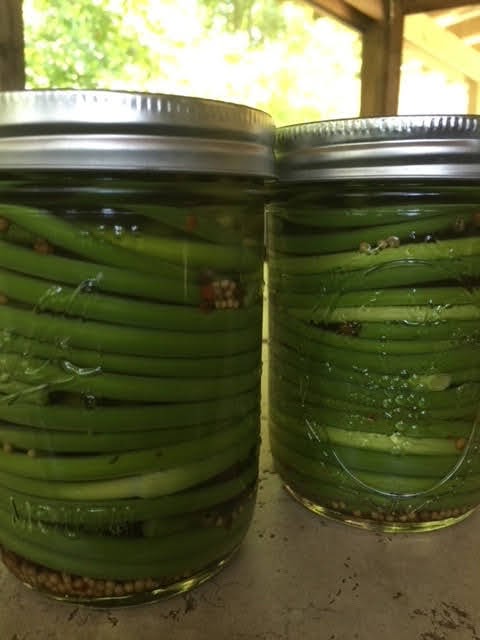
Garlic scapes are the flower of the hardneck garlic. As farmers, we remove them from the plant in order for the garlic to spend its energy in bulb development. If you are one of those fortunate enough to find garlic scapes at your local farmers market, or grow hardneck garlic yourself, don’t miss out on their culinary diversity. Anything from potato salad, scrambled eggs, and pesto; you can use these little gems as you would garlic cloves. Although milder in flavor, they add a pleasant texture and kick to many recipes.
Today we will focus on pickling them. They are an unexpected treat. I prefer to make them as a refrigerator pickle.You can whip them up in no time, and will keep for 3 weeks in your refrigerator. Give them 2-4 days to absorb the flavor of the brine, and you will wonder why you haven’t tried these tangy morsels.
INGREDIENTS:
3-4 bundles garlic scapes
1.5 cups seasoned rice vinegar
1/2 cup water
1/3 cup white wine vinegar
1/2 cup sugar
1 tablespoon Kosher salt
4 cloves garlic diced
1/2 bunch fresh dill
1/4 teaspoon each of the following: cumin seed, fennel seed, dill seed and mustard seed
1/4 teaspoon crushed red pepper flakes
INSTRUCTIONS:
Wash scapes and remove the white flower (these are tough)
In a medium saucepan over medium-high heat, add the rice vinegar, water, white wine vinegar, sugar and salt to pot. Stir until the sugar and salt dissolve. Add the garlic and seeds/spices to the pot and remove brine from heat.
Layer scapes and dill sprigs in a half or full wide mouth pint jar. Twist them around the inside of jar, while gently pushing them in until you have 1/2 inch head space from the top.
Pour brine over scapes until they are covered. Spoon out seeds to divide them between jars. Cover and refrigerate 2-4 days. ENJOY!!!
“There are five elements: earth, air, fire, water and garlic.” Louis Diat
Mediterranean and Eastern Europe are full of foods originating from rural areas. These dishes are an important part of their heritage. Each dish emphasizes the ingredients at hand. Creative cooks everywhere placed their imprint on each dish. Moussaka is one of those dishes.
Moussaka is a traditional Greek eggplant casserole made with eggplant (aubergines) and potatoes, a rich, tomatoey beef or lamb sauce, and topped off with a creamy bechamel sauce. In other words the ultimate comfort food. It is considered their national dish. Moussaka is to the Greek what lasagna is to Italians. Eggplant replaces the pasta sheets, so it is lighter than lasagna. The eggplant can be fried, roasted or grilled. I leave the potato out completely (creative license), and find grilling the eggplant provides a wonderful smokeyness to the dish that I prefer. This approach pairs well with ground lamb. Adding pecorino cheese to the bechamel sauce adds a richness that brings the dish together.
RUSTIC EGGPLANT MOUSSAKA
INGREDIENTS:
3 large eggplants (about 1 lb a piece)
Kosher salt
3 tablespoons olive oil
TOMATO LAMB SAUCE:
2 tablespoons olive oil
1 large onion, diced
4 large cloves garlic, chopped
2 lbs ground lamb (or ground beef if you prefer)
1 14-ounce can of diced fired-roasted tomatoes
1/4 cup tomato paste
1/2 cup dry white wine (you may substitute stock)
2 teaspoons dried oregano
1 teaspoon kosher salt
1 teaspoon sugar
1 teaspoon cinnamon
1/2 teaspoon freshly ground black pepper
1/4 cup fresh parsley, minced
BECHAMEL SAUCE:
3 tablespoons butter or olive oil
1/4 cup all-purpose flour
2 cups whole milk
1/2 teaspoon freshly grated nutmeg
1/4 teaspoon ground white pepper
3/4 cup shredded Pecorino cheese, divided
1 farm fresh egg, room temp, lightly beaten
INSTRUCTIONS:
Pre-heat your oven to 400 F, or your gas grill on high. Cut eggplant into 1/3-1/2 inch disks and place slices vertically in large colander. Sprinkle liberally with salt and let drain for 1 hour. This step is important so your eggplant is less bitter. Rinse slices and pat dry, then brush each side with olive oil. If using the oven place slices on greased baking sheet (you may have to do this in batches) turning slices half way through. Roast until golden about 15 minutes. If grilling, turn grill down to medium and grill until golden and good grill marks have developed. Turn and repeat on other side. Set aside.
In a medium-large pan with deep sides, saute diced onion in oil on medium-high heat for 4-5 minutes or until translucent. Add garlic, cook for 1-2 minutes (do not burn). Turn heat down to medium and add ground lamb and brown meat, stirring often, about 15 minutes. Drain excess fat. Add diced tomatoes, tomato paste, white wine, parsley, sugar, cinnamon, kosher salt and pepper. Stir and cover. Let simmer on medium-low heat for about 20 minutes, stirring occasionally.
Next in a small pot, heat the butter. Whisk in the flour and let cook on medium heat, while whisking for 3 minutes. It will start to smell nutty. Start adding milk a little at a time, whisking constantly until all two cups are incorporated and sauce is smooth. Continue to whisk and bring to a boil. Turn heat down to low and simmer for 2 more minutes. Remove from heat and add nutmeg, 1/4 cup pecorino cheese, salt and pepper. Set aside to cool. In a separate bowl, lightly beat the egg, but do not add to sauce just yet.
Divide your eggplant slices into three stacks, reserving the largest pieces for the top and bottom of casserole. The small pieces can be used for the middle layer which is concealed. In a greased 8 x 13 baking dish, Place one layer of eggplant, slightly overlapping pieces. Add half of the meat sauce. Add another layer of eggplant using smaller or slightly inconsistent slices. Cover with remaining meat sauce. Add the last layer of eggplant, again slightly overlapping the slices.
Whisk in about 1/4 cup of bechamel sauce into the beaten egg (to temper it) then pour this back into the bechamel sauce, whisking until nice and smooth. Spread the bechamel sauce over the final eggplant layer.
Sprinkle with remaining 1/2 cup of pecorino cheese. Place in a 350 F oven for 50-60 minutes, uncovered until beautifully golden. Let stand 15 minutes before serving.
Serves 6-8
“Since we cannot change reality, let us change the eyes which see reality.“
There’s something about anything salty and savory that will always get my attention. Olives, capers, anchovies, in any recipe will certainly make me sit up and take notice. One thing that will give your creativity a boost is having a delicious and versatile olive tapenade on hand. During the holidays I try to incorporate it in appetizers, pasta and entrees in general. It keeps well in the refrigerator for a couple weeks, and if your making a larger batch, freezes well for several months.
Consider the following suggestions for using tapenade:
Serve it on top of hummus for a savory boost
Serve broiled fish with a dollop of tapenade on top
Use tapenade to stuff portabella or cremini mushrooms
Make a cold pasta with veggies and use the tapenade as the dressing with lemon juice
Top burgers with roasted red pepper, cheese and tapenade
Toss with steamed baby potatoes
Use on pizza to replace tomato sauce
Make a sandwich on focaccia with salami, ham, roasted red peppers, tomatoes, red onion, pepperoncini, mozzarella and tapenade
Make a wrap of hummus, red onion, roasted red pepper, arugula and tapenade
Make a pasta with tapenade, cherry tomatoes and toasted breadcrumbs (recipe to follow)
The possibilities for its use is only limited by your imagination! Although you can purchase store bought tapenade, it’s so easy why not make it yourself for a lot less! This blog will focus on whipping up this flavorful Mediterranean olive spread and a easy, crowd pleasing pasta when you’re busy.
OLIVE TAPENADE (MEDITERRANEAN OLIVE SPREAD)
INGREDIENTS:
6 ounces brine-cured olives, pitted and drained (Manzanillo and or kalamata work well)
6 ounces California black olives, pitted and drained
1 teaspoon anchovy paste or 2 anchovy filets
1/4 cup capers, drained
2 tablespoons fresh flat leaf parsley
3 cloves garlic
3 tablespoons fresh lemon juice
Couple grinds fresh black pepper
1/4 cup extra-virgin olive oil
INSTRUCTIONS:
Place drained and pitted olives in the bowl of a food processor. Add anchovy, capers, parsley, garlic, lemon juice, and black pepper. Pulse several times until coarsely chopped.
Scrape side with spatula and add olive oil. Pulse several times until a chunky paste forms, scraping sides as needed. Serve at room temperature.
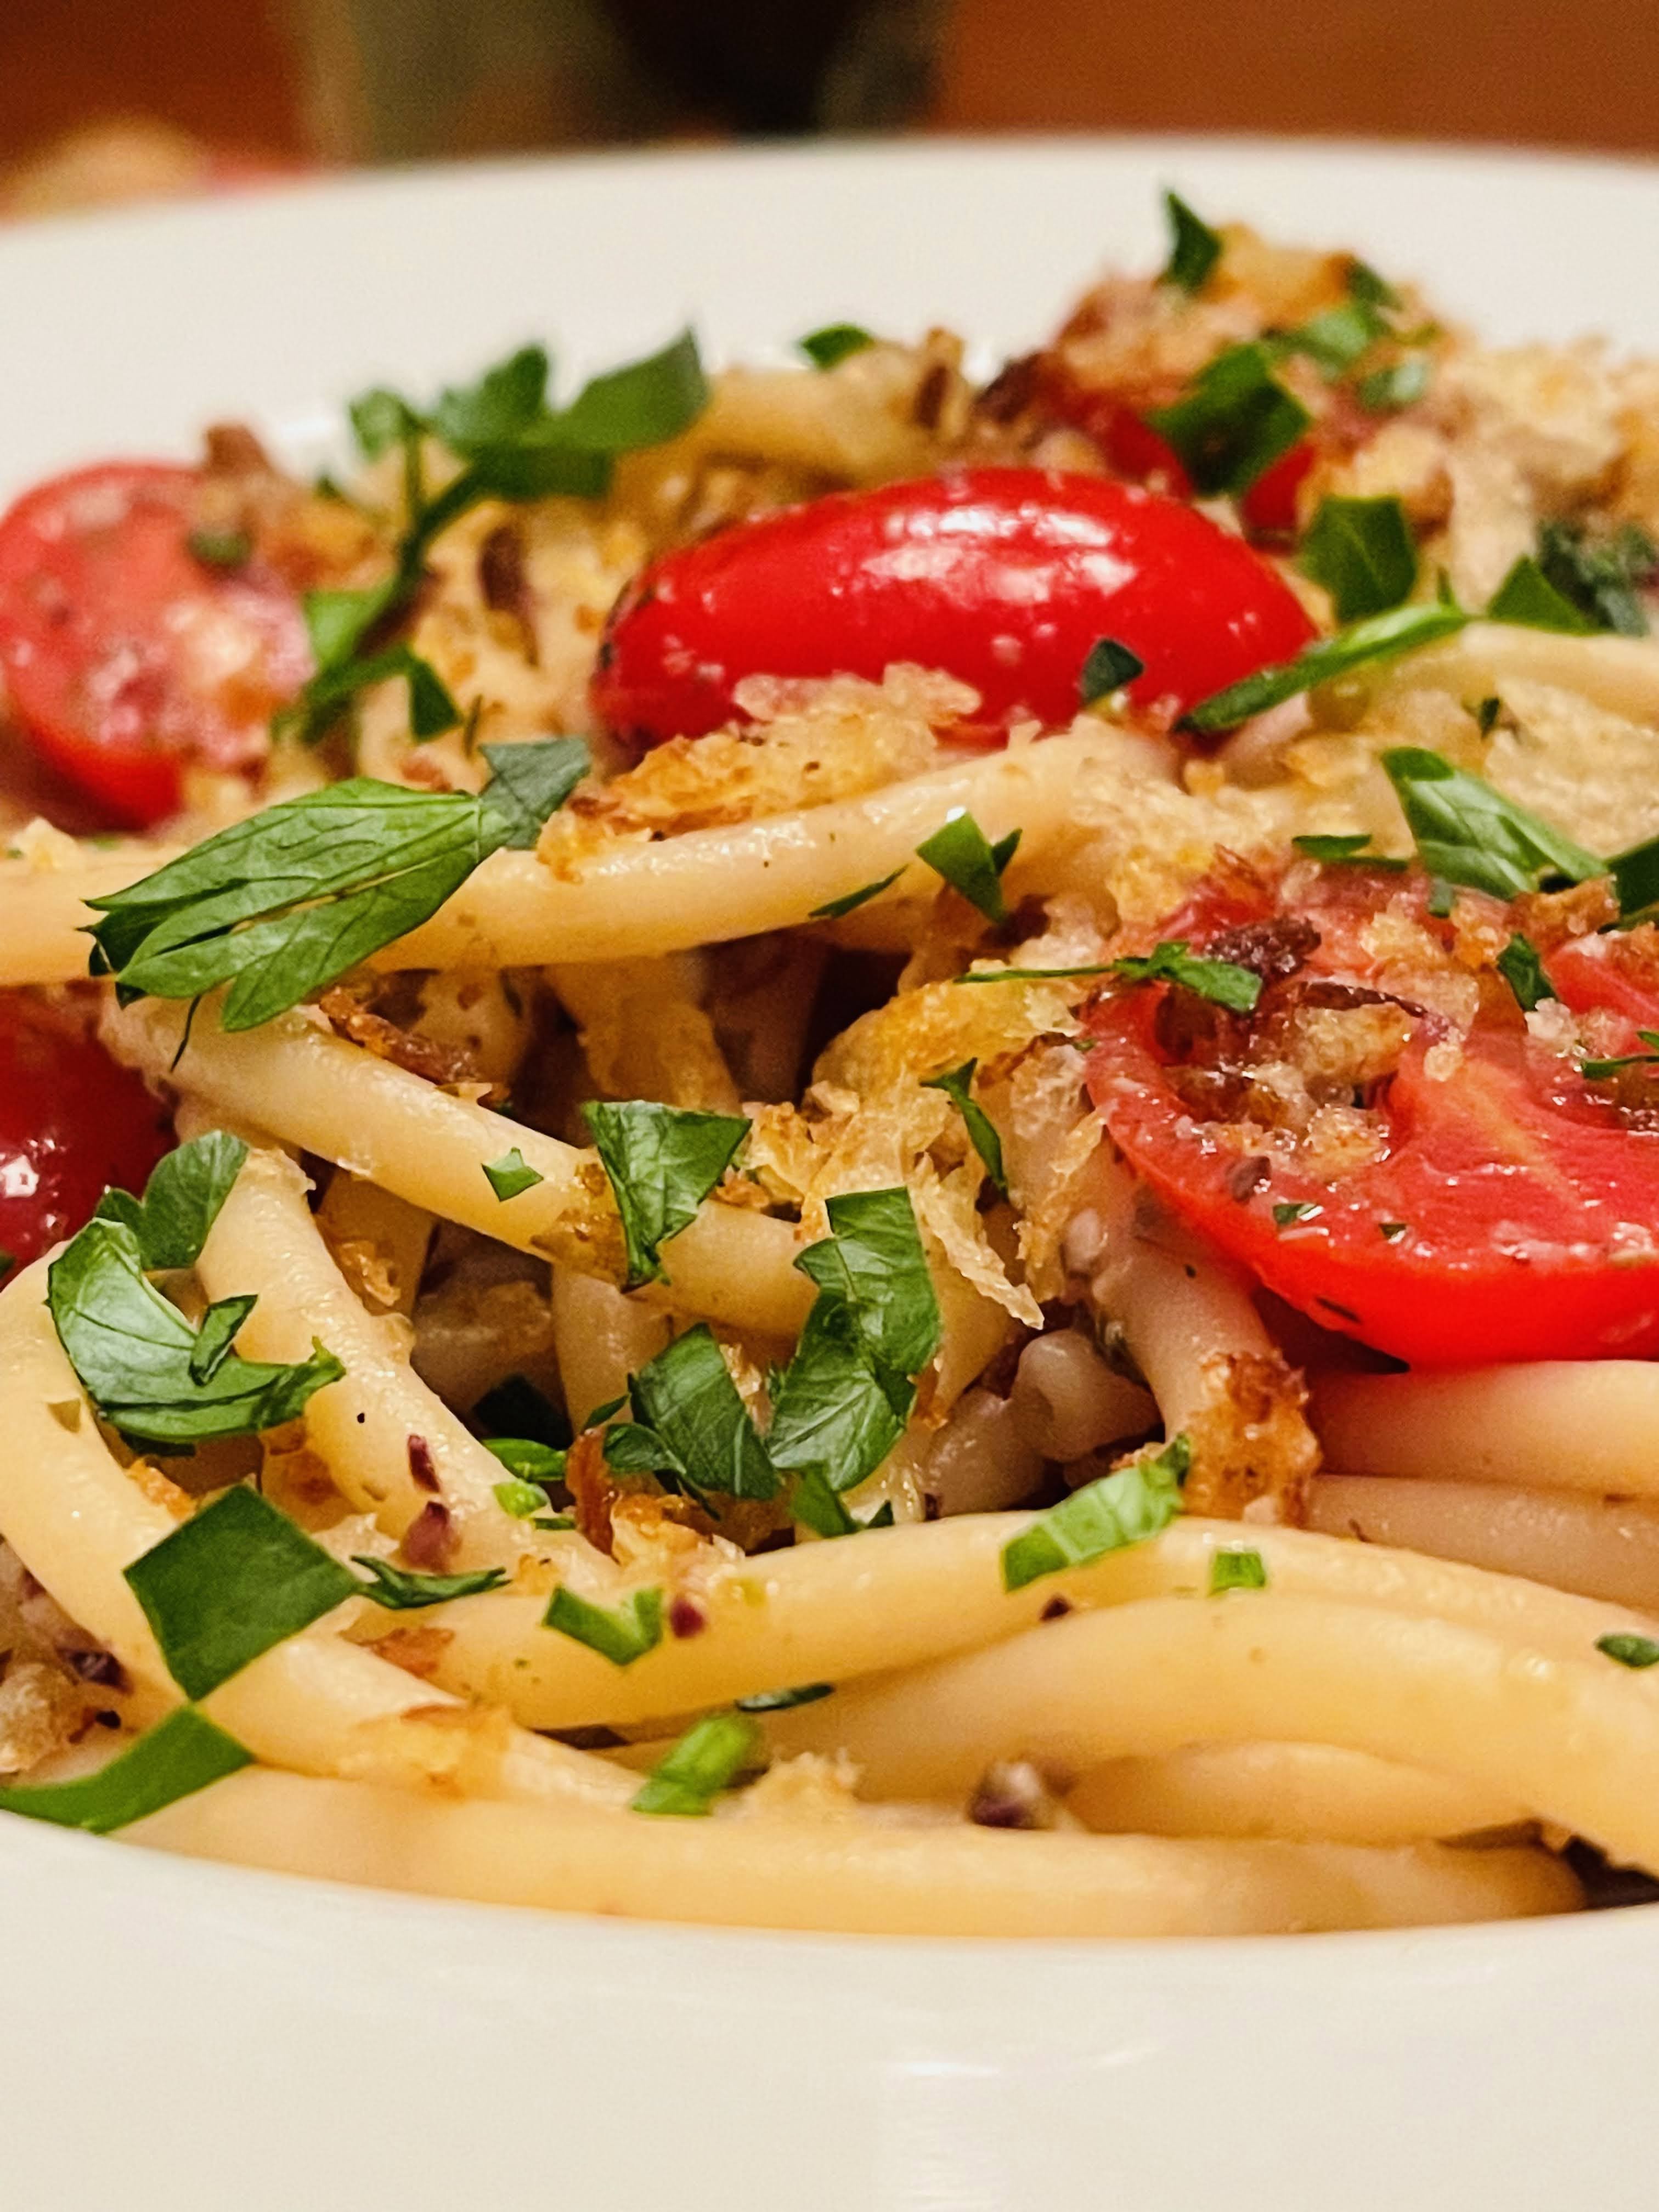
TAPENADE PASTA WITH CHERRY TOMATOES AND TOASTED BREADCRUMBS
INGREDIENTS:
8 ounces bucatini pasta
1/2 cup toasted fresh breadcrumbs
2 cups cherry tomatoes, halved
1/2 cup olive tapenade
3/4 cup pecorino cheese, grated
1/2 cup chopped flat-leaf parsley
Freshly ground black pepper
INSTRUCTIONS:
Bring a large pot of water to a boil. Season the water generously with salt and then add the pasta. Cook the pasta according to package directions.. Reserve 1 cup of pasta water before draining the pasta.
While you pasta is cooking heat a few drizzles of olive oil in a small skillet over medium heat. Stir in the fresh breadcrumbs and toast them until golden brown, 3-5 minutes. Drain on paper towels.
Add the drained pasta back into the pot and add the tapenade, and 1/2 cup of the pasta water. Toss well to combine, adding additional pasta water if needed. Add 1/2 the cheese, the cherry tomatoes and parsley. Season with black pepper.
Pile the pasta onto plates or shallow bowls. Top with cheese, parsley and breadcrumbs. Finish with a drizzle of olive oil.
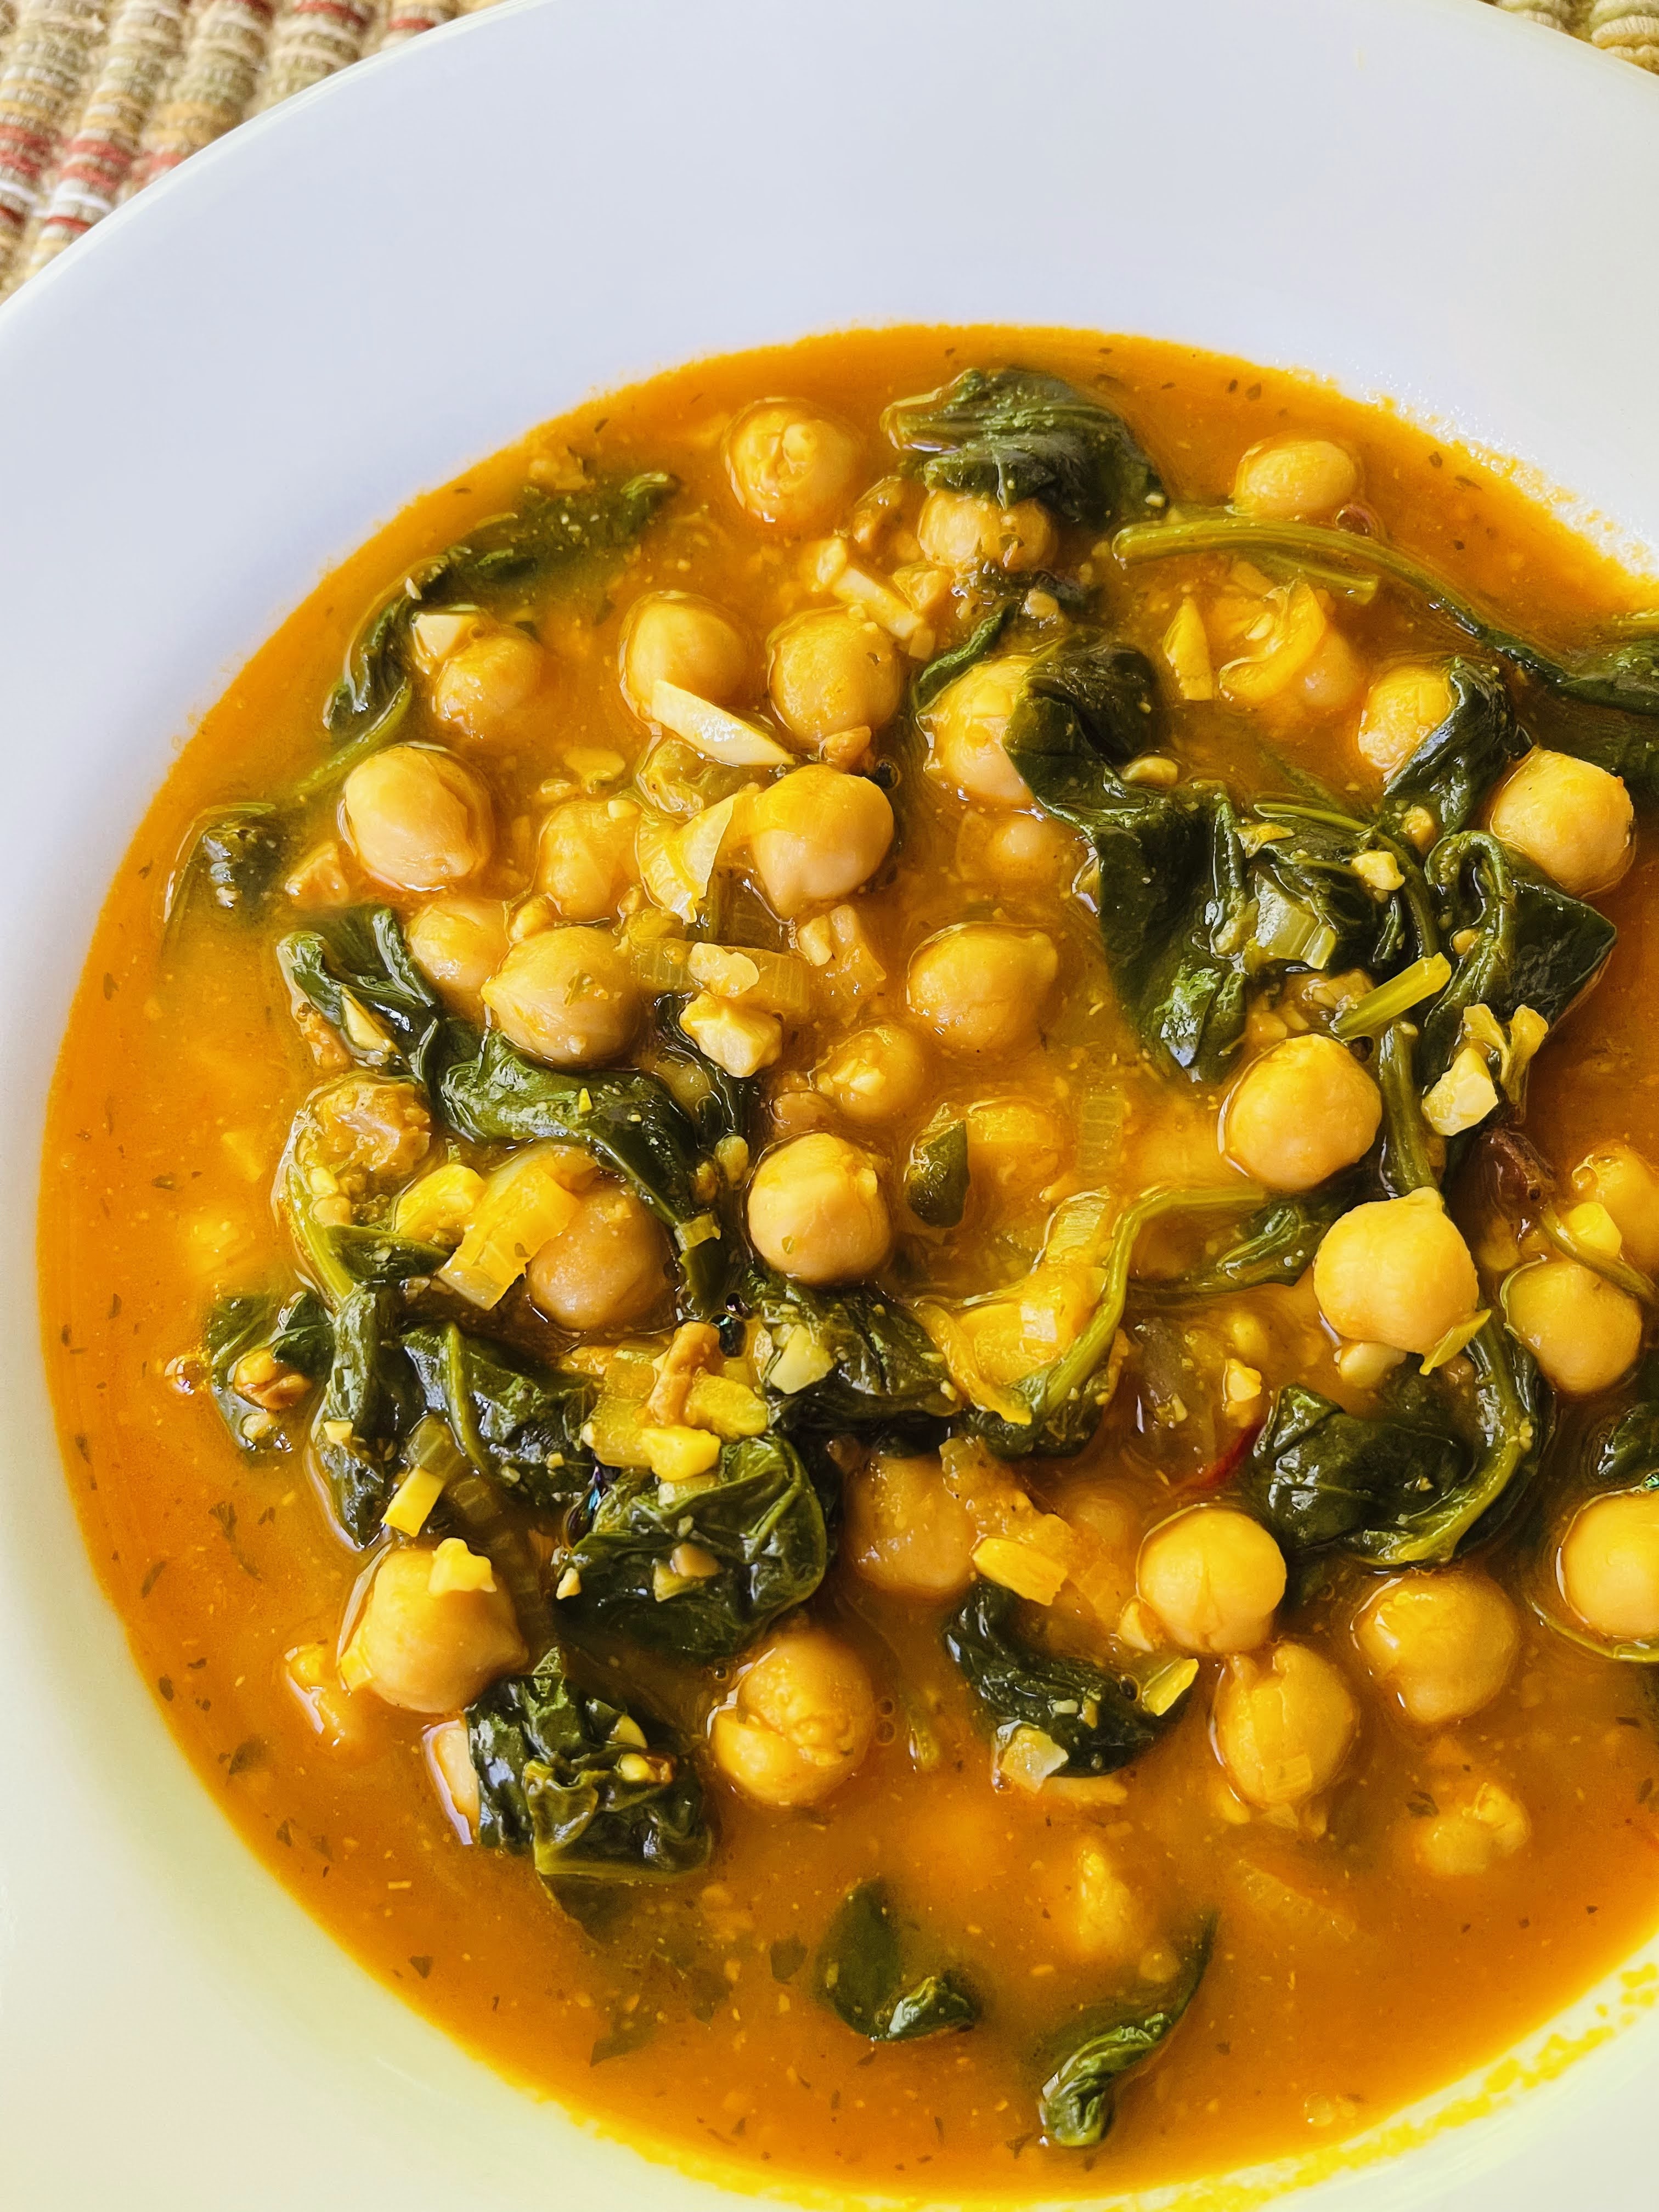
There are times after a busy day on the farm that I want to make something healthy yet packed with flavor. If I can get it to the table in 30 minutes, all the better. It also doesn’t hurt that it’s made with my favorite legume, the chickpea or garbanzo. Chickpeas go way beyond hummus, and are excellent in stews, soups, sides and salads, along with grains and pasta. They boast 11 grams of protein in 1 cup, and deliver the most nutrients of all other beans. Loaded with zinc and fiber, they pair well with cuisines from many cultures.
This is a simple stew from Catalonia, Spain loaded with garlic, vegetable broth, spinach, saffron and get this, raisins. In the end, this savory-sweet stew hits on all cylinders. We love it, and I think you will too!
CATALAN SPINACH AND CHICKPEA STEW
INGREDIENTS:
3 tablespoons extra-virgin olive oil
1/4 cup toasted almonds, ground in a mortar and pestle or food processor
2 large shallots, thinly sliced
6 large cloves garlic, coarsely chopped
1/2 cup tomato sauce
10 ounces fresh baby spinach
2 15 ounce cans chickpeas, drained and rinsed
1/4 cup golden raisins
2 cups vegetable stock (homemade if possible)
Large pinch of saffron threads
3 tablespoons freshly chopped parsley
Sea salt and freshly ground black pepper to taste
INSTRUCTIONS:
In a stock pot over medium-high heat, add 3 tablespoons of olive oil, the sliced shallots and the garlic. Saute, stirring constantly, until shallots are translucent about 2 minutes. Add tomato sauce and simmer for another 2-3 minutes.
Meanwhile, in the mortar and pestle or food processor, add the saffron threads, parsley, and sea salt. Process until fine. Set aside.
Add the fresh spinach, and stir until wilted, then add the chickpeas, raisins, and sea salt and pepper to taste. Add 2 cups of vegetable stock and the almond mixture. Simmer for about 5 minutes. Serve in shallow bowls.
Serves 4
“Beans, beans, the magical legume. The more you eat, the more you consume.” –A. Yankovic
I’ve been making hummus, the Middle-Eastern chickpea spread for decades. I am very anti commercially processed hummus. One, I dislike the consistency, and two I can make 5-6 times as much for the price of one 8 ounce container. Although I have frequently advocated for using soaked, dried chickpeas, I’ve been working at making a good hummus with canned chickpeas; and I have finally come up with the result I was looking for using a few tricks that made a significant difference. I found it amazing that using these 4 techniques made for a creamy and delicious hummus I was ready to eat and serve to others.
Technique #1: warm your chickpeas. I found warming my chickpeas in the microwave for about 2 minutes helped to give me the same incredible consistency I prefer when I cook the chickpeas from scratch. And lets face it there are times that time is of the essence when soaking and cooking them isn’t practical.
Technique #2: Save your canned liquid. The starchy liquid from canned chickpeas is called Aquafaba. It is often used by vegans as an egg substitute. Here we will use it to flavor and thin out our processed chickpeas to just the right consistency.
Technique #3: Patience grasshopper! Process, process, process! It is extremely important that you process your hummus for as long as it takes, which can be as long as 10 minutes! I find the time can vary quite a bit for unknown reasons. I will sometimes add 2-3 tablespoons of ice water near the end, if the consistency is at all grainy.
Technique #4: Taste as you go. I can’t tell you how many times when I have neglected to do this that I end up making adjustments that weren’t necessary. The two primary factors being salt and lemon juice. Once it’s added you can’t take it away.
I make hummus several times a month. I can’t get enough of it, and it’s so versatil. You can add roasted carrots, beets, avocado, or marinated artichokes to it and end up with something completely different. Lately I’ve been slightly obsessed with using it as a replacement for pasta or rice, and turning it into a dinner hummus. I have used ground lamb and topped it with cucumbers, cherry tomatoes, olives, green onions and cilantro. I have roasted a sheet pan of veggies like eggplant, zucchini and squash. You name it, and you can create a healthy topping for this classic spread. This week I used cut up boneless chicken thighs, caramelized onions and roasted cauliflower seasoned with my homemade ras el hanout https://twistedbasics.com/2019/03/16/got-the-munchies/ and was totally blown away with the result. This will definitely be on a permanent rotation in this house! Don’t be daunted by the several steps; it still comes together relatively quickly and is well worth the effort!
MIDDLE EASTERN DINNER HUMMUS
FOR THE HUMMUS:
2 (15.5-ounce) cans chickpeas, drained, reserving liquid from one can
1/3 cup tahini
1/4 cup extra-virgin olive oil
Juice from one lemon
1-2 teaspoons kosher salt
2 large garlic cloves
MAKE THE HUMMUS:
Heat your drained chickpeas in a microwave safe bowl for 2 minutes. Throw the garlic down your entry shoot while your food processor is running, processing to chop it. Stop and add chickpeas, tahini, oil, 1/2 of the lemon juice, 1 teaspoon salt, then process until a coarse paste forms, about 45 seconds, stopping to scrape down sides as needed.
Slowly add the chickpea liquid and process until smooth and creamy (up to 10 minutes). Don’t rush this step. If after processing your hummus still looks granular, add ice water 1 tablespoon at a time (up to 3 tablespoons). Taste adding additional lemon juice and/or salt. This will make more than you will need for this recipe, but yay more for later. Place finished hummus in bowl and set aside.
FOR CAULIFLOWER:
1 medium head cauliflower, cut or broken into small flowerettes about 4 cups
2 tablespoons extra-virgin olive oil
1 teaspoon ras el hanout
Preheat oven to 425 degrees F. Line a sheet pan with parchment paper.
Toss cauliflower with olive oil and ras el hanout. Place on baking sheet in one layer. Roast for 25-30 minutes or until cauliflower is slightly charred around the edges.
FOR CHICKEN & ONIONS:
1 pound boneless, skinless chicken thighs, cut into 1-inch pieces
1 tablespoon ras el hanout
4 tablespoons extra-virgin olive oil, divided
1 large yellow onion, thinly sliced
1 teaspoon za’atar
1/3 cup golden raisins
In a medium bowl, toss chicken with ras el hanout. Heat two tablespoons olive oil in 12 inch skillet over medium-high heat. (I love my cast iron skillet for this). Add chicken in an even layer; cook, undisturbed, until the bottom of the chicken is lightly browned, about 5 minutes. You may need to do this in two batches. Turn over chicken and cook until no longer pink, about 4 more minutes; transfer to a medium bowl.
To the same skillet reduce the heat to medium and add the sliced onion, za’atar, and the remaining 2 tablespoons olive oil; cook, stirring occasionally with a wooden spoon to loosen browned bits, until softened, lightly brown and caramelized. Add 1/4 cup water and the raisins to the skillet, the chicken and cauliflower. Stir gently and heat until warmed through. Season with salt to taste.
FOR ASSEMBLY:
On a decorative platter, spread the hummus 1/2-3/4 inch thick to completely cover the bottom of platter. Make a well in the center of the hummus and spoon the chicken, caramelized onions and cauliflower over hummus. Top with toasted pine nuts and chopped parsley. Drizzle with olive oil. Pass pita or pita chips for serve.
Serves 4
“Middle age is about getting super excited about different flavors of hummus!”