vegetables

Saving the Warmth

Cooler temperatures are upon us and autumn is in full swing. Boats are coming in off the lake, jeans are replacing shorts, and the farmers market is full of winter squash, peppers and mums. My seven week canning mission is officially done, yet there are still some last minute preparations to do for the cold months ahead.

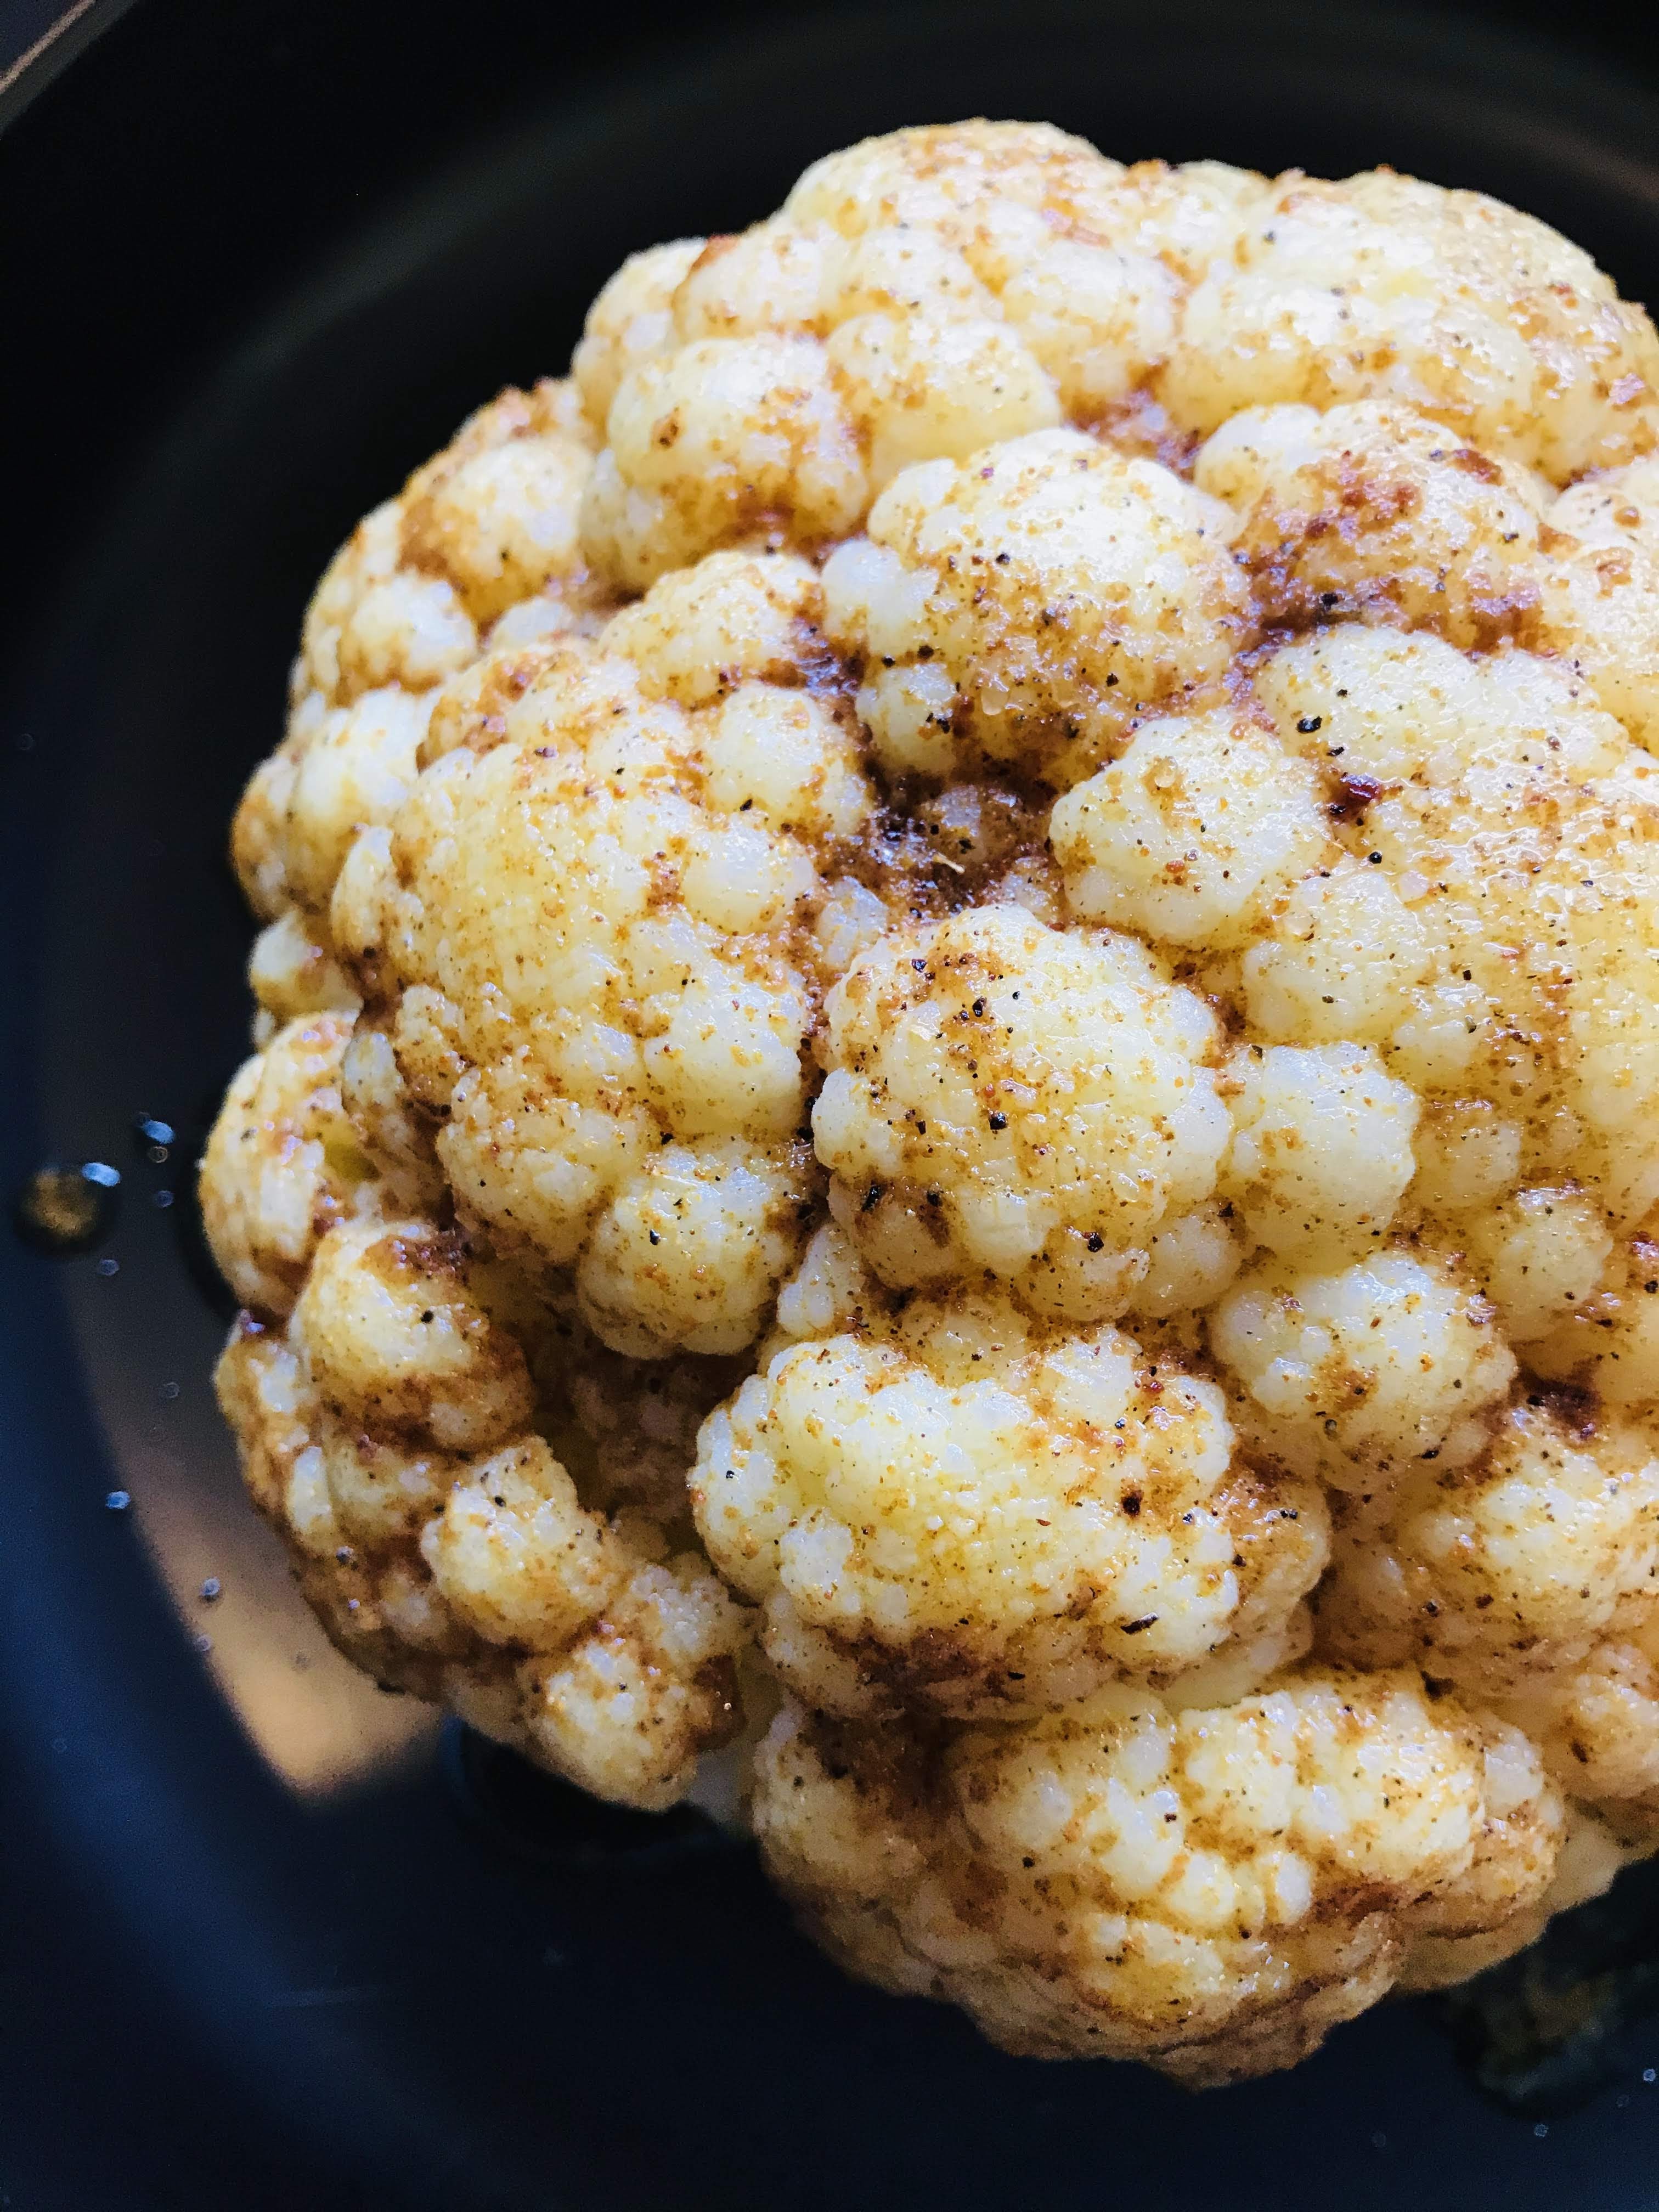
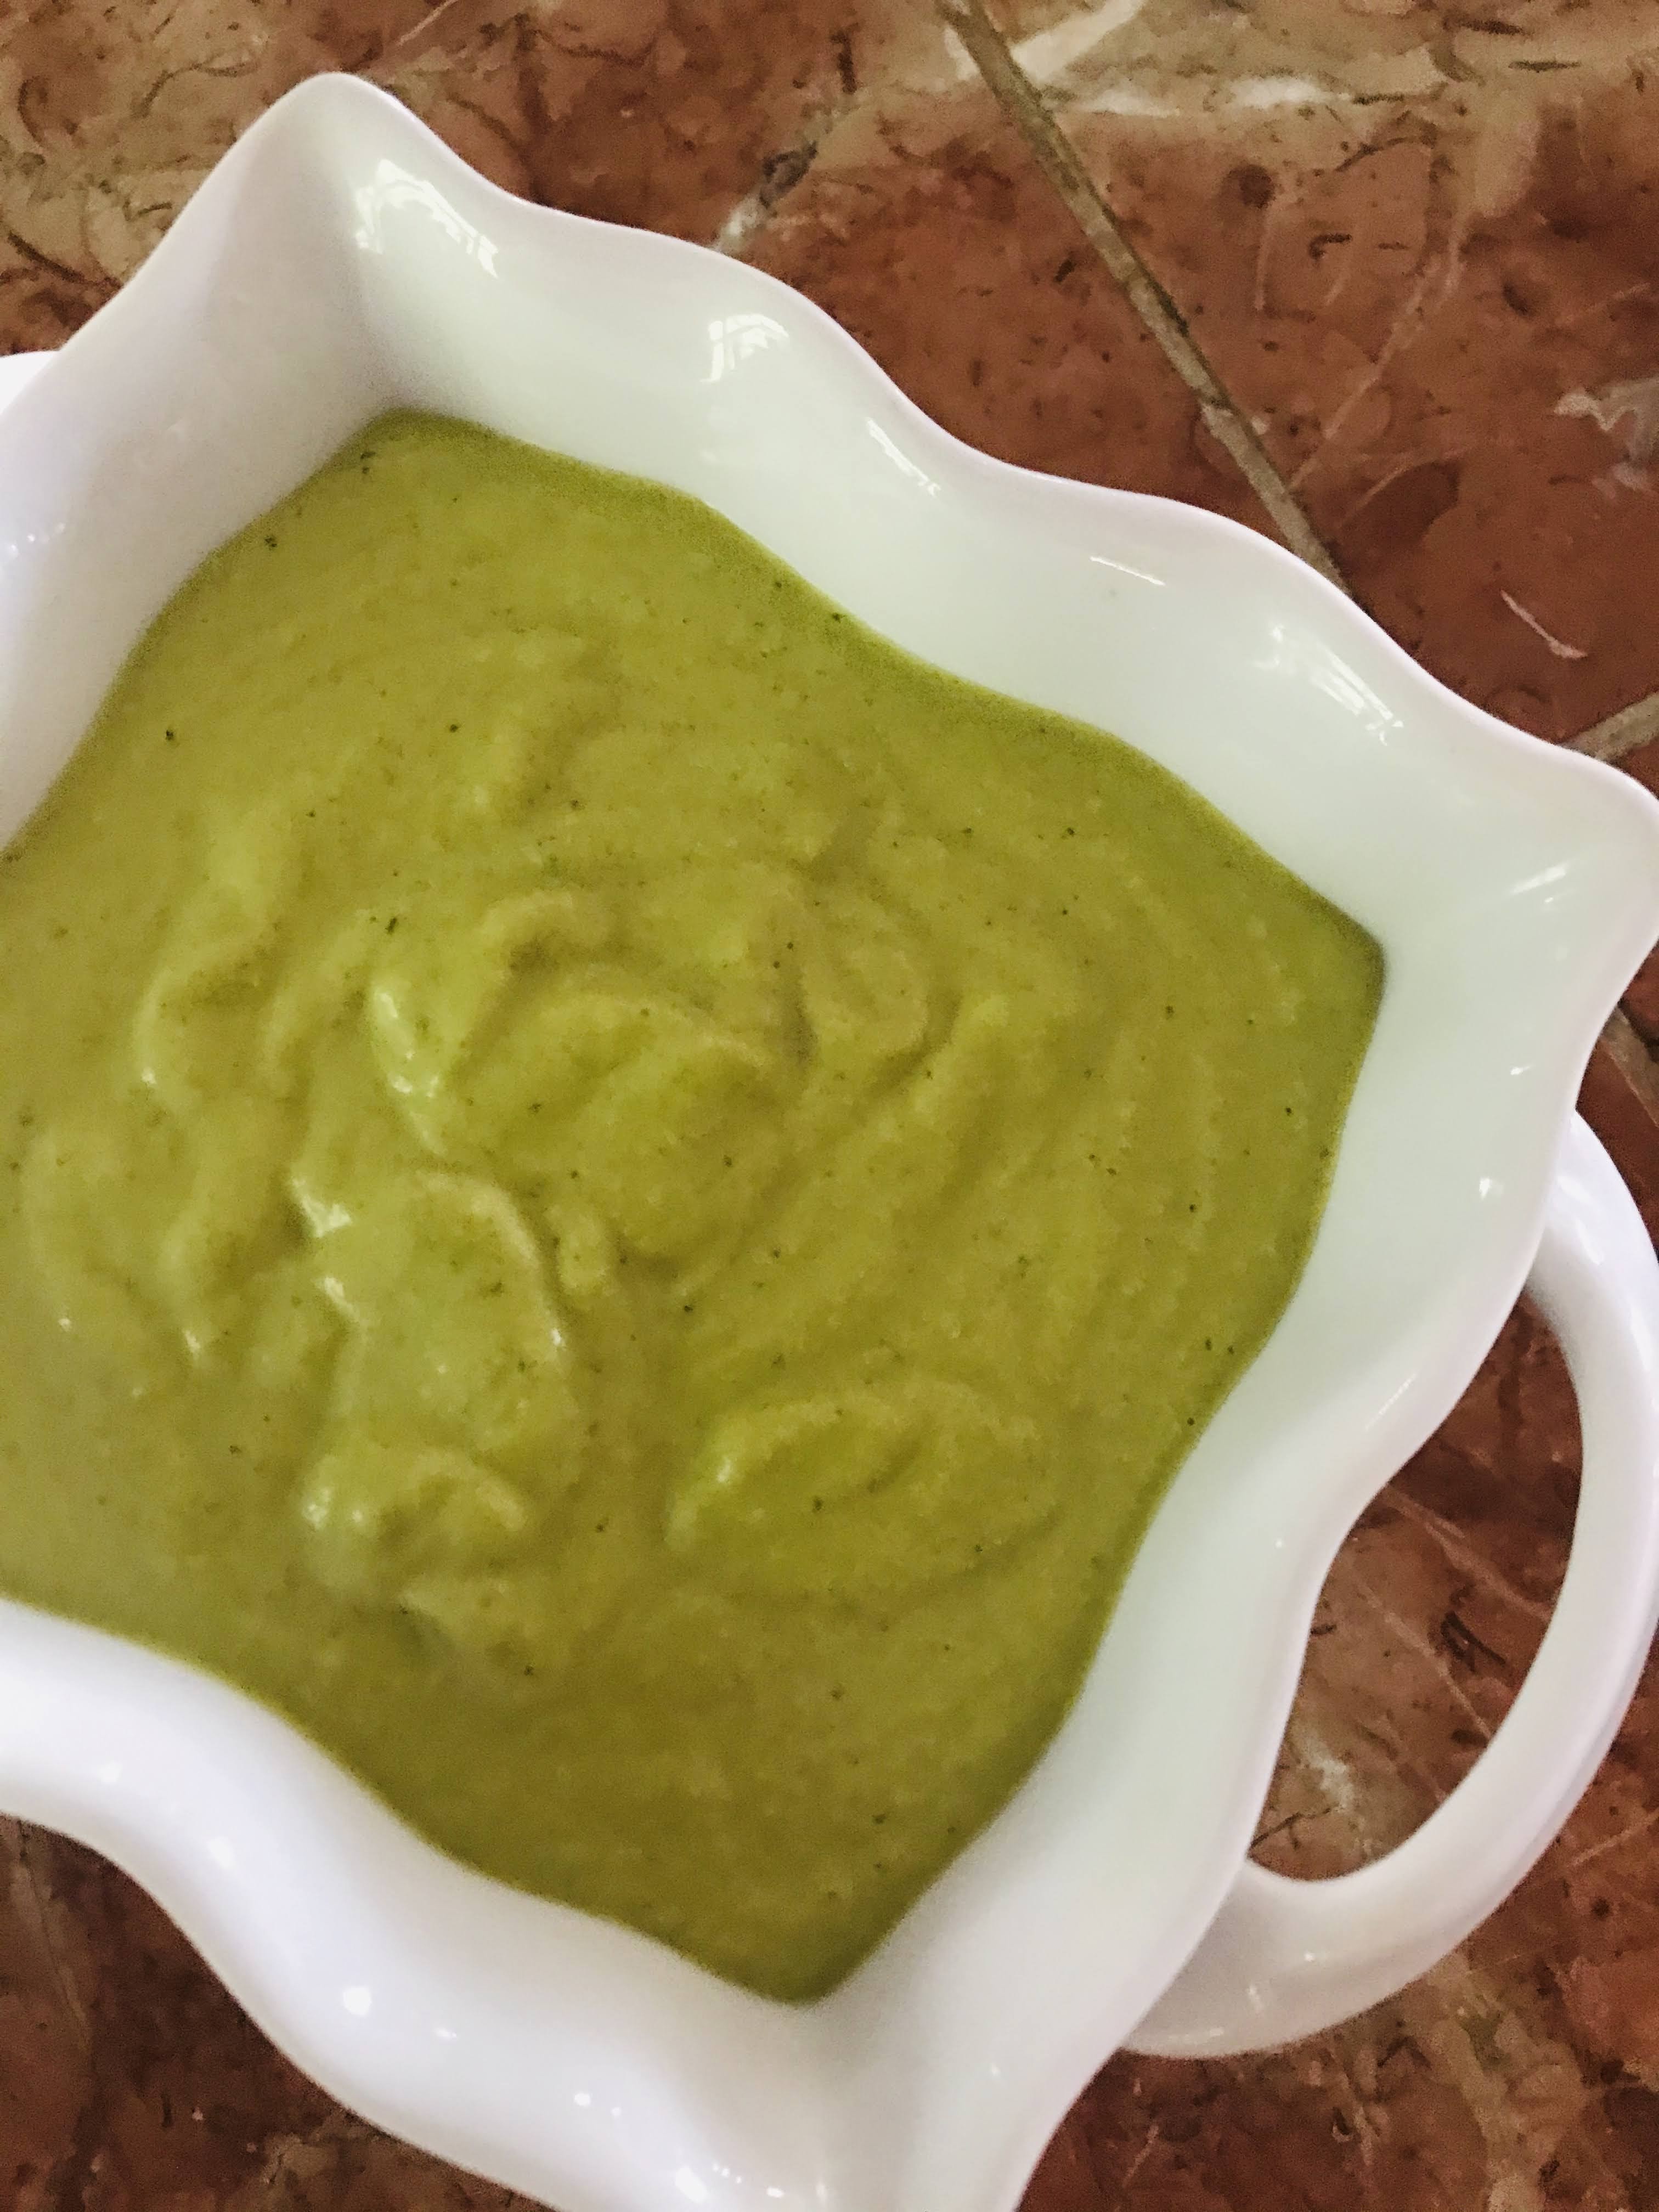
One of the vendors at market last Wednesday had a section of their stall devoted to peppers, with a large display of poblanos. Their beautiful dark green color and aromatic scent invited me to stock up on them while the getting was good. I quickly bought a dozen. I enjoy roasting them on the grill, then freezing them for future use. I love putting them in stews, enchiladas, chili and my favorite: Poblano Cream Sauce. It’s wonderful over grilled chicken or flank steak, as a topping for eggs or pulled pork, even as a dip. Earlier in the summer I had made garlic scape and cilantro pesto, so I used this in replacement of the garlic and cilantro and it worked great. This sauce has a flavorful heat that tastes rich and warm. I vacuum freeze 4 peppers per bag and they are ready anytime I need a bit of warmth.

POBLANO CREAM SAUCE

INGREDIENTS:

  • 4 poblano peppers for each batch of sauce (I grill several at a time so I can freeze them for later use)
  • 1 tablespoon olive oil
  • 1 cup diced onions
  • 3 cloves garlic, minced
  • 8 ounces sour cream (you could also use Greek yogurt)
  • 1/2 cup chopped fresh cilantro
  • Kosher salt to taste
Blistering poblano peppers on the grill
Steamed poblanos ready to peel

INSTRUCTIONS:

  1. Preheat your gas on high for 10 minutes, until good and hot. Turn down burners to medium and place the peppers across the grill, close but not touching. I can usually get 15-20 on depending on size. Close grill and turn them ever 4 minutes, until they are wrinkled and charred on all sides.
  2. Place grilled peppers in a bowl and cover with plastic wrap for 10-15 minutes to sweat. Remove the plastic wrap and peel away the skin of the peppers. Remove stem, open pepper and scrape the seeds. If you are using immediately, roughly chop 4 peppers. Leave the remaining peppers whole and place 4 peppers per bag for freezing.
  3. While the peppers are sweating, heat a small non-stick skillet over medium heat, then add olive oil, onions and garlic. Sauté for about 6-8 minutes, or until the onions are soft and translucent.
  4. Transfer the onions, garlic and chopped peppers to a blender. Add the sour cream, cilantro and salt. Blend until sauce is smooth, 1-2 minutes. Taste and adjust seasoning. This sauce will keep in the refrigerator for up to 2 weeks, or in the freezer for up to 3 months.

Yield: 1 pint

Poblano Sauce
Poblano Sauce over grilled chicken with sautéed cabbage

“Canning is not a hobby, it’s an obsession, an addiction, self expression and a way of life.”

Roasted Sweetness

It’s been quite a week. I’ve roasted and canned 15 pints of cherry tomato soup, along with roasted sauce and whole paste tomatoes. I absolutely love putting up food and canning. It is peaceful and steady work. As I fill up our larder we consider ourselves fortunate to grow the food we will enjoy this winter. Every time I can or freeze something I reduce the times I need to leave the farm. As we all know Covid-19 is alive and well. We really don’t know what the future holds. Staying fluid and flexible is the order of the day. So putting up food seems like a practical way to prepare for the very real possibility of staying home for much of the winter months.

The idea of being home this winter is actually something that feels welcoming. After we put the farm to bed for the season, winter is the time that our home truly becomes of haven. We read, we dream, play board games, cook, bake and of course talk. Enjoying each other never gets old, even though we are together pretty much 24/7. It used to surprise me, but now I’m just plain grateful. If there’s an upside to Covid, it’s slowing down and taking the time to decide what is important to us. I have begun to realize that those of us who feel satisfied with the simple joys of life do a little better with isolation. After several years of health trauma and loss, simple feels good.

This week I’m offering up Tomato Conserva and a wonderful recipe Spaghetti with Tomato Conserva, Pancetta and Pecorino, from my cookbook Twisted Basics: Laugh, Cook, Eat. The Italians look upon conserva in several ways. To ‘store’ to ‘save’ to ‘keep’; preserving the harvest in some way, be it sweet or savory. Sweet conserva’s might look like jam, marmalade or preserves; savory might look like roasting, dehydrating, freezing or canning. When paste tomatoes are in abundance, my favorite conserva is roasting slices of these meaty vegetables low and slow. Thick slices of plum tomatoes tossed with olive oil, garlic and flake salt (I use Maldon), result in something altogether different; rich, meaty and marvelous. Think pasta, sandwiches, salad or pizza.

Thick slices of paste tomatoes ready for roasting.
Six hours later.

TOMATO CONSERVA

INGREDIENTS:

  • 4 pounds of plum/paste tomatoes (I found that for 2 large rimmed baking sheets you need 24 tomatoes).
  • 4 cloves of garlic for each sheet, peeled and smashed
  • 1/2 cup extra-virgin olive oil
  • Kosher or Maldon salt, and freshly ground black pepper to taste.

INSTRUCTIONS:

  1. Position racks in the upper and lower thirds of the oven and heat the oven to 350 degrees F. Line two large rimmed baking sheets with parchment paper.
  2. Slice each paste tomato into 1/2 inch slices (you will get 3 slices per tomato and 35 slices per sheet). Place slices next to each other on baking sheets. Drizzle olive oil over slices, then sprinkle with flaked salt and freshly ground black pepper.
  3. Place the baking sheets into the oven and lower the temperature to 225 degrees F. Slowly roast, switching the trays from upper to lower each hour, until the tomatoes look like juicy sun-dried tomatoes; wrinkly and slightly browned in spots, 5-6 hours.
  4. Let the tomatoes cool for at least 10 minutes before using or serving. I use one whole sheet for the following recipe. The additional sheet will fill 3 half pint mason jars. Drizzle some additional olive oil over them for freezing, about 3 tablespoons. They will keep in the refrigerator for up to a week and in the freezer for 2-4 months.
2 cups (one sheet) of slow roasted paste tomatoes

SPAGHETTI WITH TOMATO CONSERVA, PANCETTA AND PECORINO

INGREDIENTS:

  • 1 pound spaghetti or linguine
  • 5 tablespoons extra-virgin olive oil
  • 4 ounces pancetta, pre-chopped
  • 2 cups tomato conserva, coarsely chopped
  • 1/2 teaspoon red pepper flakes
  • 2 ounces finely grated pecorino cheese (approximately 2 cups)
  • 1/2 cup packed fresh parsley, coarsely chopped
  • 1 cup dry toasted fresh breadcrumbs (optional)
The conserva sauce coming together.

INSTRUCTIONS:

  1. Bring a large pot of well-salted water to a boil and cook pasta according to package directions. Reserve about 1 cup of hot pasta water and drain the pasta.
  2. Meanwhile, heat 3 tablespoons of the oil in a 12-inch skillet over medium-high heat. Add the pancetta and cook, stirring occasionally, until golden brown, about 3-5 minutes.
  3. Add the tomato conserva, red pepper flakes, and 1/2 cup of the pasta water, and toss to combine. Add the drained pasta and cook, tossing until heated through about 3 minutes.
  4. Turn the heat to medium-low and add the remaining 2 tablespoons olive oik, and 1/2 the pecorino and parsley. Toss, adding more pasta water, if needed, to loosen the sauce. Season to taste with salt and pepper.
  5. Sprinkle the remaining 1/2 of reserved pecorino. Serve in shallow bowls topping with toasted breadcrumbs if using.

Serves 4-6

“Food is the most primitive form of comfort.” —Sheila Grahm

Never Enough

The memories that mark time seem to speed up as we age. Nine years ago in 2011, when our tomato production for market was at its height, we were faced with a dilemma; what do we do with all the imperfect tomatoes we could not sell at market? Val was sick of dividing them between our chickens and our compost pile. I remember her telling me, “Figure it out!” So figure it out I did and created our delicious roasted tomato sauce. This is one recipe that went into both of my cookbooks. I give it out dozens of times at market each season. In the winter, when you go into your pantry and open a quart of this luscious stuff, you smell the sun. I put up about 28 quarts of this per year, as there are uses galore.

Why do we literally swoon over this stuff? I have never tasted a commercial product that compares to it. I use six different heirloom varieties that have different colors and flavor profiles, lots of fresh garlic, olive oil and Maldon salt. The result is something not only delicious, but a sauce you will feel proud to serve your family and company. Every two hours I ladle out the liquid that is released from the tomatoes and can this as well; adding it to risottos and soups making it a win, win! You can either water bath can it for 15 minutes or freeze it for later use. Depending on the volume of tomatoes you roast will determine the length of you roasting time. You want a thick concentrated sauce as your end result.

There are things I have learned along the way about this sauce. When removing the liquid for later use, be sure you strain it through a small mesh colander to remove unwanted seeds. Also, many people don’t mind the rustic quality of the finished sauce. However, I choose to put it in my Vita-mix blender for a few minutes before heating or adding to your recipes. You will end up with a velvety sauce that has a stunning orange-red color which I find much more pleasing to the eye and the palate. You’re welcome!

BRICKYARD FARMS ROASTED TOMATO SAUCE:

INGREDIENTS:

  • A minimum of 20-30 pounds of tomatoes (I recommend a half bushel), consider a mix of many different varieties. This will add depth to your sauce.
  • 1-2 heads Brickyard Farms garlic, peeled and sliced
  • 1 tablespoon Kosher salt (although I highly recommend Maldon)
  • 1/2 cup extra-virgin olive oil

img_6842

INSTRUCTIONS:

  1. You will want to set up a “station” of sorts: sharp knife, cutting board, large stainless steel bowl, and your roasting pan.  This is when I say many hands make light work. Val and I can prep one 1/2 bushel in about 40 minutes.
  2. Next slice your tomato crosswise deep enough to eliminate the core in one step. Next hold trimmed tomato in your hand over the bowl and twist gently to remove some of the seeds.  No need to be perfect; the idea is to reduce some of the liquid. Next cut the tomato in half from top to bottom, then each half in quarters or sixths, depending on the size of your tomato.  Repeat this process until your roasting pan is heaping with tomatoes (don’t worry they will cook down considerably).
  3. Preheat your oven to 300 degrees F. Sprinkle your garlic slices and salt over the tomatoes; pour olive oil over tomatoes. Stir gently to combine.
  4. Set your timer for one hour.  Remove roasting pan from oven and with a soup ladle, press down gently so that the juices fill you ladle.  Each time you have 4 cups, strain and fill a quart canning jar until full, leaving 1 inch head space. This juice is gold. I use it for risottos, soups, chili and stews; it’s filled with tomato and garlic flavors.  Return your roasting pan to the oven and set timer for another hour. Repeat. You will do this until the tomatoes have reduced and there is about a quart of juice left in the pan.  At this point it should be pretty thick. This should take roughly 3-4 hours (don’t be concerned if it takes a little longer).
  5. When your sauce in finished, fill quart canning jars leaving 1 inch head space. You now can choose to freeze the jars or water bath can them for 15 minutes.  When ready to use, either thaw frozen jars or open canned jars and place in a blender. Blend for about 2 minutes, or until all the skins and seeds are incorporated into the sauce.  Use in your favorite recipe.

Yields: 4-6 quarts sauce, 2-3 quarts stock

ROASTED TOMATO VODKA SAUCE:

INGREDIENTS:

  • 1 quart roasted tomato sauce
  • 1 tablespoon extra-virgin olive oil
  • 1 medium onion, sliced thin vertically
  • 3 cloves garlic, thinly sliced
  • 1 teaspoon dried basil
  • 1/2 teaspoon red pepper flakes
  • 1/4 cup vodka, (additional for sous chef)
  • 1/2 cup heavy cream
  • Kosher salt and freshly ground black pepper to taste
  • 8 ounces dried pasta of your choice

INSTRUCTIONS:

  1. Place your quart of sauce in a blender and puree for about 2 minutes or until smooth.
  2. Meanwhile, prepare pasta according to package directions. Drain.
  3. Place olive oil in a large saucepan over medium-high heat, add onions and saute until soft and translucent, about 3-4 minutes.
  4. Add garlic, basil and red pepper flakes, stir to combine and cook for additional 3 minutes.
  5. Add vodka and reduce by half.
  6. Add blended roasted tomato sauce and simmer until hot, about 4-5 minutes.
  7. Stir in heavy cream. Place drained pasta in decorative bowl. Top with sauce and toss gently to combine.

Serves 4

img_2926

“There ain’t nothing better in life than true love and a homegrown tomato!”

Think Green, Think Fresh

Summer is officially here, and it’s hotter than the hubs of hell. Although I’m still obsessed with turnips, it’s time to move on to other vegetables. Typically when it is this hot I turn to lighter fare. The heat saps me so I want something that is quick and easy to make, and uses seasonal produce. I also like options that allow you to use what might be on hand. This pasta dish comes together quickly (than 20 minutes). Although I have used fresh spinach and sugar snap peas, you could just as easily use shelling peas, asparagus or cherry tomatoes. I’m finding a lot of uses for ricotta these days. I find it refreshing and lighter than a sauce using heavy cream. Spaghetti or linguine are you best pasta choices, but feel free to use what you have on hand. Remember when you add your vegetable to the pasta water, that you want to barely blanch them. I suggest 1 minute so the freshness of the vegetable comes through. The tartness of the lemon is the perfect contrast to the ricotta and vegetables. This recipe can be doubled if serving 4 or more people.

PASTA WITH SPRING VEGETABLES AND LEMON RICOTTA

INGREDIENTS:

  • 8 ounces pasta, such as linguine or spaghetti
  • 1 cup whole-milk ricotta
  • 1 teaspoon fresh chives, chopped
  • 1/4 teaspoon red pepper flakes
  • 8 ounces fresh baby spinach
  • 8 ounces sugar snap peas, sliced vertically in 3 pieces (it’s a nice way to expose the interior of the peas)
  • 1/3 cup Parmesan or pecorino cheese, grated
  • 1 unwaxed lemon, zest and juice, plus a few extra wedges to serve
  • 1 tablespoon extra-virgin olive oil, plus extra for drizzling
  • 2 garlic cloves, grated
  • Kosher salt and freshly ground black pepper to taste

INSTRUCTIONS:

  1. In a large pot of boiling salted water, cook pasta according to package directions. Meanwhile make the ricotta sauce.
  2. In a medium bowl, combine ricotta, olive oil, cheese, garlic, lemon zest and juice, red pepper flakes and salt and pepper to taste. Stir to combine, taste and adjust seasoning to you preference.
  3. In the last minute of the pasta’s cooking time, add spinach and snap peas to the pot. Stir and push the vegetables into the boiling water.
  4. Drain after 1 minute, making sure to reserve 1/2 cup of the cooking water (you will use this to thin you sauce if needed.)
  5. Return pasta and vegetables to the same pot, add the ricotta sauce and a few tablespoons of hot pasta water (you will not use all of it!). Stir well to evenly coat the pasta in sauce, you want a smooth and creamy texture.
  6. Serve immediately, drizzling extra-virgin olive oil over each bowl; add a sprinkle of extra cheese.

Serves 3

img_6652

“There is nothing that is comparable to it, or as satisfactory or as thrilling as gathering vegetables one has grown.” —Alice Toklas

Your My Thrill

You do something to me! It was so unexpected when it happened. Caught totally off guard, I find I just can’t get enough of my new love! There are so many ways to use these little gems, and this recipe is perfect for a breakfast or brunch. Full of cheese, eggs, kale, cream and bread cubes it is a meal by itself, or if you prefer, with something simple from the grill. Turnips have the added benefit of not being a carbohydrate. They have less than half the calories of potatoes or sweet potatoes; and can easily be swapped out in recipes. So you can literally eat them with abandon!

TURNIP AND KALE GRATIN

INGREDIENTS:

  • 5 cloves garlic, thinly sliced
  • 2 cups heavy cream
  • 1 teaspoon fresh thyme leaves (lemon thyme is wonderful)
  • 2 tablespoons unsalted butter, divided
  • 3 medium onions, thinly sliced
  • Kosher salt and freshly ground black pepper to taste
  • 3 bunches kale, ribs and stems removed, leaves torn (you can use any type of kale, I find Tuscan and Red Russian particularly good)
  • 6-8 medium turnips, trimmed, and cut into 1/2 inch cubes (I don’t peel mine, however if you do feel free)
  • 3 large farm-raised eggs, beaten
  • 1 cup Fontina cheese, grated (about 4 ounces)
  • 1 cup pecorino cheese, grated (about 1 ounce)
  • 2 cups day-old bread such as ciabatta, cut into 1/2 inch pieces

img_6645

INSTRUCTIONS:

  1. In a medium pan, bring garlic, cream and thyme to a simmer over medium heat. Reduce heat to low and continue to simmer for 30 minutes. Let cool.
  2. Meanwhile, heat 1 tablespoon butter in a large skillet over medium-low. Add onions, season with salt and cook, stirring occasionally until they turn a nice light amber color, about 20-30 minutes. Add a splash or two of water if they start to stick to the bottom of your pan. Transfer to a large bowl and let cool. Wipe out skillet.
  3. Heat remaining 1 tablespoon of butter in same skillet. Working in batches, add your kale, tossing and letting it wilt slightly before adding more; season with salt. Cook until kale is wilted and tender, about 5 minutes. Add to bowl with onions.
  4. While kale is cooking, cook turnips in a large pot on well-salted water until crisp tender, about 2 minutes; drain. Transfer to a bowl of ice water and let cool. Drain and pat dry. Transfer to the bowl with onions and kale.
  5. Preheat oven to 375 degrees F. Whisk eggs, Fontina cheese, pecorino cheese, and cooled cream mixture in a large bowl to combine. Add onion and kale mixture, along with bread; season with salt and pepper. Transfer to a 8 x 8 casserole dish and bake uncovered until well browned, 40-50 minutes. Let rest 10 minutes before serving. Gratin can be assembled 12 hours ahead. Cover and chill.

Serves 6

img_6647

“The best things happen unexpectedly.”

Not On My Radar

Today I am grateful. Grateful for living in the country on our vegetable farm. It provides a much needed counterbalance to the daily stress and anxiety of watching our world unravel by the seams. So many things are out of our control; so I focus on the things I can do to live a meaningful life. These include keeping in touch with those I love, planning for an uncertain future, reading, playing games with Val, and above all cooking with as much creativity that I can muster.

If I am an obsessive cook, Val is an obsessive farmer. She loves growing vegetables that are unfamiliar to us. These include some vegetables that don’t necessarily excite me, like turnips. Turnips have never been on my radar. When there are so many vegetables that I love, why grow turnips? When I expressed this to Val she simply said, “Then learn to like them.” She was obviously not detoured. So grow them she did, while I did my part and explored recipes for ideas on how to use them.

I found myself gravitating to recipes that featured them roasted. I figured most vegetables that are roasted are usually sweeter. Really, I didn’t know what to expect, so I tried a simple side dish that roasted them, then tossed them with a vinaigrette while warm; I imagined similar to a French potato salad. It was certainly worth a try. I made a vinaigrette using scallions, tarragon vinegar, whole-grain mustard, extra-virgin olive oil and fresh parsley. I reasoned if I liked everything else in the recipe, I would have a good chance of enjoying them. I butterflied a whole chicken for the grill and we were in business.

I roasted and tossed the turnips with the vinaigrette and the sharpness of the mustard with the vinegar and olive oil smelled wonderful. I went out to finish up the chicken, when Val appeared shortly after with a piece of turnip between her fingers. “It’s time.” she said and popped it in my mouth. Frankly, I was stunned! This was a turnip? This was what I had been avoiding? It was absolutely delicious! Wow. Val stood there with a smirk on her face. “I assume we should grow these again?”

It’s safe to say, I am now a convert. I was so impressed with them I decided that I could use a similar strategy to roast them with chicken. This time I pan-seared chicken thighs, then pan-roasted turnips with fresh tarragon, course mustard, garlic, lemon zest, white wine and chicken stock. I then finished the whole thing covered in the oven for 25 minutes. I have found that turnips love roasting, tarragon and mustard for sure.

ROASTED TURNIPS IN MUSTARD-VINAIGRETTE

INGREDIENTS:

  • 1 tablespoon tarragon or white wine vinegar
  • 2 teaspoons whole-grain mustard
  • 1 scallions, sliced thin
  • 1/2 cup extra-virgin olive oil
  • 2 tablespoons chopped flat-leaf parsley
  • Kosher salt and freshly ground black pepper to taste
  • 24 small or 10 larger turnips, cut in half or wedges depending on size

INSTRUCTIONS:

  1. In a bowl, whisk the vinegar with the mustard, scallion, parsley and 1/4 cup of the olive oil. Season with salt and pepper.
  2. Preheat oven to 425 degrees F. Line a rimmed baking sheet with foil. Cut the turnips in half through the stems if small, quarter or cut in sixths if larger. In a large bowl toss the turnips with the remaining 1/4 cup olive oil and season with salt and pepper. Spread the turnips on the baking sheet and roast for about 18 minutes.
  3. After 5 minutes or so, transfer to a decorative bowl and toss with vinaigrette. Serve.

Serves 4-6

ROASTED CHICKEN WITH TURNIPS, TARRAGON AND LEMON

INGREDIENTS:

  • 3-4 pounds skin-on, bone-in chicken thighs
  • 1 tablespoon extra-virgin olive oil
  • Kosher salt and freshly ground black pepper to taste
  • 6 medium to large turnips
  • 6-8 sprigs of fresh tarragon
  • 1 tablespoon finely grated lemon zest
  • 1 tablespoon whole-grain mustard
  • 4 garlic cloves, thinly sliced
  • 1 tablespoon tarragon or white wine vinegar
  • 1/2 cup dry white wine
  • 1/2 cup chicken stock
  • 1/4 cup heavy cream
  • 1/4 cup parsley, chopped

INSTRUCTIONS:

  1. Preheat the oven to 350 degrees F. Heat a heavy oven-proof Dutch oven on a stove top over high heat. Pat the chicken thighs with paper towels, then rub with the olive oil. Sprinkle generously with salt and pepper. Add to pot and sear 6-8 minutes per side, or until well browned. Remove from pot and set aside.
  2. Turn heat down to medium. Pan roast the turnips, adding a bit more olive oil if needed, until lightly golden. Add the tarragon, mustard, garlic, vinegar, wine and stock. Bring to a simmer. Return chicken thighs to pot.
  3. Transfer to oven and roast for 20-25 minutes or until the chicken is just cooked through. Remove from oven and take out chicken thighs; cover them with tented foil.
  4. Place pot back on stove over medium-high heat. Reduce liquid by a little less than half. Stir in heavy cream. Cook an additional 5 minutes or until sauce starts to thicken.
  5. With a slotted spoon, remove turnips and place on each plate. Top with a chicken thigh; then spoon sauce over both. Garnish with parsley and serve.

Serves 4

img_6639

“This is about trying new things, and getting out of your rut.” — Teri Gault

Peas, Peas Me

Now that we have moved from spring to summer the fresh food possibilities have exploded.  Strawberries, sugar snap peas, fresh shelling peas, leeks, herbs, beets, garlic scapes and greens, show us how wonderful fresh food can be. Local farmers markets are teaming with everything, and it will only get better. Although we are still challenged with world events and the Covid-19 pandemic, seasonal produce helps to alleviate feeling glum, (at least it helps me to live in the moment).

I’m one of those people whose addiction to crunch surfaces in many ways; this salad for instance. It’s the best in early summer when fresh sugar snap peas, shelling peas and herbs are plentiful. I blanch ever so slightly the fresh snap peas and shelling peas to bring out the vibrancy of their color. This salad works well for a picnic, pot luck or in your screened in porch.

SUGAR SNAP PEA SALAD WITH CIDER VINAIGRETTE

INGREDIENTS  FOR SALAD:

  • 2 pints sugar snap peas, stemmed
  • 1 cup shelled or frozen peas
  • 1/2 small red onion thinly sliced or 2 spring leeks thinly sliced
  • 3 tablespoons fresh dill, coarsely chopped
  • 8 fresh mint leaves, coarsely chopped
  • Kosher salt, and freshly ground black pepper to taste

FOR VINAIGRETTE:

  • 1/4 cup apple cider vinegar (I use Braggs)
  • 1 teaspoon fresh lemon juice
  • 2 tablespoons filtered water
  • 1/2 teaspoon tamari sauce (I use Braggs Liquid Aminos)
  • 1 teaspoon Dijon mustard
  • 2 teaspoons pure maple syrup
  • 1 clove garlic, grated
  • Kosher salt and freshly ground black pepper to taste
  • 3/4 cup cold pressed sunflower oil

INSTRUCTIONS:

  1. In a medium pot of salted water, blanch the sugar snap peas for 2 minutes, drain, then place in bowl of ice water. Drain and cut in half on a diagonal. If using fresh peas, blanch for 2 minutes, drain and place in bowl of ice water. Spin both vegetables in a salad spinner, or drain on paper towels.
  2. Slice spring leeks in small rounds, using white and light green parts only.
  3. Chop dill and mint. Place all ingredients in large bowl and toss gently with your hands.
  4. Combine all ingredients for vinaigrette in a pint Mason jar. Shake vigorously. Dress salad with about 1/4 cup dressing (you will have left over dressing) and toss gently.
  5. Serve immediately

Serves 4-6

img_6588

“Ahhh 2020 is challenging us; but this too will pass.”


Walk on the Wild Side

Wow, it’s been quite a week. My sadness for our country is overwhelming. I bow to my black and brown brothers and sisters who in spite of the pandemic have peacefully protested for justice for George Floyd and for themselves. We have not been listening. Historically, it has always been the youth that have demanded change. Although the timing of such things is not in our hands, the call for justice is asking us to lend our voices to promote it. I am proud of our country’s youth and have confidence they will help to lead us out of this quagmire.

Here, we still farm. This week we have planted, caged and wired 400 tomato plants. When they become ripe, we will savor their sweetness, dust off our canners and prepare for cooler months. We will sell some, process for our future and take what we have remaining to local food banks. Our land is sacred to us. It has fed many families for 2 decades. As we age we are confident this land will find its future in the hands of like minded people of service.

This week we needed a sturdy salad that we could enjoy when we were too tired to cook. This amazing salad will hold for 5 days in the frig and only gets better as the dressing macerates the veggies in the salad. It has crunch, texture, and an appealing nuttiness that compliments the lemony dressing. It’s great for a picnic or potluck, since it’s completely stable with no dairy. I think you will agree it’s a keeper.

WILD RICE SALAD

INGREDIENTS:

  • 2 cups good quality long grain wild rice
  • 6 cups filtered water
  • 1 teaspoon Kosher salt
  • 1 cup toasted pecans, roughly chopped
  • 1 cup celery, chopped
  • 1 cup green onions (white and green parts), sliced thin
  • 1/2 cup fresh parsley, chopped
  • 8 ounces white mushrooms, halved and sliced thin
  • 8 slices bacon, chopped, fried, drained (optional)
  • 1/2 cup avocado oil
  • 1/2 cup fresh lemon juice
  • Kosher salt and freshly ground black pepper to taste

INSTRUCTIONS:

  1. In a heavy medium pot bring the rice, water and salt to a boil. Adjust heat to medium and simmer until tender, 45-55 minutes. Drain, and place in a large bowl.
  2. To toast pecans, heat oven to 350 degrees F and place on rimmed baking sheet. Toast for 8 minutes. Remove and let cool.
  3. Add celery, green onions. parsley, and mushrooms to bowl. Mix gently.
  4. In a pint mason jar, measure avocado oil and fresh lemon juice, and salt and pepper. Shake vigorously.
  5. Add pecans and dressing to bowl and mix thoroughly. Place in decorative bowl or platter. Crumble bacon on top. Serve.

Serves 6-8

img_6487

“Truth never damages a cause that is just.” —Mahatma Gandhi


When Sweet and Sour Collide

The days and weeks are blurring together as we continue to self-shelter. The things that make the days distinct from each other are often absent. Monday seems the same as Wednesday, as we work on the farm; not at all sure that our efforts will hit their intended destination. The pandemic has changed virtually every known thing to the unknown. Then, something happens that feels disproportionately meaningful. A delivery of asparagus, from a dear friend’s garden, or eight pounds of beautiful red rhubarb for use in something delicious. These small things are a welcome distraction. I cling to food, love, nature and friendships like a life-line on a sinking ship. There are times when I sit down to write this food blog that I question the why of it; does it even mean anything anymore? But food it what we do here. We wake up thinking about it, and dream about it as we sleep.

When you have a passion, it is so important to continue to keep the faith, and do what you love. It is how each of us affects our environment for the better. Stay present. Do your best. Stay kind. Fight for justice. There is sour as well as sweetness in life; and we must always remember this going forward each day.

So this week I made pasta dishes, grilled, and turned all that lovely asparagus into soup; each dish a celebration of late spring. Then came the rhubarb; the deep red kind that you can only find with the old varieties. I just love the stuff. First, I made a simple syrup for cocktails. Next, I slow roasted some with sugar, white wine and vanilla to serve with maple-yogurt. But the bulk of it was turned into Rhubarb Chutney. Combined with apple cider vinegar, sugar, spices, red onion and golden raisins. Wow! I love how chutneys seem to be a surprise with every mouthful. This can be used with roasted chicken, pork tenderloin or even over ice cream. I cut way back on the sugar, as I feel that what is typically recommended is usually more than my palette can take. This lets the rhubarb shine, while allowing you to appreciate its overall savoriness. I was pleased with the results that yielded 11 half pints. I then processed it in a water bath canner for 15 minutes.

Beautiful red rhubarb

INGREDIENTS:

  • 1/2 cup can sugar
  • 1/3 cup apple cider vinegar
  • 1 tablespoon grated fresh ginger
  • 1 tablespoon grated fresh garlic
  • 1 teaspoon ground cumin
  • 1/2 teaspoon ground cinnamon
  • 1/2 teaspoon ground cloves
  • 1/4 teaspoon dried red pepper flakes
  • 4 cups fresh rhubarb, cut in 1/2 inch cubes (about 1.5 pounds)
  • 1/2 cup (generous) finely chopped red onion
  • 1/3 cup golden raisins

INSTRUCTIONS:

  1. Combine first 8 ingredients (sugar through red pepper) in heavy Dutch oven. Bring to a simmer over low heat, stirring until sugar dissolves.
  2. Add rhubarb, onion and golden raisins; increase heat to medium-high and bring to a boil as you thoroughly mix ingredients.
  3. Cook until rhubarb is tender and mixture thickens slightly, 5-8 minutes.
  4. Fill 1/2 pint canning jars, leaving 1/2 inch head-space. Attach lids and rings. Water bath process for 15 minutes.
  5. Let cool completely.

Yield: 5-6 jelly jars

If it doesn’t challenge you, it doesn’t change you.”

Talking Heads

We absolutely love vegetables. I guess that is one of the reasons that we are vegetable farmers. I have seen multiple recipes for roasting whole heads of cauliflower. In fact I think it’s a ‘thing’. Two years ago I created a Ras el Hanout spice mix that I have used on endless things, from Lamb Ragu, to Moroccan Almonds, to this roasted cauliflower. The mix is savory more than just hot. I feel that you have a party in your mouth when you taste it. You can find this mix in my new cookbook Twisted Basics: Laugh, Cook, Eat! It is also available on this blog by searching for Moroccan Almonds. This would accompany anything on the grill, particularly lamb chops. We ate it with leftovers and were swooning!

WHOLE ROASTED CAULIFLOWER

INGREDIENTS:

  • 1 medium to large cauliflower
  • 1 1/2 teaspoons Ras el Hanout
  • 3 tablespoons unsalted butter
  • 3 tablespoons extra virgin olive oil
  • 1/2 teaspoon sea salt
  • Several grinds of fresh black pepper

img_6356

img_6357

img_6358

INSTRUCTIONS:

  1. In a pot large enough to hold the head of cauliflower, fill with cold water and 1 teaspoon of salt. Clean cauliflower by removing outside leaves and cutting core horizontally so it sits level.
  2. Bring water to a boil and place cauliflower head in the pot with the core on top.  The whole head does not have to be submerged. Cover with lid and cook for 6 minutes. Lift with slotted spoon and place in wire mesh strainer for 15 minutes.
  3. Preheat oven to 375 degrees F. Place head of cauliflower in a casserole dish that gives it several inches around it.
  4. Melt butter, oil, salt, pepper and Ras el Hanout over low heat. Baste with butter and spice mixture. Bake for 20 minutes. Baste again. Bake for an additional 25 minutes. Your cauliflower will take from 45 to 90 minutes depending on its size. Baste every 25 minutes until a metal skewer inserted in center indicates that the cauliflower is soft. Let rest for 10 minutes.
  5. Slices into wedges.

Serves 4-6

img_6360

Laughter is the brightest, in the place where the food is.”  –Irish Proverb

1 4 5 6 10